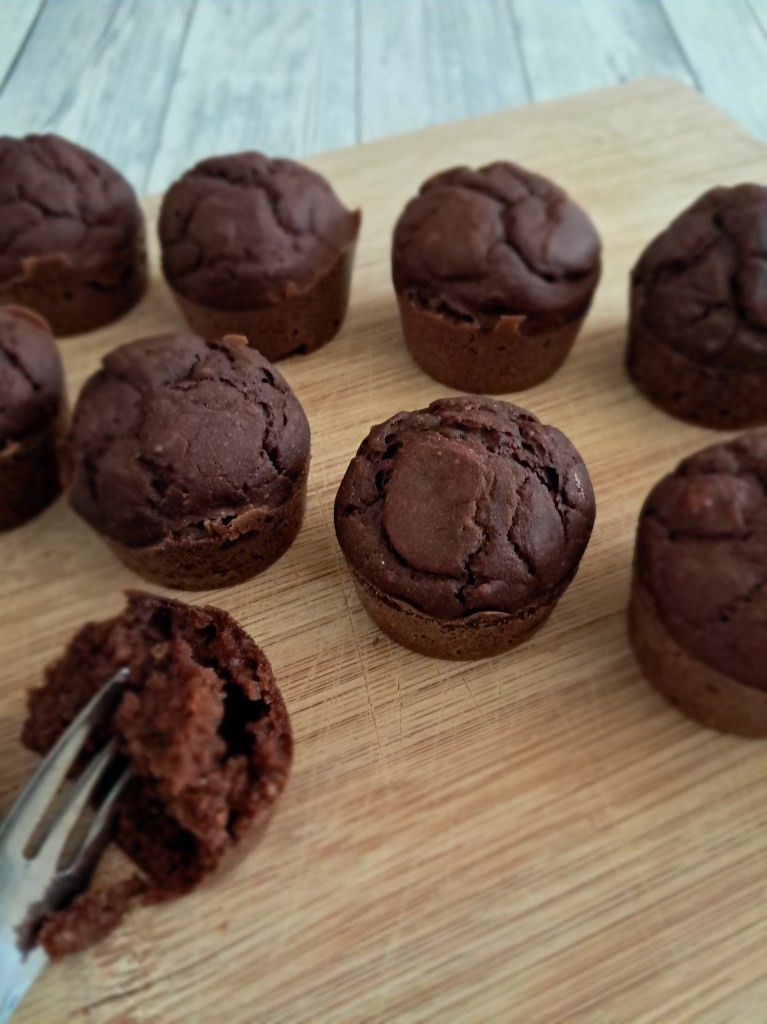
Quite possible the easiest and healthiest chocolate muffins you will ever make!
Makes 12 mini muffins or 7 large muffins
Ingredients 1 cup all-purpose flour 1 cup unsweetened apple sauce 1/2 cup to 1 cup sugar or preferred sweetener equivalent, depending on taste 3/4 cup (plant) milk of choice 1/4 cup cacao or cocoa 2 tsp baking powder dash of vanilla pinch of salt
Note: You will need a silicon mould as they will stick to paper muffin cups due to their low fat content.
Preheat oven to 180 °C. Dump all ingredients (no particular order needed!) in a large mixing bowl and mix with a whisk or wooden spoon until you obtain a smooth and pourable batter. This should not take long at all. Evenly distribute into the muffin moulds. Bake for 15-20 minutes. Turn off the oven and let them rest in the hot oven for 5 minutes, then take them out and let them rest on the bench for 10 minutes. Only remove them from the mould once they have cooled as they will stick.
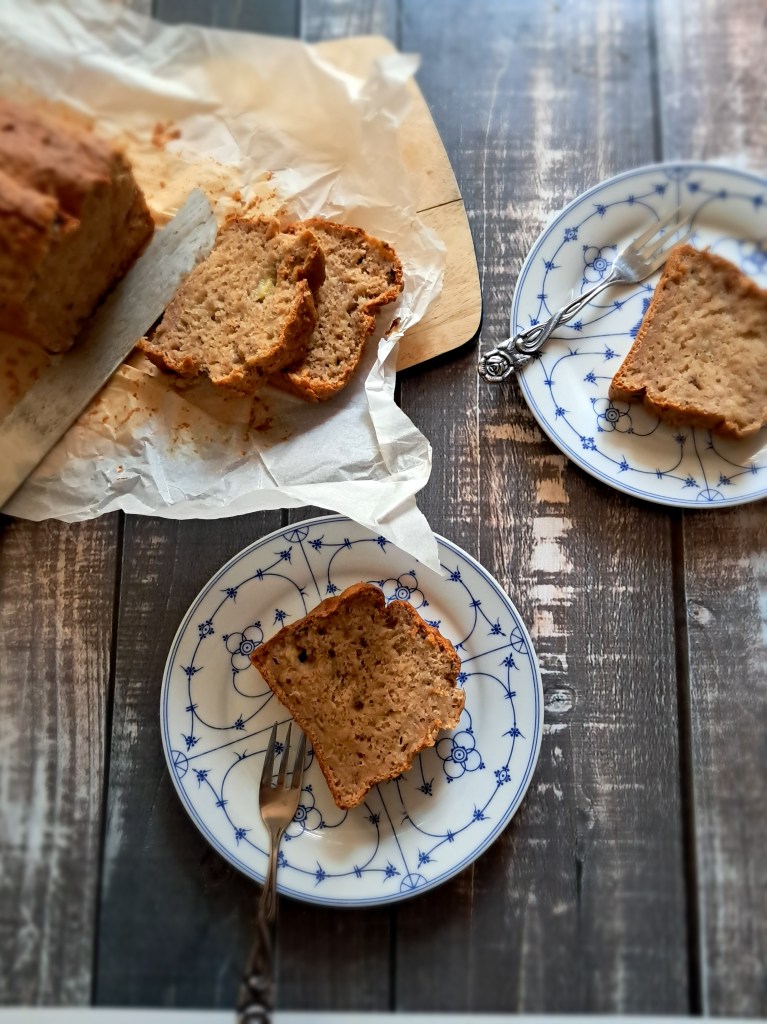
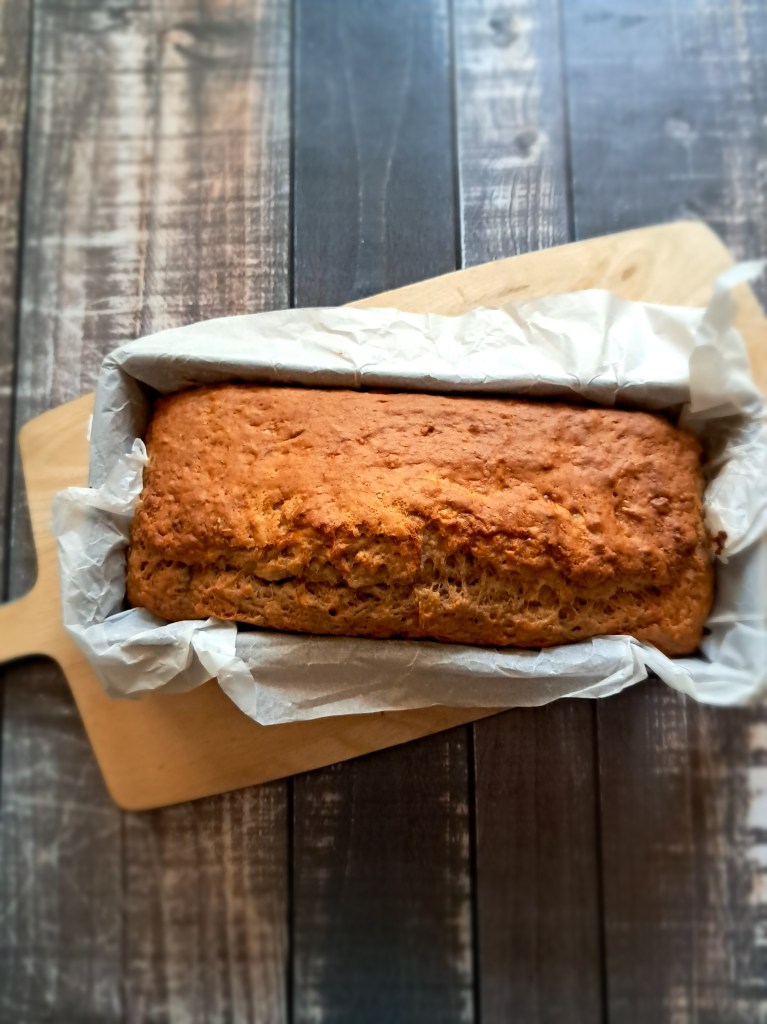
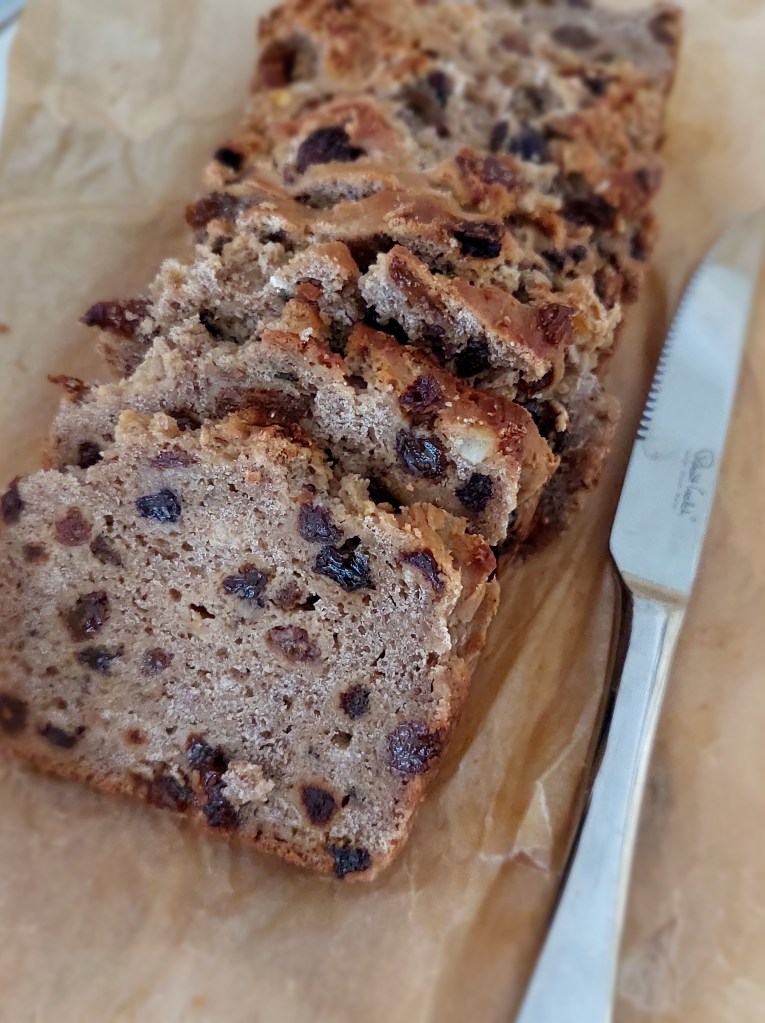
Ingredients 260g self-raising flour (gluten free if required) 40g plain flour (gf if required) 500g overripe bananas, well-smashed/pureed 2 eggs or egg replacer pinch of sea salt vanilla essence 100g sugar of choice 1tsp cinnamon half cup milk or dairy alternative of choice half a cup of apple sauce
Method Preheat oven to 180°C. Line a loaf pan with baking paper, allowing it to overhang. Sift the flours, salt and cinnamon into a large mixing bowl. Stir in the sugar and make a well in the centre. Add mashed bananas, apple sauce, egg replacer, vanilla and milk. Stir until well combined. Spoon batter into prepared pan Bake for 45 minutes. Let cool on a wire rack and cut into slices. Keeps well in the fridge for at least 5 days.
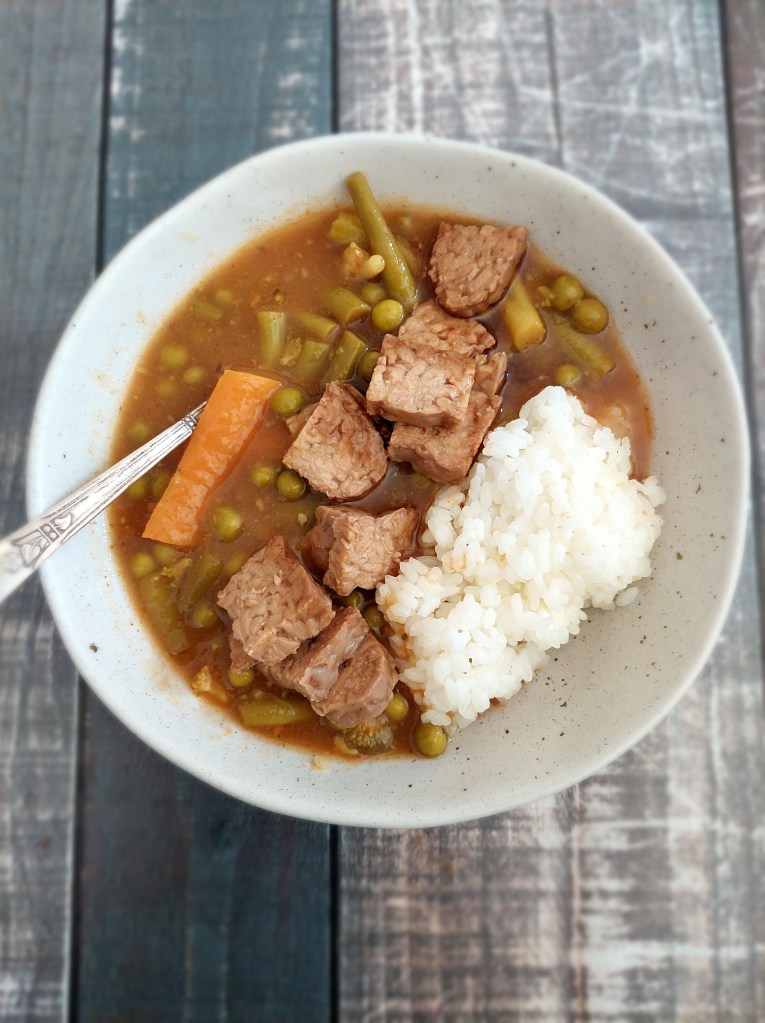
Who doesn’t love Japanese curry? That burst of Umami just always seems to hit the right spot. Unfortunately, store bought Japanese curry relies on roux made with butter so it is never a light meal. But what if you could create a Japanese curry in your own kitchen without all the added fat from butter and oil?
Now, I will not call this an “authentic” Japanese curry because it isn’t, but if you’re craving that umami flavour without fat, oil, onions, garlic, dairy, and gluten, then this recipe is for you! Needless to say, it is quick and easy like all my recipes.
It is also very customisable – while I consider carrots and peas somewhat crucial you can absolutely use up any vegetables that are lingering in your fridge. Obviously regarding the protein, the options are endless. The version pictured has marinated tempeh, but please feel free to use any protein you/your family like. My kids love it with chicken nuggets (a kind of cheat’s katsu curry!), but beef, tofu, chickpeas would also be great options.
4 cups of vegetables (I recommend peas, carrots, and potatoes, but broccoli, cauli, zucchini and pumpkin would also be great options)
1-2 apples (Fuji or Pink Lady are great)
4 cups of vegetable or chicken stock
2 tbsp ketchup
1 tbsp (vegan) Worcestershire sauce
1 tbsp rice wine vinegar
1 tbsp soy sauce or tamari
2 tbsp curry spice
3 tbsp cornstarch/cornflour
Bring stock to boil in a large pot/saucepan, add vegetables, apple, and condiments (Ketchup, Worcestershire sauce, vinegar, soy sauce, curry spice) and cook on low to medium until potatoes are tender.
In a separate small saucepan, mix cornstarch/flour with the same amount of water until all the lumps are gone, then add about a cup of the curry liquid and stir until thick and viscous. This is your fat-free roux. Add the roux into the curry and cook for another 20 minutes.
Meanwhile, cook rice for serving as well as your protein of choice.
Now this is a real game-changer. If you are sick of rancid-tasting store-bought microwave popcorn and the idea of an oil-free healthy crunchy snack sounds good to you, look no further than this easy recipe for oil free healthy microwave popcorn.
Oil free healthy microwave popcorn
1/4 cup popcorn kernels
1/4 tsp salt (more or less to taste)
2 tbsp water
In a heat-proof glass pyrex dish, mix all ingredients. Cover with an old dish towel (it might get stained) and microwave for two rounds of 3-4 minutes each, around 7 minutes in total, until popping slows down.
You might need more or less time depending on your microwave. Be careful when opening the microwave door as the bowl will be very hot.
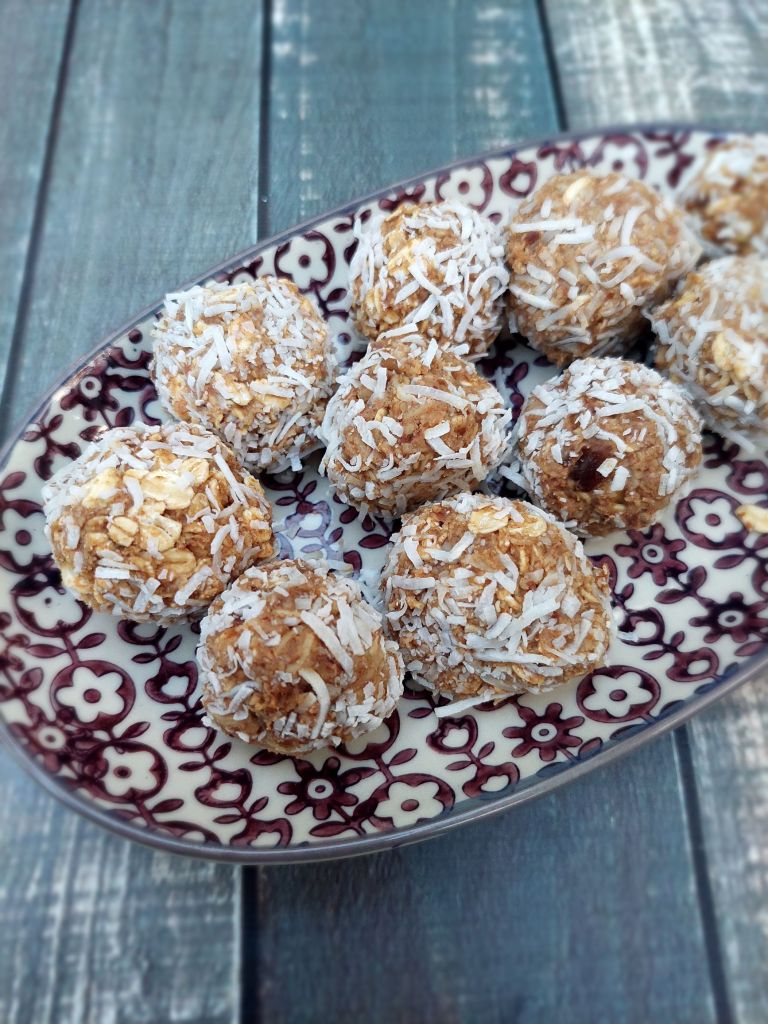
Bliss balls, energy balls, power balls – there are many names for these beautiful little babies that are not only your best mate when the 3pm munchies hit, but also a great addition to your little one’s lunchbox as they are completely nut free and allergy friendly and provide sustained energy thanks to rolled oats, dried dates and a smidge of protein powder!
Of course these are very customisable, but here I am offering my quick, easy, healthy and yummy version for a snack/treat/breakfast that my kids actually eat and that is just as good for grown-ups too!
Makes 24 balls
One cup packed dried dates (approx. 170g)
2/3 (two thirds) cup shredded coconut (approx 40g)
1.5 cups rolled oats (approx 120g)
One scoop vegan vanilla or choc protein
1 tbsp raw cacao
Pinch of salt
Start by soaking the dates in hot water until soft. Drain, but keep the date water. Blitz all ingredients in a high-powered blender while adding the date water gradually until the mixture comes together. If you add to much loquid you might have to add some more of the dry ingredients. It’s okay for the mix to be sticky but it should still be able to be formed into balls.
Roll into balls (roughly 22-28 depending on size) and roll in more coconut or oats as desired. Pop into fridge or freezer until ready to eat.
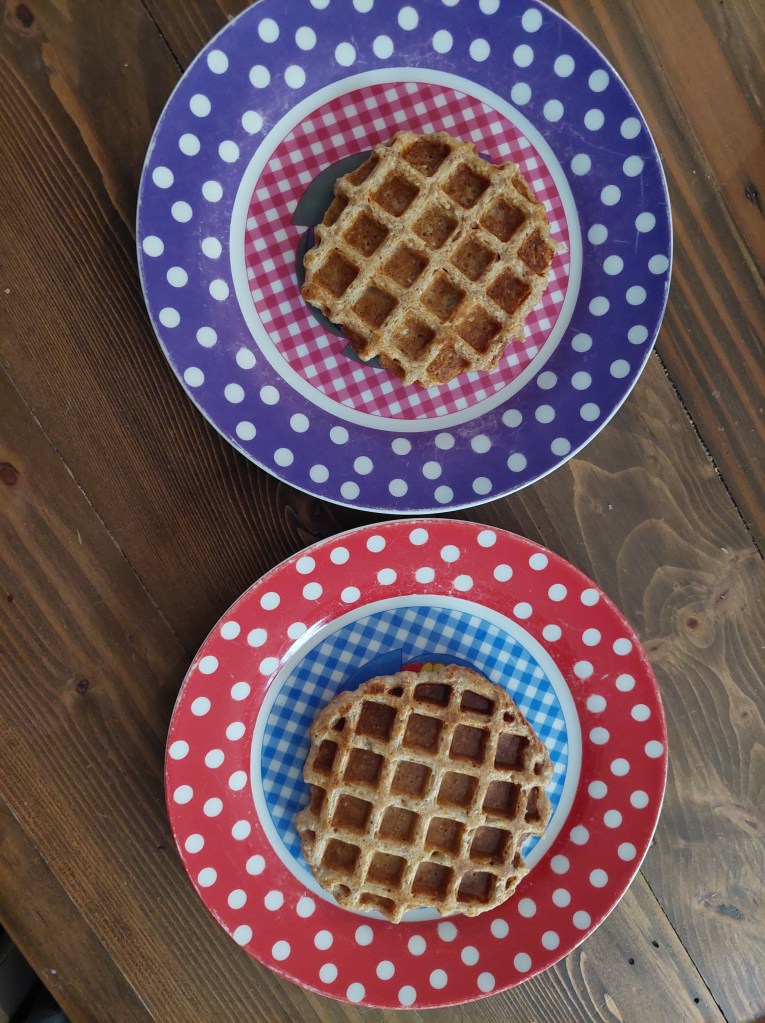
Waffles are the ultimate comfort food – unfortunately, they are usually also loaded with fat and other unhealthy ingredients. If you are looking for a healthy but no less yummy version of waffles to pop into your kids’ lunchboxes or have ready for a quick breakfast or afternoon snack, please give my waffles a try.
If you don’t have a waffle maker (I highly recommend this mini waffle maker from Kmart), the batter also works for mini pancakes!
For 12 mini waffles, you will need:
2 cups oats 1.5 cups plant milk or water 1 cup apple sauce 1 tbsp flaxseed (optional, but thickens the batter up nicely) 1 tbsp raw sugar or other sweetener 2 tsp of vanilla essence 1 tsp cinnamon (optional) 1 tsp baking powder pinch of salt
Blend all ingredients in a high-powered blender until smooth. Let sit for a few minutes for the batter to thicken. Heat up your waffle maker according to the manufacturer’s instructions. Make waffles according to the manufacturer’s instructions and enjoy!
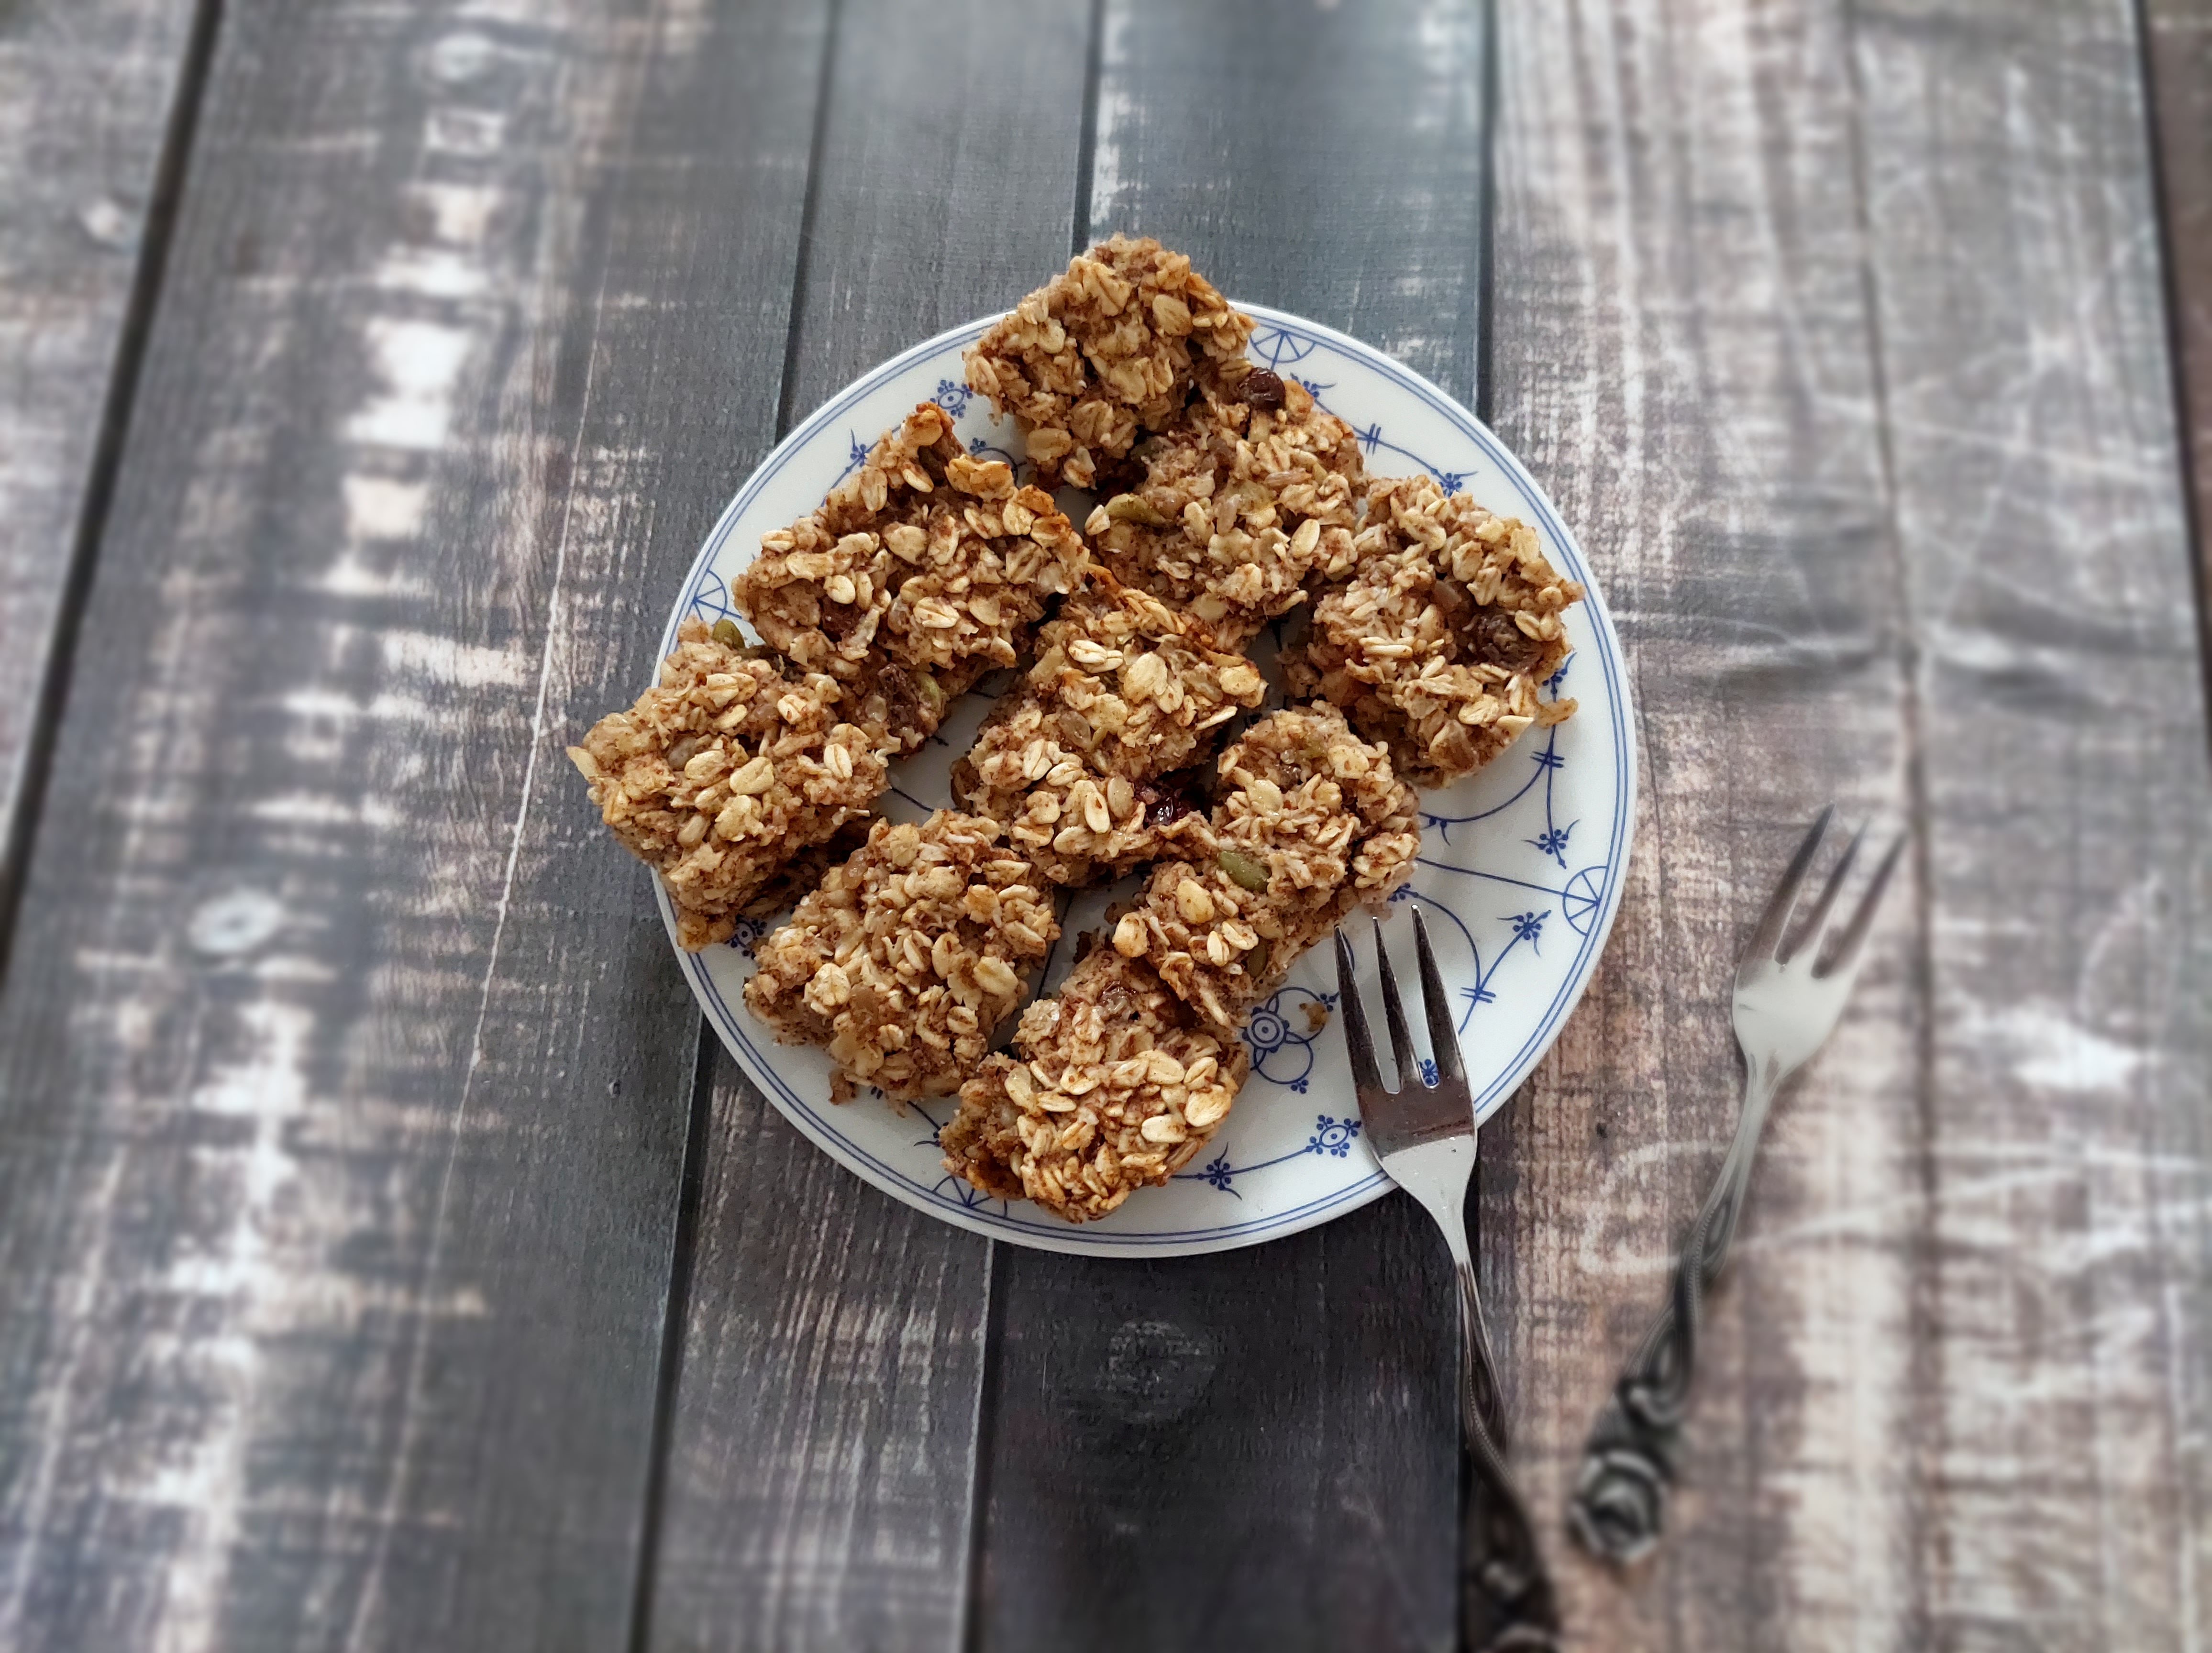
This is probably the recipe I am making most often in my kitchen and still it has taken me so long to get around to posting it!
Everyone needs a recipe for a quick and easy lunchbox-friendly bar in their repertoire, so here comes my version of a low-fat, vegan, nut-free, gluten free (if you use gf oats) oatmeal bar that is a hit in lunchboxes, for picnics, afternoon tea, and at kids birthday parties alike! It is full of fibre to keep small (and big) tummies full and slow carbs to get those brains working. I also love it as a mess-free and satisfying breakfast on the go with its great balance of plant protein, complex carbohydrates, fibre, and a small amount of healthy fats (naturally occurring fats in oats and from any seeds you are adding if any).
Whip it up every Sunday afternoon for the week ahead and fill your house with the cozy aroma of this healthy and yummy oatmeal bar! This is an extremely customizable and forgiving recipe – use whatever milk or sweetener you like, add any combination of dried fruits, nuts and seeds (if nuts are allowed) or even chocolate chips. Add gingerbread spice or pumpkin pie spice for an autumnal twist, glaze it with chocolate – the options are seriously endless. You can adjust the sweetener to your liking and even leave it out altogether and your bars will still be tasty! It is also pretty fool proof – I don’t even really follow a recipe anymore and always manage to create something delicious based on this loose recipe matrix.
4 cups old-fashioned oats (you can use quick oats, but the result will be a bit more mushy and with less of a “bite” to it, still delish tho!) 4 flaxseed eggs or egg replacer eggs (or use “real” eggs if not vegan) 1/4-1/2 cup (more or less) honey, maple syrup or raw sugar or mix hereof (adjust to taste) 1 cup plant milk 3/4-1 cup apple sauce 1 tbsp baking powder 1 tbsp of vanilla essence pinch of sea salt 1 cup (adjust to taste) any mix of dried fruit (dates, sultanas, cranberries, candied peel etc.) and seeds/nuts (optional) 1 tbsp Cinnamon and/or other spice (gingerbread or pumpkin pie spice is lovely) optional: melted dark chocolate to drizzle over
Mix all ingredients and let stand for 20 minutes for the pats to soften and the flavours to develop. Preheat your oven to 180°C. Line a square 20cm baking pan with baking paper and pour the batter in, smoothing the top. Bake at 180°C for around 30 minutes. Let cool, then cut into 30 squares.
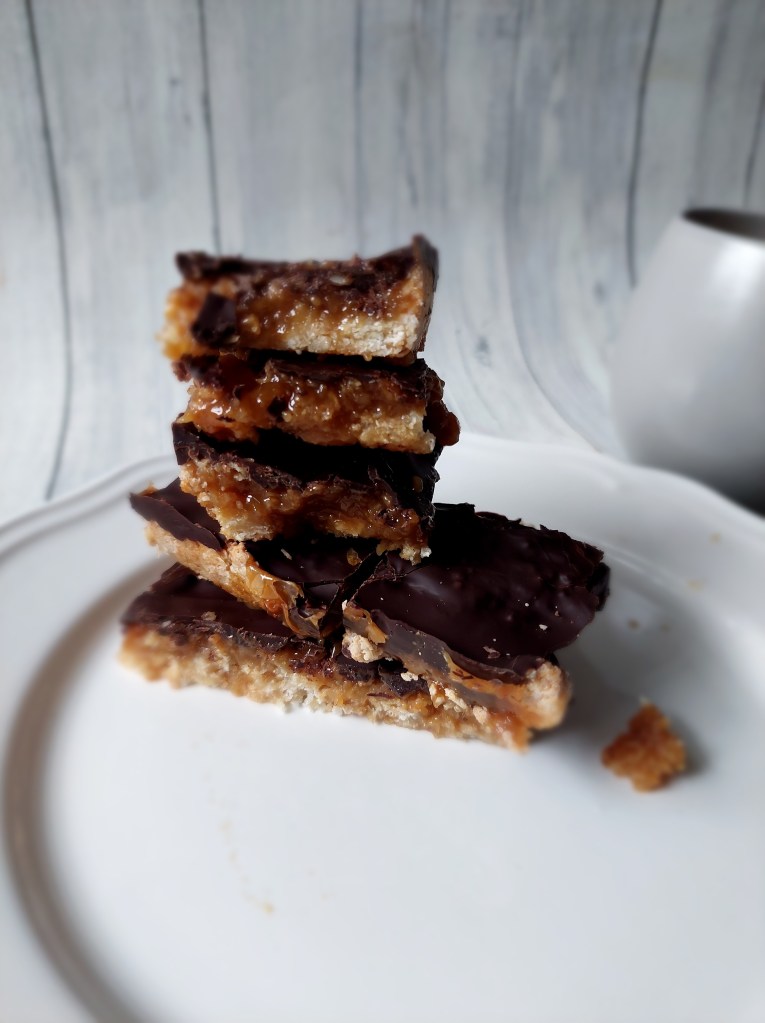
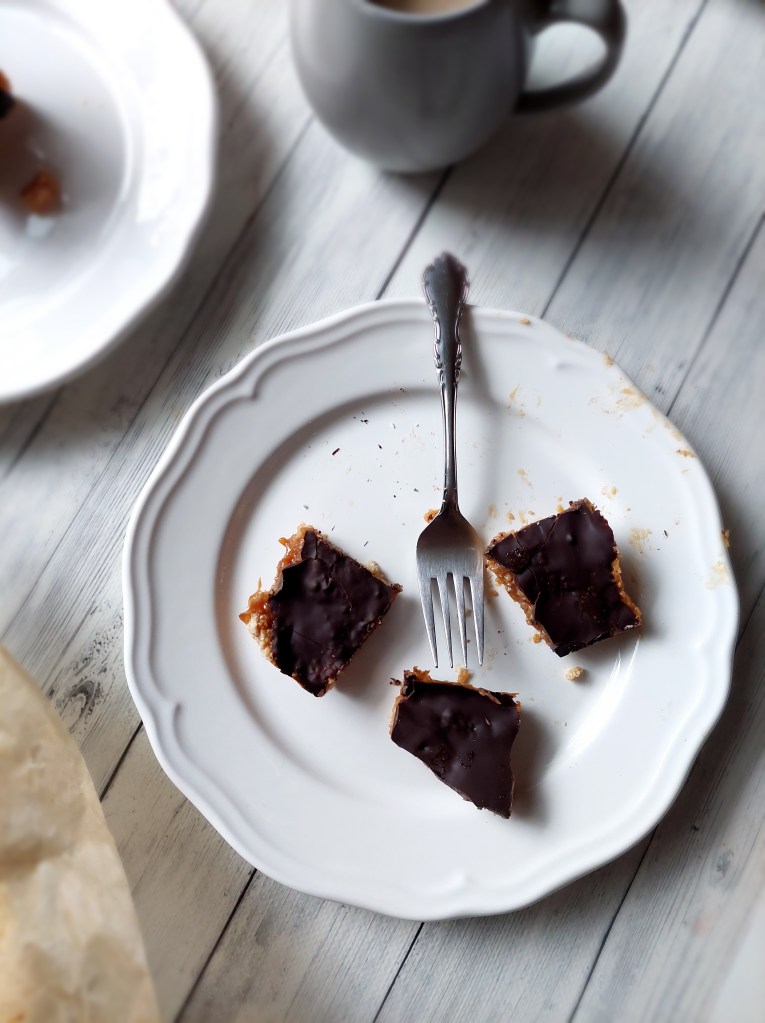
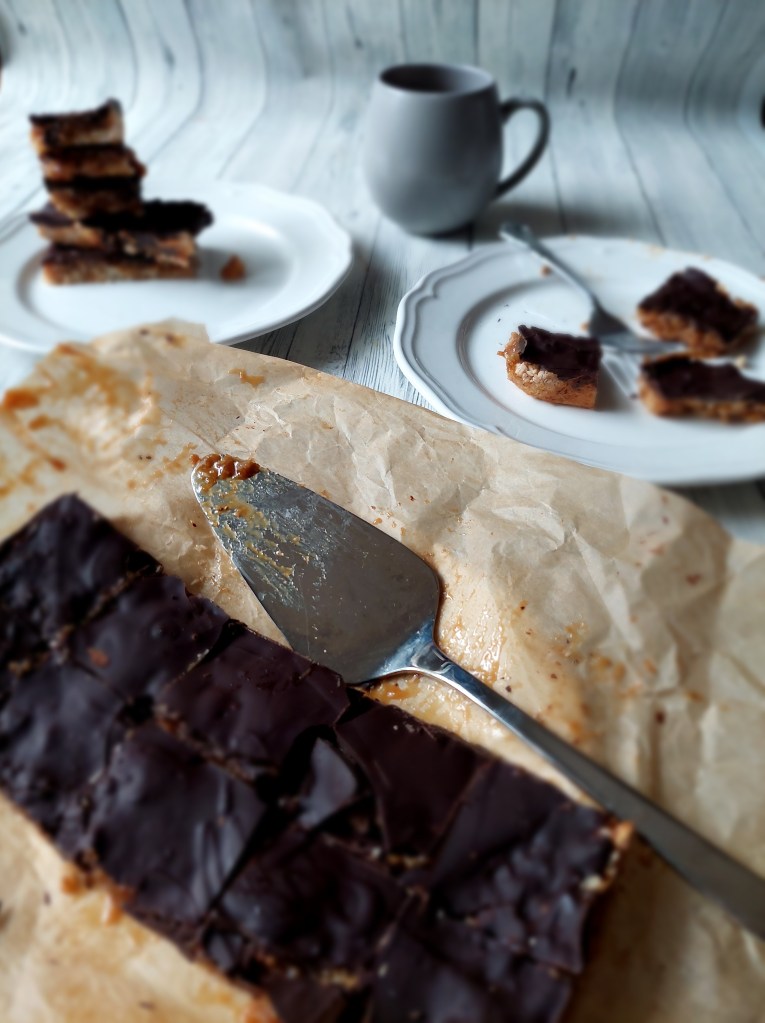
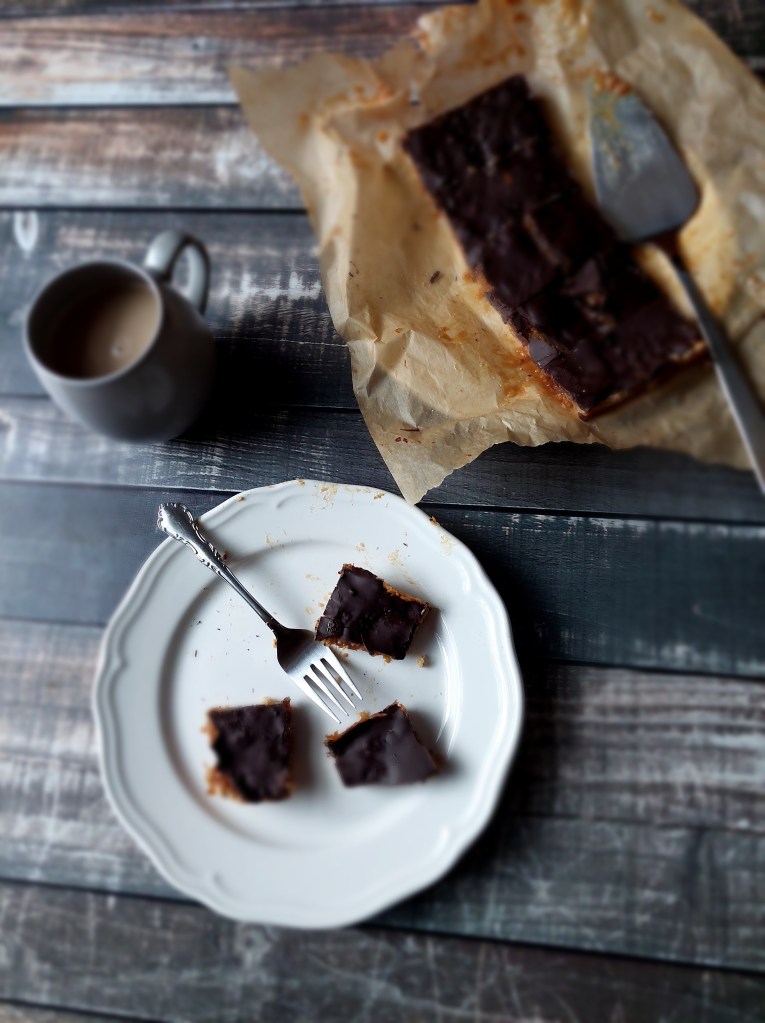
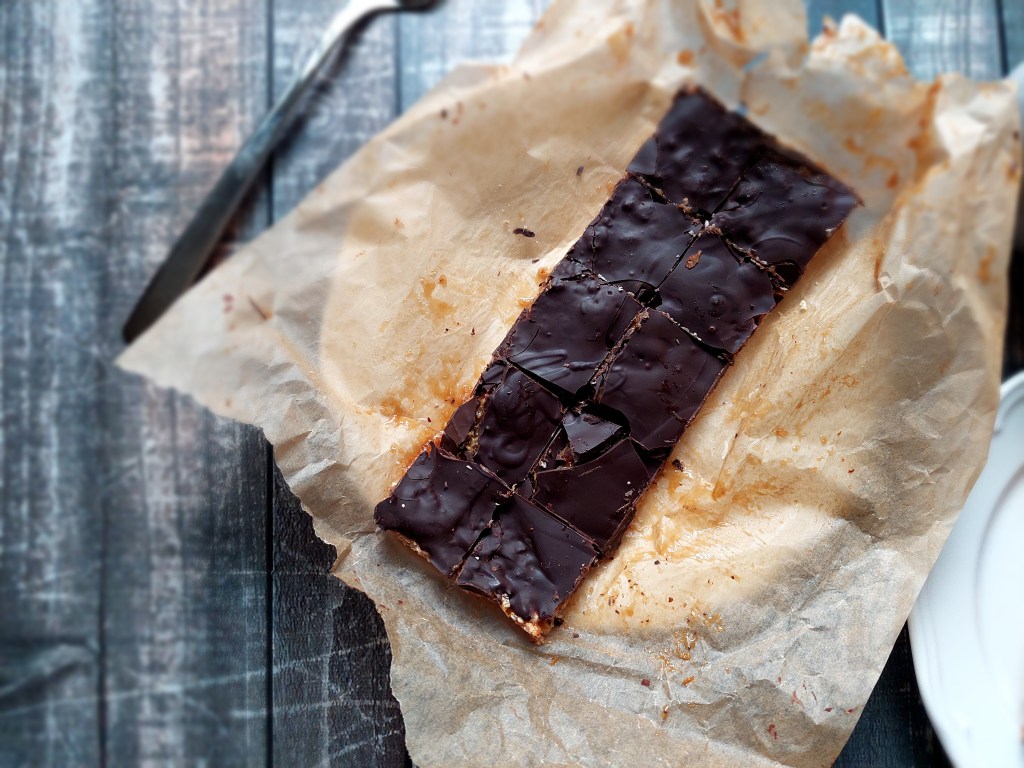
Gluten free, vegan and much lower in fat than traditional caramel slice – what’s not to love?
Making healthier, allergy-friendly versions of old favourites is definitely a hobby of mine. And caramel slice is no exception!
Just look at it – wouldn’t you think it’s the real deal?
Traditional caramel slice comes with a buttery shortbread, but you won’t find any butter or margarine in my version. For the caramel, I used a store-bought vegan condensed milk which is quite low in fat, but you can also make your own. I used dark chocolate for the topping so this is not a “fat-free” caramel slice, but it is much lighter and healthier than the original. And because there is a lot less sugar in it, it is also more satisfying!
My whole family approved of these (which is rare!) and they would be perfect for school’s cake stalls as they come without dairy, eggs or nuts!
Makes 24
One cup gluten free flour One cup apple sauce One cup desiccated coconut
Preheat oven to 180°C and line a slice tin (20x30cm) with baking paper. Combine flour, coconut and apple sauce in a large bowl until mixed well. Press into tin and bake for 15 minutes until golden brown. Pour condensed milk over base and bake for another 10 minutes. Allow to cool Melt the chocolate and pour over base. Let set in the fridge, then slice into squares.
These freeze very well – but I am sure they will be gone before you have a chance to freeze them!
Gluten free, vegan and fat free are usually not attributes that come to mind when hearing “Stollen” – I show you that the impossible is possible!
Tastes just like traditional Stollen – but without butter, egg, oil or wheat!
Today I got a real treat for you! Most of you would be familiar or would have at least heard of “Stollen”, a very dense traditional German spiced loaf typically eaten in the weeks leading up to Christmas.
Behold all this spicy, Christmas-y, fruity deliciousness!
It is basically our version of Christmas pudding and it is certainly never a light dish! Traditional Stollen is made with lots of butter (in the store-bought version often replaced with cheap margarine) as well as nuts and marzipan, none of them recommended if you are watching your waistline or are struggling with autoimmune issues (me).
Now, there is no shortage of recipes for gluten-free Stollen out there and there is even store-bought gluten free Stollen these days. Making it vegan is already a bit more of a challenge as Stollen relies heavily on milk, butter, and eggs. However, you do find recipes for vegan Stollen on the net. Problem is, even the vegan versions use lots of oil or margarine. I am presenting you here a completely fat-free version of this delicious treat that also happens to be vegan and gluten free!
It is so fluffy, juicy and delicious, you won’t miss a thing. It is comforting and perfect with a cup of hot latte or tea on a chilly afternoon. So now matter if you are vegan, want to lose weight or suffer from allergies, fear not – the perfect Stollen is awaiting you!
One loaf
454g gluten free flour (I use a self-made mix of buckwheat flour and a store-bought gf flour mix) 14g dried yeast 130ml almond milk, luke-warm 120g raw sugar 1 cup apple sauce 3tsp mixed spices (cinnamon is mandatory, everything else is up to you – I recommend ginger, cardamom, cloves, nutmeg) almond extract 250g mixed dried fruit (sultanas etc.) and orange peel
Soak dried fruit in some hot water (or orange/apple juice) to soften. Dissolve yeast in the milk, add a tsp of sugar and stir until completely dissolved. Add the flour, spices and remaining sugar to a large bowl, add the yeast-milk mixture and apple sauce, mix well, cover with a dishcloth and let the dough rise in a warm spot for 15 minutes. Add the almond extract and drained soaked fruit and knead well. Let rest for another 2-3 hours. Preheat oven to 180°C. Fill the dough in a loaf tin and bake for 45 minutes. For a more authentic Stollen, you can sprinkle with icing sugar after baking but it is not necessary.
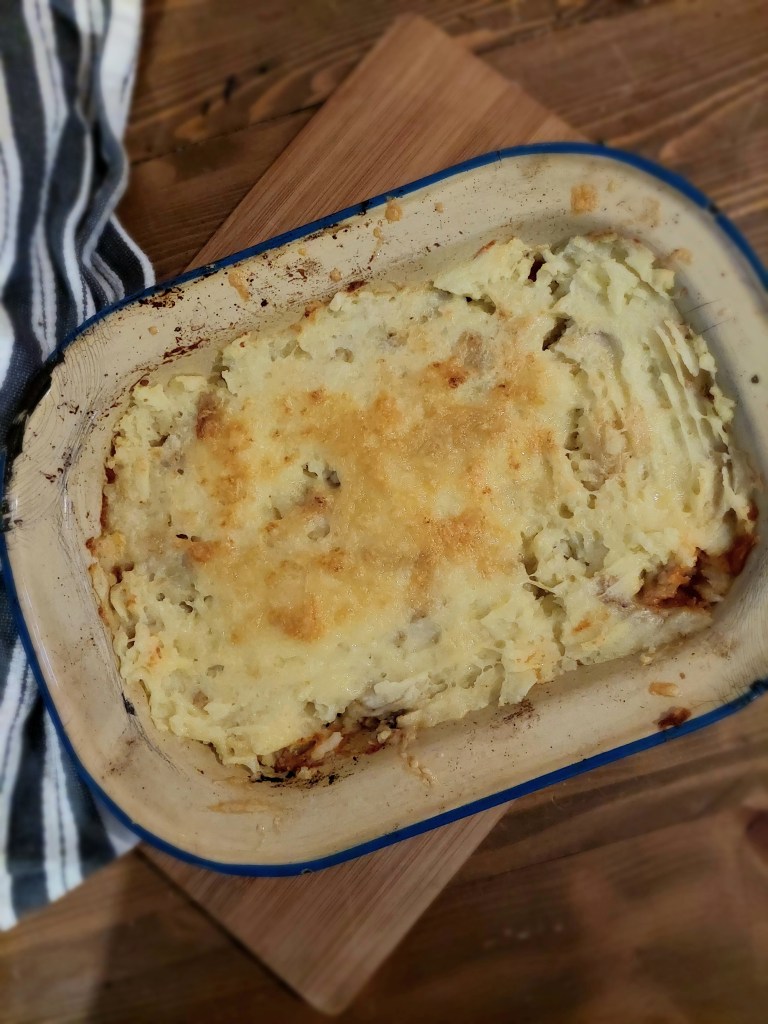
Vegan Cottage Pie – gluten free, dairy free, oil free and low in fat!
Is there anything more comforting than a cottage pie on a cold night? I think not. However, this popular classic originally involves meat as well as other heavyweights such as butter and milk and flour which makes it not suitable if you are gluten free. My plant-based version uses lentils as base as well as carrots and celery for flavour which also makes it a very economical dish. My kids normally hate lentils but they absolutely love this dish and I hope you do too! My trick is to blend up the lentil ragu before using it in the pie. You could skip this step if you don’t mind a coarse texture (I actually love it).
The lentil base for this pie freezes terrifically so I suggest making a big batch and then freeze some to whip up a comforting cottage pie on a week night!
Serves 4
Ingredients Lentil base 2 onions (leave out of low FODMAP) 2 cloves garlic (leave out of low FODMAP) 3 carrots, washed and finely sliced or cubed 3 celery sticks, finely sliced 500g dried lentils, any variety works well 400g diced tomatoes 1 cup tomato paste 1 cup red wine 1l vegetable stock
Mashed potato crust approx. 800g potatoes, washed and diced Flavourings of choice (nutritional yeast, salt, plant milk…)
Method Sauté the onion and garlic (if using) in a large cast-iron pot in a bit of water or stock until fragrant. Add carrots and celery and cook until softened. Add lentils, diced tomatoes, tomato paste, red wine, and stock. Bring to a simmer, then cook until the lentils are fully cooked and the ragu has a nice bolognese-style texture (about 45-60 minutes). You can now let the ragu cool and then freeze for up to 3 months or use it straight away for this pie. If you need a smooth texture for fussy eaters, blend the ragu with a stick blender until nice and smooth. To make the mashed potato, steam or boil the prepared potatoes until very soft. Add flavourings if using. Nutritional yeast and salt are great. If you are not concerned about fat content you can use plant milk, vegan margarine and/or vegan cheese. Mash with a potato masher. Scoop lentil base into 4 portion-size baking dishes. Top with mashed potato. Either serve straight away or broil in the oven to get a nice crust.