15 Minute Prune Spread {vg, gf}

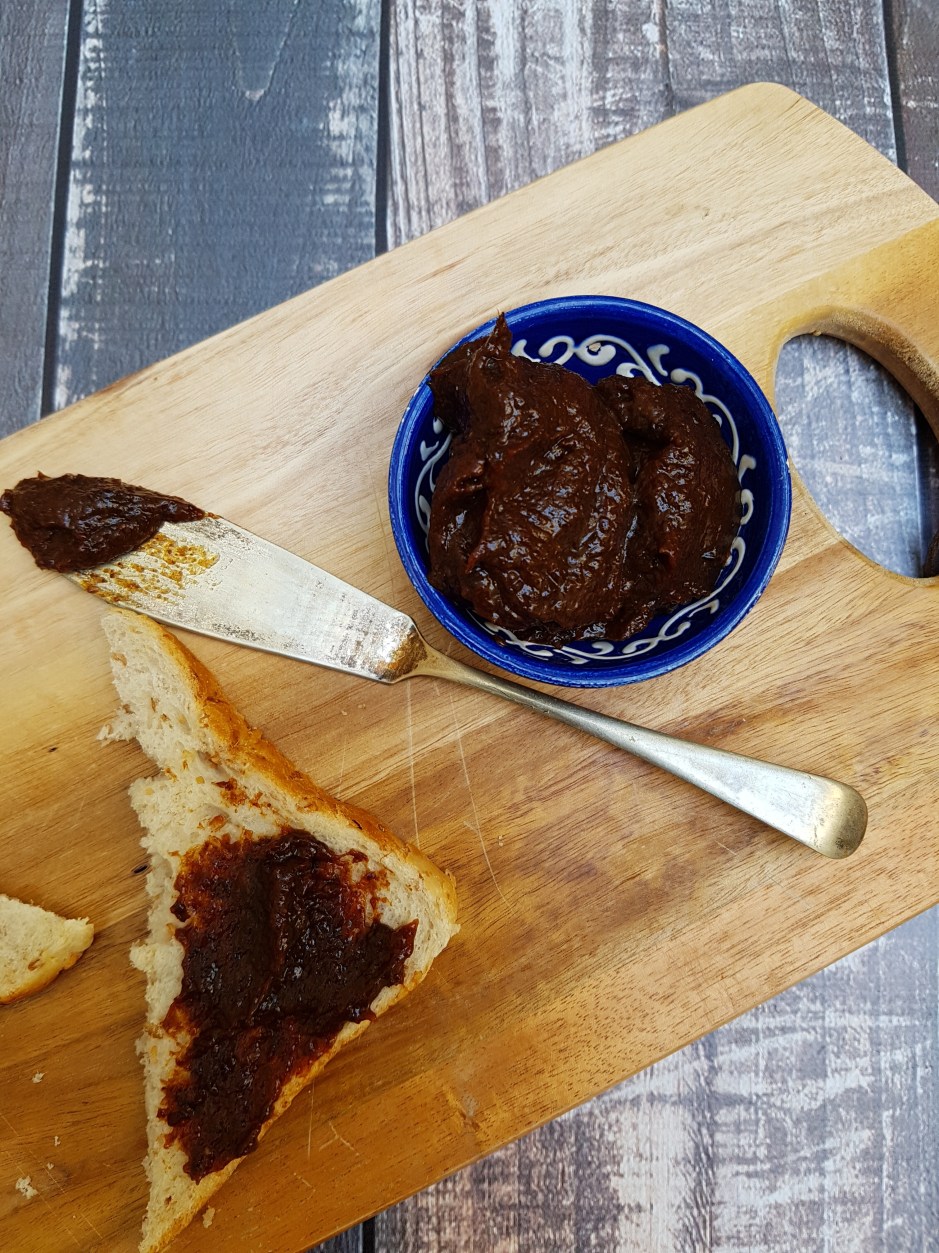
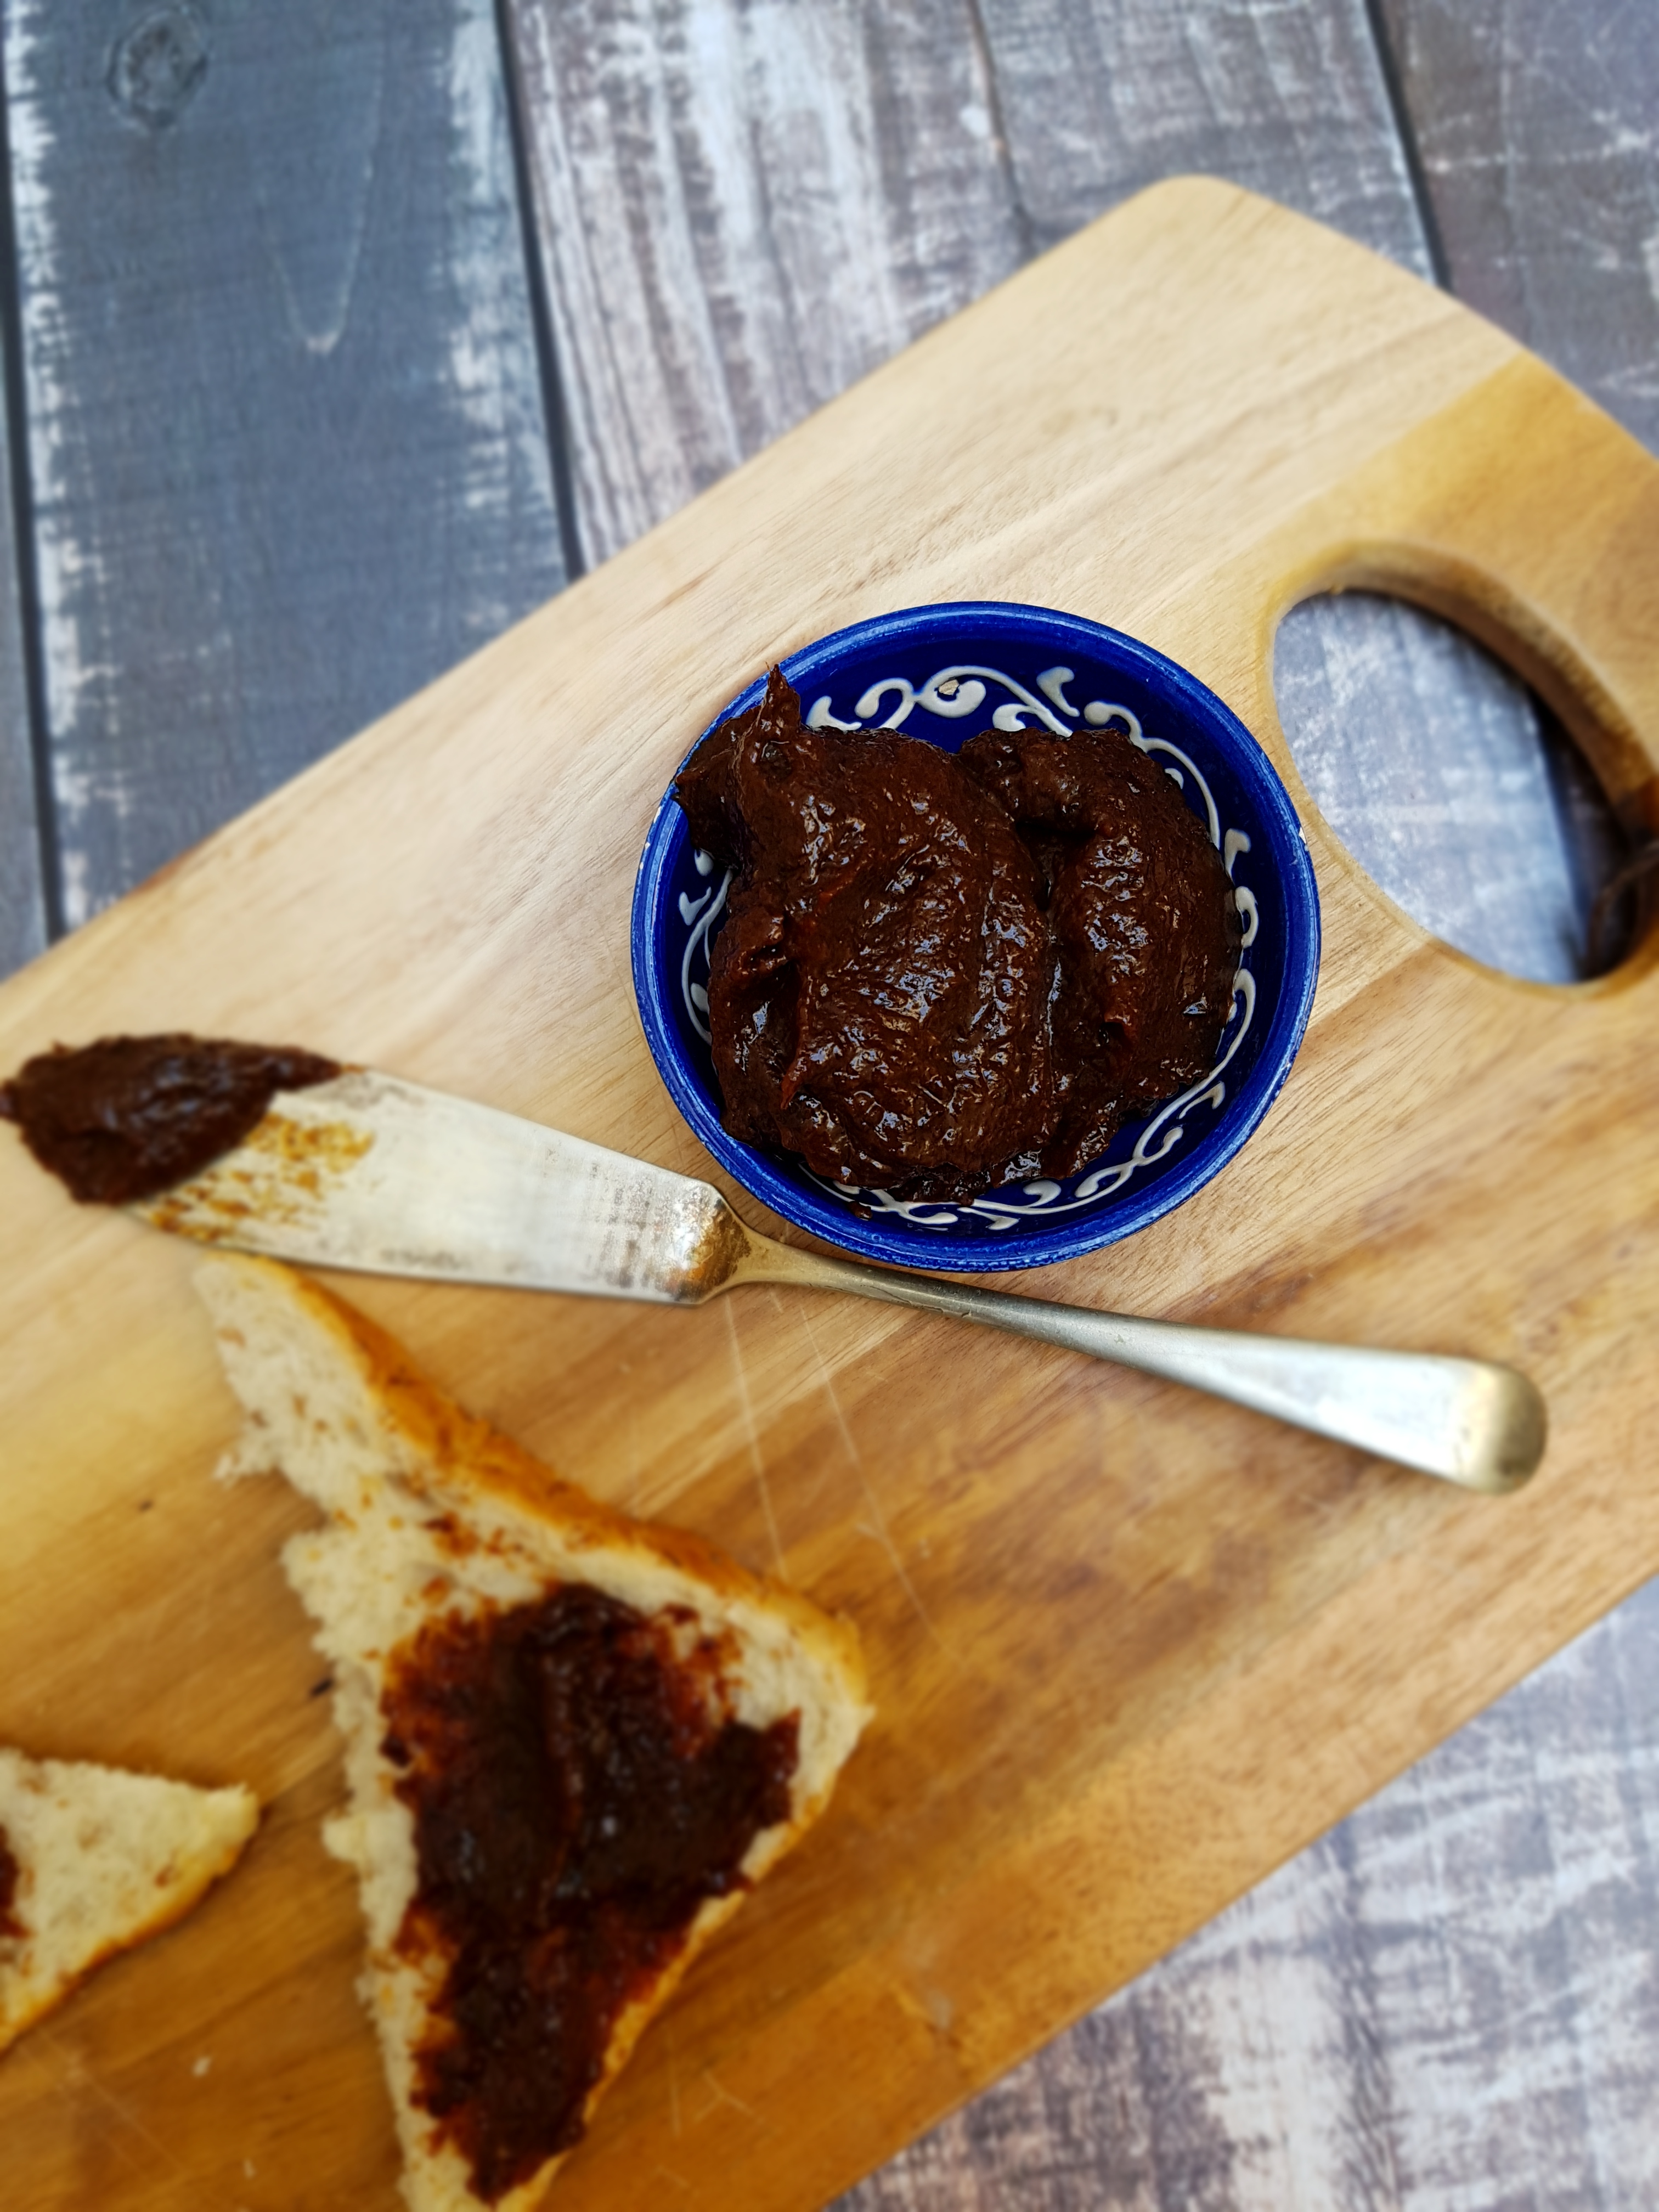
In Germany where I am from, “Pflaumenmus” (something like plum jam/plum puree/plum butter) is a very popular spread for bread rolls and also a common filling for jam doughnuts. Never having been a huge consumer of jams and sweet spreads, I have always liked plum jam as it is less sweet than other jams and usually also contains some wintery spices such as cinnamon, cloves, cardamom etc. which I adore. To my chagrin, I have never found anything like it in Australia. But when I saw a bag of dried prunes on special, I thought I’d try my luck! and tada – here’s my very own version of Pflaumenmus aka prune spread!

I have to say that the first attempt was a success indeed! While the preparation is a bit messy, this spread comes together easily and is utterly delicious. It works on any type of bread and is also a great topping for pancakes and oatmeal. If you want to be adventurous, try it as a chutney with some (vegan) cheese. Or why not mix into your favourite yogurt! Prunes are less sweet than other dried fruit and therefore a good alternative if you are watching your sugar intake. And their benefits don’t stop their – you can even use exactly this recipe to replace butter and oil in your favourite baking recipes! But that’s a topic for another post, so stay tuned!

Prunes are associated with protection against cardiovascular disease. Due to their high fiber content, they help to keep your blood sugar stable and delay the absorption of sugar into the bloodstream which makes you feel fuller for longer. Thanks to their phenolic compounds, prunes improve bone density and as they improve the absorption of iron, they are especially valuable for vegetarians and vegans. High time to enjoy some delicious prune spread on your (gluten free) bread!

Quick and Easy Prune Spread
Delicious Prune Spread

Prune Spread

450g prunes (dried plums), roughly chopped
2 cups water
1 tsp cinnamon
a pinch each of ground cloves, star anise, cardamom and black pepper
a dash of lemon juice
sweetener to taste (such as maple syrup or date syrup)

Add all ingredients into a saucepan, bring to the boil and simmer for 15 minutes. Mash everything with a stick blender, let cool (the mixture will continue to thicken as it cools) and fill into mason jars.

Enjoy!

Lemon Meringue Bliss Balls {vg, gf}

If you love bliss balls, there is no shortage of recipes on the internet, including my blog. Whether you feel like carrot cake, lamington, cookie dough, baklava or ginger bread, I have you covered. Only missing are cheesecake blissballs and black forest bliss balls, and I can offer you a whole patisserie in bliss ball shape! So here is the latest creation…drumroll…Lemon Meringue Bliss Balls!

Have you tried any of my bliss ball recipes? All these lovelies – besides being healthy and super delish – have one thing in common: they are based on dates. I think making my bliss balls have severely increased our local supermarket’s turnover on dates! What, however, if you don’t love dates? I know, I know – it seems blasphemic to say this. Not loving dates? Who are you? But, ahem, tastes are different. So I am not going to judge you if you happen to be someone who doesn’t love dates. I just think you are weird, I mean, erh, did i just say weird? Okay. Sorry. I mean – we just have different tastes then. I still want to be friends with you. So I come to your rescue with some lemon meringue bliss balls, completely without dates. Are you in?

I love these babies as they are so featherlight and refreshing. They even smell a bit like a tangy lemon cheesecake. So if you are interested in a healthy snack on the go, but found my previous bliss ball recipes too sweet, I hope you’ll enjoy these ones. They come together just as easily as all my other bliss balls so they are a great stand-in for an emergency snack attack with a much lower carbohydrate and sugar content than “standard” bliss balls. They are also vegan, gluten free and refined sugar free, but I am repeating myself here…

Lemon Meringue Bliss Balls

Lemon Meringue Bliss Balls

Makes 15 bliss balls

1 cup oats
1 cup desiccated coconut
juice and zest of one organic lemon
5 tbsp maple syrup

Blitz the oats in a high-powered blender until they resemble fine crumbs. Add the remaining ingredients and process until you achieve a malleable dough. Chill the mix for 30 minutes to firm up, then shape 15 bliss balls and enjoy! Store in the fridge in an airtight container for up to a week.

Enjoy!

Kale & Chickpea Curry {vg, gf, lf}

I am amazed again and again at how the most simple meals are often the most delicious and satisfying. There you are, pondering for hours over what you could do with all the produce that “needs to go”, browsing recipes, flavour combinations…when all you need is just some common sense and a look in your pantry! You find yourself with a lot of fresh veggies for whatever reason (a very good problem to have imho). Maybe you had a green thumb this season, your neighbour ended up with way too much stuff, or you are savvy like me and just buy anything in the shop that’s marked down for quick sale. No need to let your precious 5-a-day die a slow death in your crisper section. As long as you got some stock, spices, legumes and tinned tomatoes in your pantry (and you want to make sure you always do), you can pretty much do anything from a chili sin carne to soup to vegan bolognese. Or in this case a curry. A kale & chickpea curry, to be precise.

Admittedly, it doesn’t happen very often that I end up with too much kale. I belong to the weird species who really and truly enjoys kale. I love munching on it and also in smoothies. Long story short, if I buy kale, I tend to use it up pretty quickly while it is still in its prime. However, one day I bought a LOT of kale that was marked down. Apparently, there were not many other people around who belong to the kale appreciation society like me. While I froze some of it to be used in smoothies, I was wondering what to do with the rest of it. I mean, there is only so much raw kale you can munch on before your jaws are sore and your digestive system pays for it! What to do?

So I had kale (obviously, the whole previous paragraph was carrying on about that). I had tinned chickpeas and tomatoes. There were frozen green beans, vegetable stock and also an array of exotic spices, as well as a couple of potatoes (that also needed to go).

I am glad I trusted my intuition to throw all this together. Because the end result was delicious, warming, satisfying, comforting, and my omnivore husband loved it too! I served it with cauliflower rice (as pictured) to boost our veggie intake even further, but it would definitely be delicious with any kind of rice! It is vegan, gluten free and very low in fat while brimming with nutrients, protein, healthy carbs and fiber. It is also a very cheap meal, requiring only basic ingredients.

Another plus side is that this delicious kale & chickpea curry takes less than 15 minutes to make! I know what it’s like to be flat out after a day’s work when you are hangry but cooking is the last thing you want to do. If you ever find yourself with some kale on a busy weeknight, here is your solution to keep everyone happy, fed and healthy!

Kale & Chickpea Curry

Kale & Chickpea Curry

Serves 3

1 l vegetable stock
half tbsp mild or hot curry powder
3 cloves garlic, minced
1 tsp each cumin seeds, mild or hot chili powder, ground ginger, and turmeric
Large bunch of kale, washed and finely chopped
approx. 350g green beans (frozen)
2 large potatoes, peeled and chopped
1 tin diced tomatoes
salt and pepper
1 tin chickpeas, drained and rinsed (see here for a delicious way to use the chickpea brine!)
a dash of lemon juice

Pour a dash of vegetable stock to cover the bottom of a large, heavy saucepan and water sauté the garlic and spices (curry powder, cumin, chili, ginger, turmeric) for a couple of minutes until aromatic. Add some more stock to prevent the spices from burning. Add kale, beans and potatoes, and then season with salt and pepper. Stir to coat the vegetables, add the remaining stock and diced tomatoes, bring to the boil, reduce the heat and simmer for 15 minutes until the potatoes are tender. If the consistency becomes too dry for your liking, add a bit of water or some more stock. Add the chickpeas and lemon juice and adjust seasonings. Serve with rice or cauliflower rice.

Enjoy!

Healthy Anzac Biscuits {vg, gf, lf}

Today is Anzac Day. And without going into all the historical intricacies, for the purposes of this blog, this means Anzac biscuits! Traditional Anzac biscuits, albeit tasty, are far from healthy as they contain butter (or far worse – margarine), refined sugar and white flour. Healthy Anzac biscuits? It seems like an impossible quest, but you can totally do this. Enter my healthy Anzac biscuits!

Healthy Anzac Biscuits

Healthy Anzac biscuits that are gluten free, vegan, refined sugar free and much lower in fat than standard Anzac biscuits. The best bit is that taste-wise, they are so close to the “original” that nobody will believe they are healthy! And as I can attest, they are husband and toddler approved too! I am not a biscuit person myself, but I can hardly stay away from them! With only a handful of standard pantry ingredients and very little prep time, there is no reason to enjoy a healthy Anzac biscuit – not only on Anzac day!

Consisting of oats, desiccated coconut, coconut oil and maple syrup, they are a guilt-free treat with benefits. Oats are one of the most nutritious foods on the planet, a great source of fiber, and have been shown to lower bad cholesterol. Coconut provides an array of essential nutrients, with manganese, copper and selenium only to mention a few. Coconut oil is a medium chain fatty acid, which is not readily stored as fat, but converted to energy and moreover has antifungal and antimicrobial properties. Maple syrup boasts calcium, iron, magnesium, phosphorus, potassium, and zinc as well as vitamins such as thiamin, riboflavin, niacin, and B6. Now that’s what I call healthy Anzac biscuits!

Healthy Anzac biscuits

Vegan, Gluten Free, Dairy Free, Refined Sugar Free, Low Fat

Makes 16 small biscuits

2 cups rolled oats
1/4 cup desiccated coconut
2 tbsp organic maple syrup
4 tsp melted coconut oil
1 tsp vanilla extract
2 tbsp water

Preheat your oven to 160 °C and line a baking sheet with baking paper. Give all ingredients in that order into a high-powered blender and blitz for 20 to 30 seconds, scraping down the sides as necessary, until the dough is combined and comes together. Form into 16 rather flat cookies and arrange evenly on your lined baking sheet. Bake for 20 minutes until lightly golden, let cool completely and store in an airtight container.

Enjoy!

Gingerbread Bliss Balls {vg, gf}

I am continuing my bliss balls obsession with a new flavour that is just perfect for the current season – autumn! While autumn here in the southern hemisphere doesn’t necessarily go hand in hand with gingerbread, the shops in Germany and other Northern and Central European countries start to fill up with all kinds of gingerbread-y goodies as soon as the leaves turn yellow. And because gingerbread is so delicious and comforting all year round – not just in the lead-up to Christmas – here’s my gingerbread bliss balls.

The idea for gingerbread bliss balls has been at the back of my mind for a while. After all, if you make carrot cake bliss balls and cookie dough bliss balls, why not turn other baked favourites into healthy snacks as well? I am pleased to say that these babies are utterly delicious! They are spicy, warming, comforting, full of flavour and just divine. I love all my bliss ball creations – if I do say so myself – but I think this is by far my new favourite. So make these now or bookmark this page if you are craving something really delicious and really healthy or frantically looking for Christmas presets (or any presents) in a few months’ time.

These gingerbread bliss balls are of course vegan and gluten free, but they are also nut free, which is great if you are watching your fat intake or struggle with nut allergies. My gingerbread bliss balls are therefore also great for kids’ parties and toddler snacks, in which case you might want to ease up on the spices a bit. Featuring dates, oats, maple syrup and an array of spices, these gingerbread bliss balls are refined sugar free, packed with fiber and magnesium, antioxidants, vitamins and minerals, while cinnamon helps to lower blood sugar, ginger has anti-inflammatory effects, and cardamom aids detoxification.

If that is not enough to convince you, these balls take just a few minutes to prepare!

Gingerbread Bliss Balls

Gingerbread Bliss Balls

Makes 12-15 bliss balls

2 cups rolled oats
6 Medjool dates
1.5 teaspoons ground ginger
1.5 tsp ground cinnamon
half a tsp nutmeg
half a tsp cardamom
2 tbsp maple syrup
half a tsp gingerbread spice

First, process the oats in a high powdered blender until a coarse meal forms. Add the other ingredients and blitz until you achieve a malleable consistency. Shape 12 to 15 balls and store in the fridge to firm up a little. They can last in the fridge in an airtight container for up to two weeks. But I doubt they will last that long. 😉

Enjoy!

Gluten Free Vegan Baklava Bites

There are things like shortbread and brownies that are as easy as pie (excuse the pun) to make gluten free. Others such as crusty bread and pizza are a bit more tricky and rarely work. And then there is those that are downright impossible to make gluten free. One of these would be baklava, i.e. phyllo dough. I have never seen ready-made gluten free phyllo dough in the shops. And no, phyllo dough is NOT puff pastry. While there are baklava recipes in which you could theoretically swap the wheat flour for gluten free flour, the process would be so laborious that it would be hardly worth it. But as a long-standing lover of baklava, I have never given up on my quest for some gluten free baklava, and I am happy to present to you the one and only – gluten free vegan baklava bites! They are a healthy-ish version without all the butter and sugar of the original and they are done in five. Who is in?

The idea for these babies came to me when I had a bowl of gluten free weetbix topped with some nuts and maple syrup the other day. The crunch of the weetbix in combination with the nuts and syrup evoked a long-forgotten pleasure from the blissful days without gluten intolerance: baklava. So my brain started rattling how to make it work and didn’t stop until it screamed: Bliss balls! I call them gluten free vegan baklava bites here just to provide for some linguistic variety. But the concept is much the same. Dates, nuts, cereals, and spices. Blitzed in a blender, then rolled into balls and chilled. It doesn’t get any easier than that!

Needless to say, they are gluten free, vegan, and refined sugar free – something that regular baklava cannot exactly boast with. They are also husband and toddler approved, and therefore a great little and nutritious snack for the whole family (if you are not allergic to nuts, of course). Due to the nuts, this treat is not as low in fat as most of my creations, but nut fat is super healthy for you and also very satisfying. I used a mix of walnuts, pistachios and almonds here. You can use other nuts, but I found that these yield the most trational “baklava” flavour, especially the pistachios.

Walnuts are high in flavonoids for a healthy heart and vitamin E for glowing skin and brain power. Pistachios contain most of the nutrients required for good health, such as vitamins, calcium, iron, magnesium, zinc and copper. Let’s tuck in!

Gluten Free Vegan Baklava Bites

Gluten Free Vegan Baklava Bites

Makes 12-15 baklava bites

3 gluten-free weetbix biscuits, crumbled
1 cup (ca. 12) medjool dates, pitted and roughly chopped
1 cup mixed chopped nuts (such as walnuts, pistachios, almonds)
1-2 tbsp rose water (optional, but provides authentic “baklava” flavour)
2 tbsp natural maple syrup

Just blitz everything in a high-powered blender, roll into balls and chill in the fridge until firmed up. Store in the fridge in an airtight container for up to a week.

Enjoy!

Warming Winter Cabbage Stew {vg, gf}

It’s that time of the year again. No, not the tax return yet – though that one is looming large too. It’s autumn here in Australia, and with autumn comes, inevitably, winter. While, unlike in the Northern hemisphere, winter in Down Under does not mean Christmas and gingerbread (but rather five consecutive month of rain and inefficient heating, in Melbourne anyway), it is time for warming stews and all sorts of comfort food. Ironically, I feel the cold much more since moving from Germany to Australia, which is probably due to the less than perfect insulation of houses around here. All the more reason to tuck into a steaming bowl of my warming winter cabbage stew, which features all the beauties of the season – potatoes, pumpkins, carrots, …yes, and cabbage. You saw that coming, didn’t you?

Cabbage is generally not a vegetable that people – no matter if vegan or omnivore – are especially excited about. Grossly underrepresented in fine dining spots and hipster cafés alike, cabbage often leads a desolate existence, wilting away in the supermarket next to its en-vogue cousins kale and cauliflower. You don’t see many hashtags saying #cabbageyeah, and it is admittedly not the first veggie I seek out when I visit the farmer’s market. In short, the chances of me ever making cabbage stew were ridiculously low. Not so much because I disliked it but rather because up until recently, it was not a vegetable that occurred to me.

A mistake indeed, as it turned out. Luckily for me (even though I thought it was unlucky at first), my organic vegetable delivery box last week featured one whole head of a drumhead cabbage. Neatly packed in cling wrap. (I never understand why organic delivery services use cling wrap. But that’s a topic for another day.) Needless to say, I wasn’t quite sure what to do with it, so off it went into the crisper. Where it stayed. For a while.

If you know me, you know that I am a big advocate of zero waste. I simply can’t stand throwing out food and can’t really remember when I last threw out food. Being a scientist at heart and pained by the sight of the poor cabbage in my fridge, I started doing my research. And while I was doing this, I started to fall in love with this unsightly and slightly smelly vegetable.

Cabbage has been consumed by many cultures of the world for thousands of years, and for very good reason. It is high in vitamin C to boost your immunity in the colder months, It is linked to the prevention of type 2 diabetes, boasts a number of antioxidants great for cardiovascular health, and provides an array of other vitamins and minerals, such as vitamin K, B6, B1, B2, phosphorus, maganese, potassium, magnesium and calcium, to name just a few. It is a great source of fiber and with its hearty, pasta-like texture, it provides comfort at virtually zero calories, so it is a great weightloss food!

Needless to say, this stew is ridiculously easy to make, a great way to rescue slowly dying veggies from your fridge and it is very cheap too!

Warming Winter Cabbage Stew

Warming Winter Cabbage Stew

Serves 6

4 green onions, cut in small rings (white and light green part only)
3 gloves garlic, minced
half a drumhead cabbage, shredded into bite-sized pieces
4 carrots, cut into bite-sized pieces
a quarter pumpkin, cut into bize-sized pieces
4 medium potatoes, cut into bize-sized pieces
4 cups vegetable stock
1 tin diced tomatoes
salt and pepper to taste
additional spices such as chili, cayenne pepper, or curry powder to taste

Throw the washed and prepared vegetables into a large stockpot or cast-iron pot, Cover with stock, tomatoes and spices, stir well, cover, and cook for about 45 to 60 minutes until potatoes, pumpkin and cabbage are tender. Adjust the spices and serve or keep in the fridge for a few days.

Enjoy!


No-Bake Matcha Energy Balls {vg, gf}

My obsession with anything green continues. My love for matcha is not exactly a secret, and neither is my infatuation with these little no-bake babies that go by the name bliss balls or energy balls. Want proof that I am not a newbie to these things? See here, here, here, and here. So it was only a matter of time before matcha and energy balls would be happily married in my kitchen. Read: no-bake matcha energy balls.

Matcha Energy Balls
Matcha Energy Balls

Matcha does not only taste great – and coming from a green tea hater, this is saying something! – it is also much better for you than standard green tea. Matcha is brimming with antioxidants for that glow in your skin. It boosts memory and concentration – something we all need in our fast-paced lives – and increases energy levels without the coffee jitters. Whether you believe in detoxing or not, matcha green tea is a great way to purify your body and it strengthens your immune system, which is a great asset, especially in the shoulder seasons when the weather doesn’t really know what it wants. Matcha also greatly contributes to an improved mood, so with eight long Melbourne winter months ahead, it’s time to get your matcha in!

These balls are ridiculously easy and quick to make, so there’s absolutely no excuses to chomp down these matcha energy balls in 5 minutes! The only thing you might not have readily available in your pantry is the matcha powder. But I think I’ve offered enough reasons pro matcha, so: Get your hands on the matcha!

No-Bake Matcha Energy Balls


Makes 18 matcha energy balls (or less if you like them bigger)

One rounded, well-packed cup of dates (any kind) (approx. 200 g) (you might need to soak your dates in hot water for ten minutes if not using Medjool. Then drain well and use.)
One cup rolled oats
quarter cup desiccated coconut
2 tsp high-quality organic matcha powder, plus more for rolling

Soak and drain your dates as required. Blitz the oats up until they resemble a course meal. Add soaked and well-drained dates, coconut and matcha and mix on high until well combined. Shape 12 to 18 balls, roll in some more matcha powder if desired and store in the fridge.

Enjoy!


Happy St. Patrick’s Day: 3 Green Smoothies

Happy St. Patrick’s Day everyone! I hope you all have lovely plans for the weekend. Whether or not you are into St. Patrick’s Days festivities, green smoothies are a great way to get you off to a great way to get you off to a good start. You can cram pretty much any greens and other goodies into green smoothies and thus make sure you get a healthy dose of greens in before you start your day. Plus, they look lovely and are sure to brighten up your day in more way than one.

While I believe you should have green smoothies as often as possible, they are especially beneficial before and after a night out, be it for St. Patrick’s Day or not! Alcohol is a vitamin thief, so by having a green smoothie before and after drinking, you are replacing lost nutrients and hydrate your body as alcohol is dehydrating. A short sleep is also helped best by packing as much nutrients as you can into your morning drink. That way, you can dance the Saturday away and still enjoy Sunday lunch with your family.

Below are my three favourite green smoothies. Enjoy!

Superfood Smash Green Smoothie

Superfood Smash Green Smoothies

Serves One

One handfull of kale
A handfull of spinach
Handfull of lettuce
One small zucchini, chopped
One stalk celery, chopped
Small apple, chopped
Half a frozen banana
Dash of coconut water or plant milk to blend
One scoop vegan vanilla protein poweder
5 icecubes
Any additions such as wheatgrass etc.

Blend all ingredients in a high-powered blender and enjoy.


Green Warrior Smoothie

Warrior Green Smoothies

Serves One

One kiwifruit
One handfull of spinach
Half a small avocado
1 tbs chia seeds
One scoop vegan vanilla protein powder
A dash of almond milk
1 tsp barley grass powder
5 icecubes

Blend all ingredients in a high-powered blender and enjoy.


Anti-Hangover Green Smoothie

Hangover Green Smoothies

Serves Two

One handfull of baby spinach or lamb’s lettuce
One cup of coconut water
One scoop vegan vanilla protein powder
One inch piece fresh ginger, grated
2 Medjool dates
1 small zucchini or cucumber
One frozen banana
1 tbsp tahin
Dash of lemon juice

Blend all ingredients in a high-powered blender and enjoy.


Clean Oatmeal & Raisin Cookies {vg, gf, nf, sf}

My toddler has a pronounced sweet tooth and it is almost impossible to walk her past the cookie and biscuit aisle unscathed. While Tim Tams, Anzacs and co. might be an effective temporary solution to placate a whingeing 2-year old and prevent a mortifying tantrum, they aren’t exactly what the doctor ordered. Needless to say, this doesn’t only apply to kids but to adults as well. Store-bought cookies and biscuits are loaded with processed ingredients, industrial oils and refined sugar. Moreover, white flour (and yes, this applies to “gluten free” items as well that are essentially all refined starch) is nutritionally deplete and its only benefit is the benefit for the manufacturer – by making you eat more than you want or need. Healthy cookies seem to be a contradiction in itself, but I am here to rescue you with my clean oatmeal & raisin cookies.

These babies have four ingredients and require five minutes prep time. Loaded with valuable plant-based protein, slow-burning natural sugars, fibre, minerals, and vitamins, they are incredibly tasty and just perfect for when you’re feeling sluggish (and even when you’re not!). They are completely vegan (hence dairy and egg free), gluten free, soy free and nut free and don’t contain any nasties whatsoever. So what’s their secret? Oats and bananas!

In fact, making healthy cookies out of rolled oats and ripe bananas is nothing new. Social media are literally swarming with this concept, so I didn’t exactly invent it myself. I just played around with the ratios and then added some raisins and cinnamon. I was absolutely blown away by the result so if you are interested in some truly clean oatmeal & raisin cookies, here’s my solution. And guess what – my kid loves them and I love them too! (They are husband approved, too.)

Clean Oatmeal & Raisin Cookies

Makes 12

1 (rounded) cup rolled oats (certified gf if required)
2 ripe bananas
a handfull of raisins or sultanas
1 tbsp cinnamon to taste

Preheat oven to 180 °C and line a cookie sheet with baking paper. Mix all ingredients until you reach a homogenic and malleable mass. You don’t need a blender for this, just your hands and some elbow grease. Shape 12 ping-pong ball sized balls and press them flat into a classic cookie shape. Place on the sheet and bake for roughly 15 minutes or until lightly golden on top. Let cool completely, store in an airtight container in the fridge for up to three days (if they last that long).

Enjoy!