Buckwheat & Lentil Burgers {vg, gf}

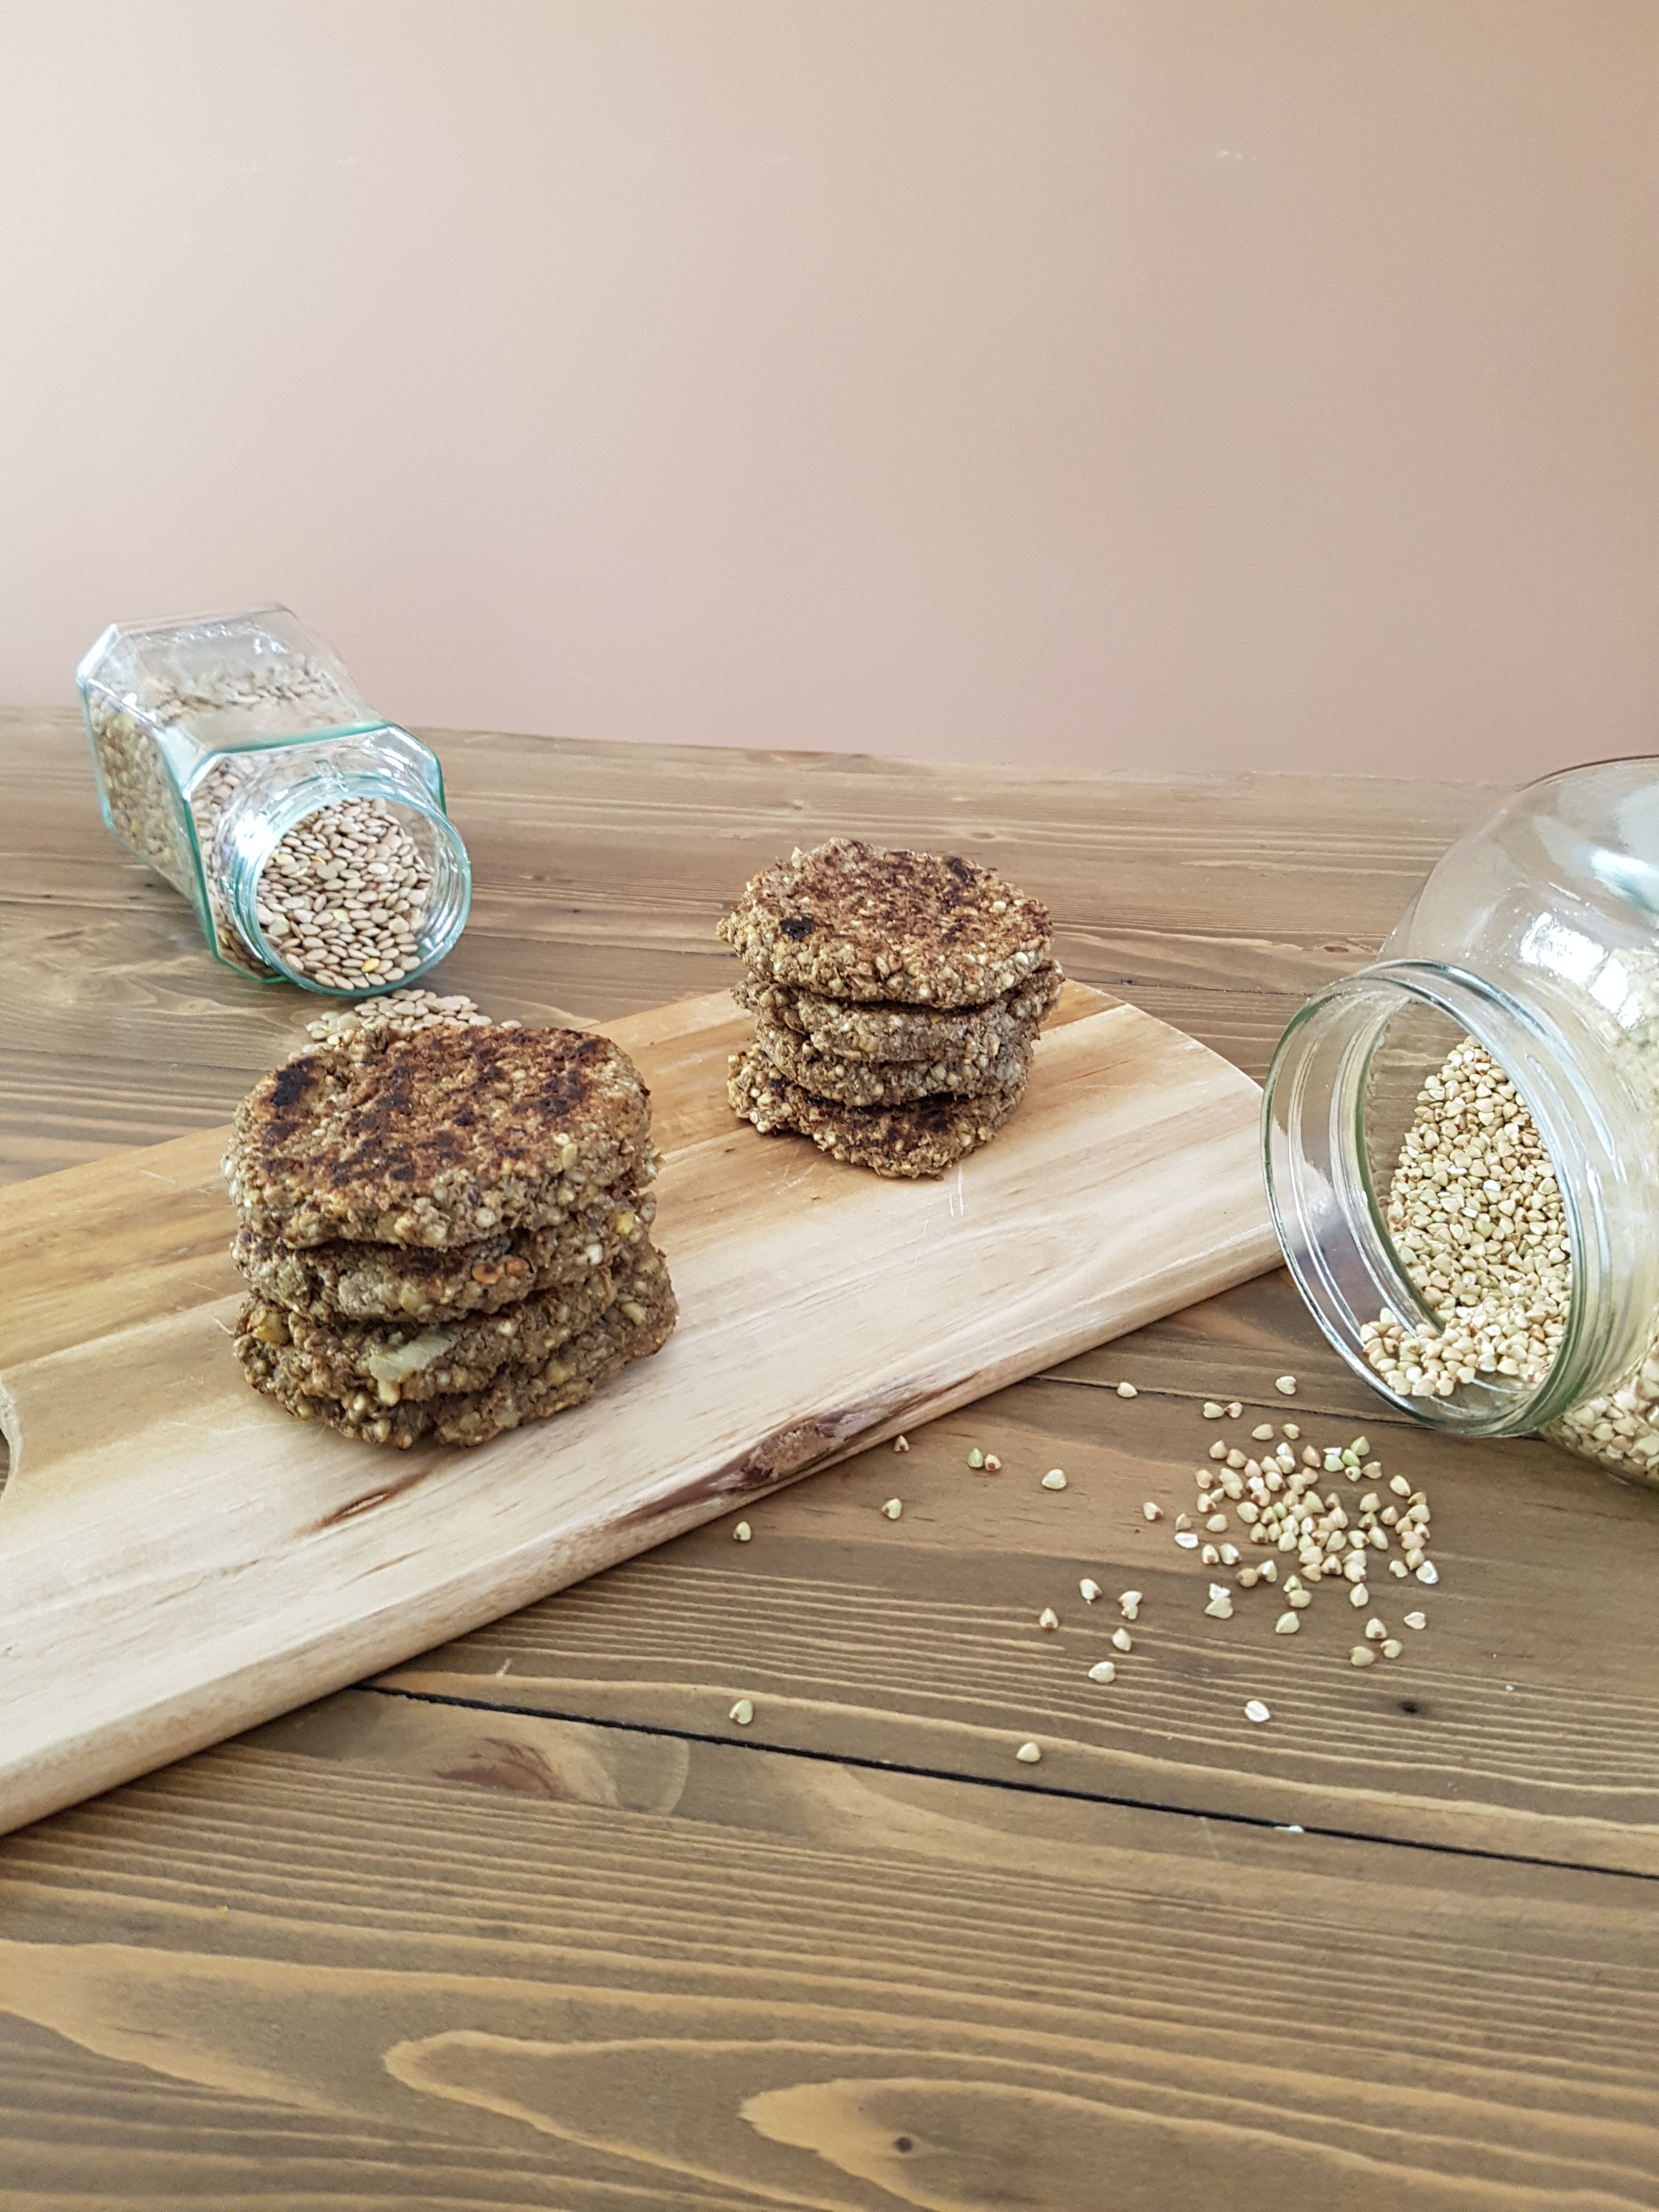
I did it. I created the perfect vegan (and gluten free) burger. This was preceded by one year of consistently trying to develop a recipe for a vegan gluten free burger that: a) would not fall apart when flipping, b) appeal even to the most ardent meat eater (my husband). I don’t want to spoil the ending for you guys, but: Everything sorted itself out in the end. I feel such a sense of achievement. Here they are…drumroll…my perfect buckwheat & lentil burgers.

If you are after a recipe for a vegan and gluten free burger, this buckwheat & lentil burger is the only one you’ll ever need! Both buckwheat groats and lentils are not only very cheap, but they are bursting with fiber and protein to make a meat burger pale in comparison. Far from just being another hipster food, buckwheat has traditionally been consumed for thousands of years, and for good reason! It is shock-full of antioxidants for a healthy heart and glowing skin and it boasts a unique amino acid combination compared to other grains. Buckwheat has been linked to lower cholesterol and blood pressure, and even the grain-phobic paleo community is in favour of buckwheat (which is actually not a grain, but a seed). Other benefits include an array of vitamins and minerals such as magnesium, manganese, phosphorus, and folate. And as buckwheat cooks a lot quicker than rice or quinoa, it is a great hassle-free addition to your pantry.

Lentils are a favourite among vegans and vegetarians. With a whopping 18 grams of protein per cup they keep you full and happy and are the perfect argument when you get asked: “Where do you get your protein?”. Lentils’ high level of soluble fiber has cholesterol-lowering benefits, improves digestion and keeps your arteries clean. Besides, its slow-burning carbs provide sustained energy and keep cravings at bay. All the more reason to include lentils in your diet more often – whether you are vegan or not!

Back to these burgers. So they are a nutrition bomb, easy to make, and – yes – they are indeed delicious. They are “meaty”, hearty, comforting, filling, satisfying, they don’t crumble, they are perfect. Bursting with high-value plant protein while boasting a moderate amount of healthy carbs and being low in fat, they make for a perfect main meal or snack. They are ready in 20-25 minutes – no chilling of the “batter” required – and freeze beautifully. So please add this recipe to your repertoire. You will know why!

Buckwheat & Lentil Burgers

Makes 12 burgers

1/2 onion, diced
2 cloves garlic, minced
One cup dried green lentils
One cup raw buckwheat groats
2 cups vegetable stock
2 cups water
3 tbsp spice blend of choice (I used turmeric, cumin,coriander, cardamon, black pepper, nutmeg, cayenne pepper and paprika)
1 tsp salt
1/3 cup LSA
2 tbsp chia seeds

Sauté the onion and garlic in a large stockpot until soft and the onion is translucent. Add the lentils, buckwheat, stock and water and simmer together until the lentils are soft and the liquid is absorbed (this will take around 15-20 minutes). Let the mixture cool down a bit, then transfer to a high-powered blender with the spices, salt, LSA and chia. Blend in increments until you achieve a malleable mass. Be careful as the mixture will still be hot. Once no longer hot to the touch form 12 patties. Heat a non-stick pan (you might need to slightly oil it). Once it is hot, fry the patties about three to four at a time, depending on the size of your pan. Fry for approx. 3-4 minutes, then check with a spatula if they are dry underneath. If they seem dry and move easily around the pan, flip. They should be browned on the fried side. Fry for 3-4 minutes on the other side. (Depending on your stove and pan, it may take up to 5 minutes.)

Enjoy!

Blueberry Muffin Smoothie Shake {vg, gf}

Unless you lived under a rock this past year, you would have probably tried a smoothie for breakfast. You might have had a smoothie on top or instead of your usual meal. Maybe you’ve read that it’s a great way to get nutrients in. After all, you can pretty much put anything in it. Or maybe you wanted to try this lowcarb double chocolate weightloss shake your co-workers are raving about. After all, it was half-price at the supermarket this week. Chances are, you were hungry again one hour later and reached for your colleague’s snack size mars bars or got some exercise by getting that enticing blueberry muffin in the café down the road. With a large full-cream latte and two sugars, of course). Bye bye, healthy goals for the new year! To avoid scenes like that from now on, here comes my blueberry muffin smoothie shake!

The truth is, while I am a big fan of smoothies for breakfast or any time of the day for various reasons (as demonstrated here, here, here and here), blended fruits and vegetables are not a complete meal, not even if you add protein powders. It’s healthy, slow-burning carbs from starchy wholefoods such as grains and legumes that keep you full until lunch (and away from the patisseries and vending machines). This blueberry muffin smoothie contains fruit, your favourite milk and favourite protein powder just like any other smoothie, but with the addition of oats (preferably soaked overnight for an ultracreamy texture). I can’t praise the benefits of oats highly enough, and one of their definite perks is that while they do contain carbs and fat, you get a lot of satisfaction per calorie so to speak as they keep your belly full and happy for many hours and are therefore a health geek’s BFF.

I called this a blueberry muffin smoothie shake as it tastes a bit like a blueberry muffin, though much much better for you. It is thick, creamy and immensely satisfying. Customise this according to your liking. Sub your favourite fruit, milk, sweetener or protein powder. Add your supplements and/or some greens to supercharge your breakfast or afternoon snack. If you want to take this a step further, you could use soaked buckwheat groats instead.

Blueberry Muffin Smoothie Shake

Serves 1

Half a cup rolled oats, soaked overnight in water or plant milk (use certified gluten free if required)
a handfull of frozen berries
one scoop of protein powder (if using plain protein powder, add some vanilla and stevia or your favourite sweetener to taste)
half a tsp of cinnamon
any supplements (maca, probiotics etc.)

Simply blitz all ingredients in a high-powered blender and enjoy! You probably don’t need any more liquid as the soaked oats will be liquidy, but feel free to add more plant milk to achieve the desired consistency.

Enjoy!

Skinny Parsnip and Peanut Soup (4 ingredients!) {vg, gf}

I do love a good soup, regardless of the weather. And I happened to have a lot of parsnips in this week’s vegetable box delivery (hello, autumn!). Parsnips that were slowly wilting away, screaming at me: “Turn me into a soup!”. I listened to them. And because I am a sucker for unconventional combos, the result was a parsnip and peanut soup. A skinny parsnip and peanut soup, to be precise.

To be honest, I am not the hugest fan of parsnips. I don’t particularly like their texture and the taste does nothing much for me, not even roasted. Throw the good ol’ spud and peanut butter into the equation, however, and magic happens. You don’t even necessarily need the peanuts, I just think it really adds some depth of flavour and it actually works really well with the parsnips and potatoes even though it seems like an unusual pairing. The starchiness of the root vegetables and the creaminess of the nuts just takes this soup to a whole new level of goodness. I used defatted peanut butter powder (pb2) to lower the fat content. However, you could use ground peanuts (or other nuts) or peanut butter instead and this soup would still be very low in calories albeit satisfying.

As a full-time working mum far away from my family (sniff), I take my commitment to create easy, quick and hassle-free recipes very seriously. This soup requires just four ingredients (yes, four!) and a minimal amount of time to prepare. It is also ridiculously fool-proof so you will have absolutely no excuses not to try it! Given that the required ingredients are fairly cheap, this is also a very budget-friendly soup. It is ideally suited to prepare as a big batch and store leftovers in the fridge or freezer. Presented in a beautiful bowl and with some fancy toppings, this soup is also impressive enough to serve at your next dinner party.

Note that if you don’t have or don’t want to use vegetable stock, it’s totally fine to use water instead (that’s what I did). You just need to add salt, pepper and other spices (such as garlic powder) to taste. The stock will make it even more flavoursome but I have tried it both ways and it works beautifully with just the water as well. For what it’s worth, I don’t peel my veggies as it all gets blended up anyway and I use organic but I know tut shat most peaople like to peel their veggies. 😉

Skinny Parsnip and Peanut Soup

Serves 2-4

1 lb (ca. 500 g) potatoes, washed, peeled (optional), and cut into small pieces
4 parsnips, washed and cut into small pieces
3 cups vegetable stock (or water plus salt, pepper, garlic powder and other spices to taste)
2 tbsp powdered peanut butter OR peanut butter OR ground peanuts (or other nut butter or nut meal)

Steam or microwave the vegetables until tender. Bring stock or water and spices to the boil, add the steamed veg and peanut butter/powder, stir and then blend with a stick blender until smooth and creamy. The soup will seem to be liquid and frothy at first, but hold on and it will turn creamy!

Enjoy!

Healthy Vegan Palak Paneer (Tofu and Kale Curry)

Indian cuisine is delicious, flavourful, nourishing and has great options for vegan and gluten free dietary requirements. But let’s face it, with its ample use of oil, cream and cashews, it is generally not the healthiest food going around. If you fancy spicy Indian flavours without sacrificing your waistline, I am here to your rescue with this super-quick, ultra-easy, mega-delicious and, yup, healthy vegan palak paneer (aka tofu and kale curry).

I know that palak means spinach and not kale, and that paneer is the name of an Indian cow’s milk cheese, neither of which feature in this dish. Consider my version as a hipster take on palak paneer: lots of protein and only very little fat from silken tofu in combination with superfood kale. Though it is a perfectly good option to use spinach or other leafy greens here, kale is what I had on hand, so kale it was. You could use firm tofu instead of silken tofu here, but I find the silken tofu makes this dish a bit more creamy.

This healthy vegan palak paneer is really easy to put together with just a handful of basic ingredients. Hello easy weeknight meal. Probably the only obscure ingredient I used was powdered peanut butter aka pb2 which might be hard to get so you can use ground cashews instead which would be more authentic but also packs more fat. I used a very light coconut milk for drinking from Vitasoy with only 2% fat which is almost nothing but still conveys this dreamy coconut flavour. You could use a fuller fat coconut milk or other plant milk instead.

Healthy Vegan Palak Paneer

Serves 2

1 block (300g) silken tofu, pressed to remove moisture and cubed
half a tsp or more of sea salt
4 tsp powdered garlic
1 tsp ground ginger
1-2 tsp mild or hot curry powder or garam masala
pinch of kashmiri chilli if you like it hot
250g fresh or frozen kale, thawed
half a cup very light coconut milk or plant milk
2 tbsp powdered peanut butter or ground cashews
a tbsp desiccated coconut

Heat the tofu in a large frying pan with salt, garlic, ginger, curry powder and chilli. You can use a bit of oil or, as I prefer, a bit of water to prevent sticking. Cook for a minute, add the milk, then add the kale and mix with the tofu without breaking up the tofu too much (it should still have the shape of cubes). Adjust the spices according to your tastebuds and cook a few more minutes until your desired consistency is achieved. Add the powdered peanut butter or ground cashews and coconut. Serve with saffron rice or with my 5-minute gluten free naan.

Enjoy!

Tofu Stir Fry with Black Bean Noodles {vg, gf}

Stirfry for me is the ultimate comfort food. It is vibrant, full of flavour, satisfying and warming, and I love how versatile it is. Stirfrying means cooking more quickly. Vegetables therefore retain more nutrients. And because stirfrying is so quick, it means less time standing in front of the stove and more time eating! Stirfrying for the win! Here goes my vegan tofu stir fry with black bean noodles. It is ultra quick (about 15-20 minutes) so there are absolutely no excuses for not dishing up a delicious and healthy meal on a week night! (Or any night, for that matter.)

Now, this does not need to be a tofu stir fry and you don’t need to use black bean noodles. I just used them as I think they work well together. I have come to really appreciate bean noodles. They are quite a bit lower in calories and higher in fibre than regular or processed gluten-free noodles/pasta, and they cook in a fraction of the time. If you can’t get your hands on black bean noodles, not to worry! Just use your favourite noodles or zoodles instead. This dish will still be delicious. If you don’t like tofu you could use tempeh (also have a look at my tempeh curry recipe here) or if you avoid soy simply use more veggies or try something new by making chickpea “tofu”. The options are endless.

That’s what I like about these kind of meals. No-one nowadays has the time or desire to go shopping every day so it’s imperative to have a handfull of standby recipes in which you can use whatever you have on hand.

Tofu Stir Fry with Black Bean Noodles

Serves 2

1 pack (300g) tofu, cubed
4 tbsp tamari
2 tbsp maple syrup
4 cloves garlic, minced
1 tbsp apple cider vinegar
1 tbsp ground ginger
half a tbsp sesame oil

dash of fresh lime juice
salt, pepper and chilli to taste

black bean noodles or other noodles (amount to taste)
dash of water or vegetable stock
about a pound (approx. 450-500 grams) mixed vegetables such as green beans, broccoli, sweetcorn, green peas, capsicum, carrots…
cashew nuts, fresh coriander, fresh chilli to serve (optional)

Mix the tamari, maple syrup, garlic, oil, vinegar, ginger, lime juice and spices in a medium bowl, then add the tofu and let sit for 5-10 minutes to soak up the marinade. Prepare the noodles according to the manufacturer’s instructions. Heat water or stock in a large frying pan or, better, a wok, and blanch the vegetables for a couple of minutes. Take out the veggies, then add the tofu with all of the marinade, cover and let cook for 5-10 minutes. Add the veggies, mix in thoroughly and cook for another two minutes. Turn off the heat, toss in the noodles and mix everything through. Adjust the spices and let sit for a minute. Serve with cashews, coriander and chilli according to your liking and…

Enjoy!


Ultracreamy Green Smoothie (with secret ingredient!)

No food blog – and no hipster café – is complete without a green smoothie nowadays. And that’s why I don’t want to hold back with my ultracreamy green smoothie.

Green smoothies can be a bit like cold vegetable soup. They are usually not creamy and indulgent unless they have lots of avocado and/or nut butters in. Now, dont get me wrong, avocado is definitely one of the healthiest foods under the sun and I love them (Avocado tarts or avocado brownies, anyone?). If you are trying to limit the fats in your diet, however, or have financial constraints (as avos can be rather exxy), they might not be your first choice. Thankfully, you can have an ultracreamy green smoothie without the fat – and we are not talking a chemical crap fest here like many things are that are labelled “low fat”, we are talking…beans.

Yes, you read that right. This smoothie contains beans. The protein and starch in the beans provides for ultimate creaminess, bulk and fluffiness as you would normally only achieve by putting LOTS of bananas and LOTS of avocado in. Just 2 tablespoons of any beans mean that you save a lot of avocado fats and banana sugar and still devour ultracreamy goodness! Not to mention that this sneaky addition costs you, like, between 10 and 20 cents, even if you buy organic. So how does that sound?

This smoothie is not only ultracreamy and ultradelicious, it is also ultragood for you. We all know the benefits of leafy greens which should be on our menu daily. The reality is, thinking of a fancy dinner involving several types of leafy greens is a nice idea for us that is hard to put into practice. I am a full-time working mum so I know how hard it can be to get your daily serves of veggies in! A green smoothie is the quickest, easiest and yummiest way to start the day on the right foot or get that mid-afternoon lift you are craving.

Adding beans does not only provide bulk and creaminess, with their protein and fibre this smoothie will keep you full for a long time!

Are you in?

Ultracreamy Green Smoothie

Serves one

2 handfulls of kale or lettuce
2 handfulls of spinach or silverbeet
1 frozen banana
2 tbsp tinned beans of choice
1/2 cup coconut water (or other liquid of choice)
1 scoop vegan protein powder
matcha powder or other greens powder (optional)
any other supplements such as probiotics, maca, ashwagandha… (optional)
a handfull of ice cubes

Blend all ingredients bar the ice cubes in a high-powered blender until smooth. Add the ice cubes and blitz in.

Enjoy!

Homemade Oat Milk

I know. Every man and their dog is making homemade almond milk these days. And hey, why not? It is easy enough if you have a high-powered blender. Store-bought plant milks are expensive and often have some fillers or other additives, so making your own plant or nut milk is better for your health and better for your wallet. So yeah homemade almond milk is all the buzz right now, but have you tried making your own homemade oat milk?

Like almost everything else I make, making homemade oat milk happened by chance. A while ago, I was making a vegan cashew panna cotta for my husband based on this recipe which calls for blending cashews in water until you achieve a creamy “milk”. I was absolutely blown away how delicious this cashew mylk was and how easy to create – especially given the astronomical prices they charge for nut mylks in the shop! So it has been at the back of my mind to make my own plant and nut mylks.

Then, a couple of days ago, I had tried a new brand of almond milk (not mentioning any names here) which I really did not like all that much. It was overly sweet, had a funny marzipan flavour and curdled horrendously in coffee. I remembered my goal to create my own plant milks. As oat milk has always been one of my favourite vegan milks and oats are also considerably cheaper than nuts, here was my project!

It dod not take much experimenting as this worked out quite well at the first shot. I blended 1 cup of quick oats with 3 cups of filtered water. This ratio produces a very thick and creamy milk which I love but you could also try a ration of 1:4 which would produce a slightly thinner milk. Just experiment! I don’t add any sweeteners but you could try adding a tablespoon or so of your favourite liquid sweetener (maple syrup, date syrup or coconut syrup would probably work best). You could also try adding some vanilla essence or cocoa powder or any other flavour you fancy. Then, just strain the milk in a bottle, chill and enjoy!

Note, there will be sediment so you need to shake your bottle well before every use. This is all natural, so it is not a 1:1 replacement for store-bought mylks which often have a lot of stabiliser and thickeners added. It is not perfect but I think it is a good and economical alternative to store-bought plant milks!

Homemade Oat Milk
Homemade Oat Milk
Homemade Oat Milk

Makes about a pint of oat milk

1 cup quick oats (use certified gluten-free of gluten free)
3-4 cups filtered water
optional: 1 tbsp liquid sweetener, pinch of salt, vanilla essence

Blitz all ingredients on a high powered blender until smooth, milky and the oats are completely broken up. Strain the milk into a bottle. The leftover oat pulp is delicious scooped out and also serves as a great thickener for smoothies and nicecreams! Store your homemade oat milk in the fridge for up to 5 days. Remember that there will be sediment so shake your milk bottle thoroughly before use.

Enjoy!

Salted Caramel Protein Bites {vg, gf}

I know it’s getting a bit much with all my energy/bliss ball-y things lately (see here, here and here). But one bite into these beauties and I knew I could not wait another day to share these with you. I know you guys love salted caramel. And I know you love protein bites. Enter…salted caramel protein bites!

These came about as I tried to recreate one of those crazy expensive and filled-to-the-brim with junk store-bought protein bars. The combination of dates and oats has never disappointed me and I figured that with the addition of my favourite vegan protein powder I’d be able to make the perfect protein bar. But then it just seemed easier to go down the bliss ball route again. So here we are. Unfortunately or fortunately, I tasted the “batter” while making these balls and got so addicted that I devoured a considerable part of the mix (so you might well be able to yield more than 30 balls out of this recipe). I could not get over how much these tasted like salted caramel!

I hate the word amazeballs, but it pretty much does them justice!

Salted Caramel Protein Bites

Makes 30 bites

2.5 cups rolled oats
3/4 cup packed pitted dates (any kind)
1/4 cup coconut syrup (you can try other liquid sweeteners, but I find the coconut syrup really gives it that deep malty, caramelly taste that we want)
1/4 cup filtered water
4 rounded tbsp (ca. 40-45 g) vegan vanilla protein powder (I use Amazonia Raw Fermented Paleo Protein)
dash of vanilla extract
healthy pinch of Maldon sea salt

First, blitz the oats in a high-powered blender until you reach a rough flour consistency. Add the remaining ingredients and blend until the mixture comes together and holds its shape but is not overly sticky. Shape into balls and store in the fridge.

Enjoy!

Vegan Vietnamese Pho {gf}

Brace yourself peeps, because here comes one of the most delicious, wholesome and satisfying meals you’ll ever make. I am not exaggerating. If you like Asian cuisine, you are going to love this. And who doesn’t love a good soup? I am a big fan of soups of all kind. They are easy, quick and yummy. They are extremely flexible and versatile and a great way to use up leftover veggies. Take that, limp celery! Which means they are economical and help to reduce food waste. A big win all round! Depending on the ingredients you use, they are also one of the cheapest meals you can make. And this vegan Vietnamese pho ticks all the boxes.

What I love about pho is that it is so filling and yet very low in fat. It is also a great all-year round meal. In winter it warms you up, and in summer it is a nice light and refreshing lunch or dinner that doesn’t weigh you down. I love Asian cuisines (the authentic ones, not the usual greasebomb takeaway places in Western countries) – whenever I eat Asian, I really feel how the food just takes all the bad things out of my body. However, eating out Asian can be a challenge if you are vegan (or vegetarian, for that matter). Especially the Vietnamese cuisine tends to be meat-heavy, and you can be hard-pressed to find something truly vegan in a Vietnamese restaurant.

This is where my vegan pho comes in. Filled to the brim with veggies, cubed tofu for the protein and “zoodles” instead of noodles (although you can use any noodles you like), this is one explosion of flavours that is low in carbs, calories and fat, but does not skimp on the taste and nutrition front. See for yourself!

Vegan Vietnamese Pho

Serves 2

750ml vegetable stock
4 garlic cloves, minced
a handfull of leeks (only white and light green part, washed and finely chopped)
3 stalks of celery, washed and finely chopped
a pound (ca. 500 g) mixed vegetables (I used carrots, broccoli, green beans, capsicum, onions and baby corn)
a teaspoon ground ginger
teaspoon hot curry powder
a teaspoon of black pepper

half a teaspoon ground cinnamon
half a teaspoon of salt
dash of lemon or lime juice
toppings (optional): fresh coriander, fresh chillies, fried shallots, nuts….

For the zoodles:
2 medium zucchini (or equivalent amount of other noodles)
2 tbsp tamari

And also:
300 g firm tofu, cut into cubes

Fry the garlic in a large saucepan until aromatic, add the stock, leeks, celery and vegetables and bring to the boil. Add the spices, turn down the heat and cook until the vegetables are just tender (do not overcook!). Meanwhile, prepare the zoodles, toss in the tamari and divide into two bowls. Top with the veggies, broth and tofu and top with your toppings if using.

Enjoy!

Raw Vegan Matcha and Coconut Tart {nut free}

I love oxymorons. Hello, healthy brownies, lowfat chocolate cake, vegan bolognese, oil-free muffins and dairy-free icecream. Just like it seems to be a given that brownies are unhealthy and spag bol involves meat, the labels “raw vegan” and “nut free” do not seem to go together. Raw vegan desserts generally contain a lot of raw nuts to replace grains which you cannot consume in a raw state. Not so this raw vegan matcha and coconut tart. I used desiccated coconut instead of nut meal. Coconut is botanically not a nut so many people with a nut allergy are able to consume coconuts. Great news if you have a littlie with a nut allergy! If you are not a fan of matcha or can’t get your hands on some you can omit it (in which case this would be just a raw vegan coconut tart) or use for example some lime zest to make raw vegan lime and coconut tart.

I am usually not a huge fan of raw vegan desserts. Nothing against nuts in moderation, but raw desserts contain such high amounts of nuts that I find them really heavy in the stomach. Also, a dessert or snack should not contain the calories of a full meal which raw desserts often do, so that is why I have not ventured down this path yet. But as I found myself in a situation where I had some avocados to use up, I was thinking of this raw dessert as I have used avocado in icecream before.

Raw Vegan Matcha and Coconut Tart

This is a delightfully creamy, dreamy and comforting dessert that will satisfy any naughty cravings you might have. It is quite a bit higher in fat than I’d prefer but the fat from this tart is super healthy fat from coconut and avocado – the two healthiest fats you can consume! Add to this magnesium, fibre and slow-releasing energy from the dates and it’s clear to see that this indulgence is a healthy treat. Just don’t go overboard – the recipe below yielded 3 small tarts with 10 cm diameter. I’d suggest quartering every tart so that you get 12 individual portions put of this. A little goes a long way!

As I mentioned, I don’t make too many raw desserts, so I hope you enjoy this one!

Raw Vegan Matcha and Coconut Tart

Serves 12

Base:
1 packed cup pitted dates (Medjool or Deglet Noor)
3/4 cup desiccated coconut
2 tbsp raw cacao
pinch of Himalyan sea salt

Filling:
1 large ripe avovado (ca. 200 g)
1 large ripe banana
1/4 cup desiccated coconut
3 tbsp coconut or maple syrup
juice of half a lemon

Blend the ingredients for the base in a high-powered blender, then press evenly into a greased and/or lined baking pan. You can use a 20 cm diameter round pan or three small pans of 10 cam diameter each. Put into freezer. Clean out the blender and blend the ingredients for the filling. Pour on top of the frozen base and let freeze for at least another hour. Store in the freezer.

Enjoy!