Homemade Oat Milk

I know. Every man and their dog is making homemade almond milk these days. And hey, why not? It is easy enough if you have a high-powered blender. Store-bought plant milks are expensive and often have some fillers or other additives, so making your own plant or nut milk is better for your health and better for your wallet. So yeah homemade almond milk is all the buzz right now, but have you tried making your own homemade oat milk?

Like almost everything else I make, making homemade oat milk happened by chance. A while ago, I was making a vegan cashew panna cotta for my husband based on this recipe which calls for blending cashews in water until you achieve a creamy “milk”. I was absolutely blown away how delicious this cashew mylk was and how easy to create – especially given the astronomical prices they charge for nut mylks in the shop! So it has been at the back of my mind to make my own plant and nut mylks.

Then, a couple of days ago, I had tried a new brand of almond milk (not mentioning any names here) which I really did not like all that much. It was overly sweet, had a funny marzipan flavour and curdled horrendously in coffee. I remembered my goal to create my own plant milks. As oat milk has always been one of my favourite vegan milks and oats are also considerably cheaper than nuts, here was my project!

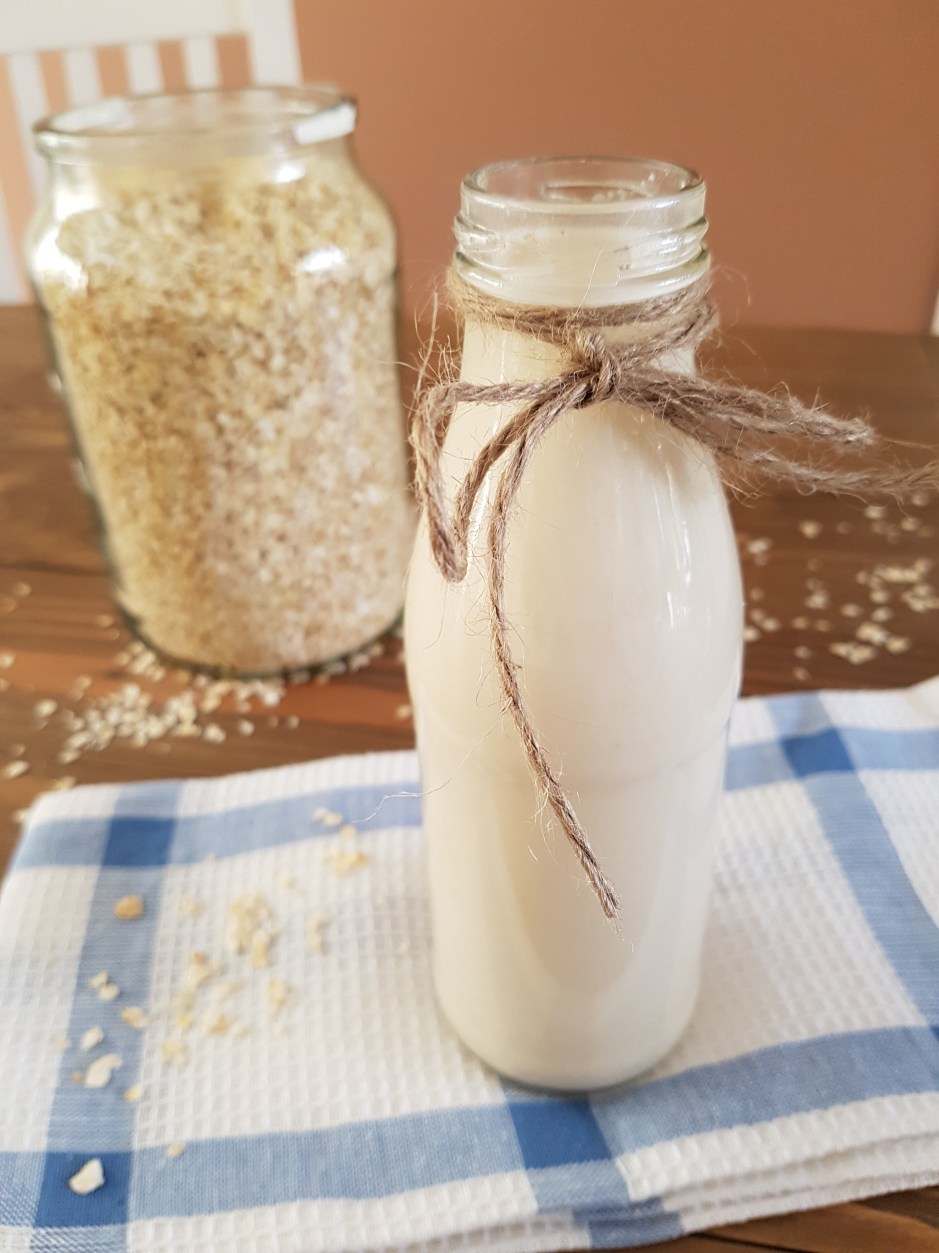
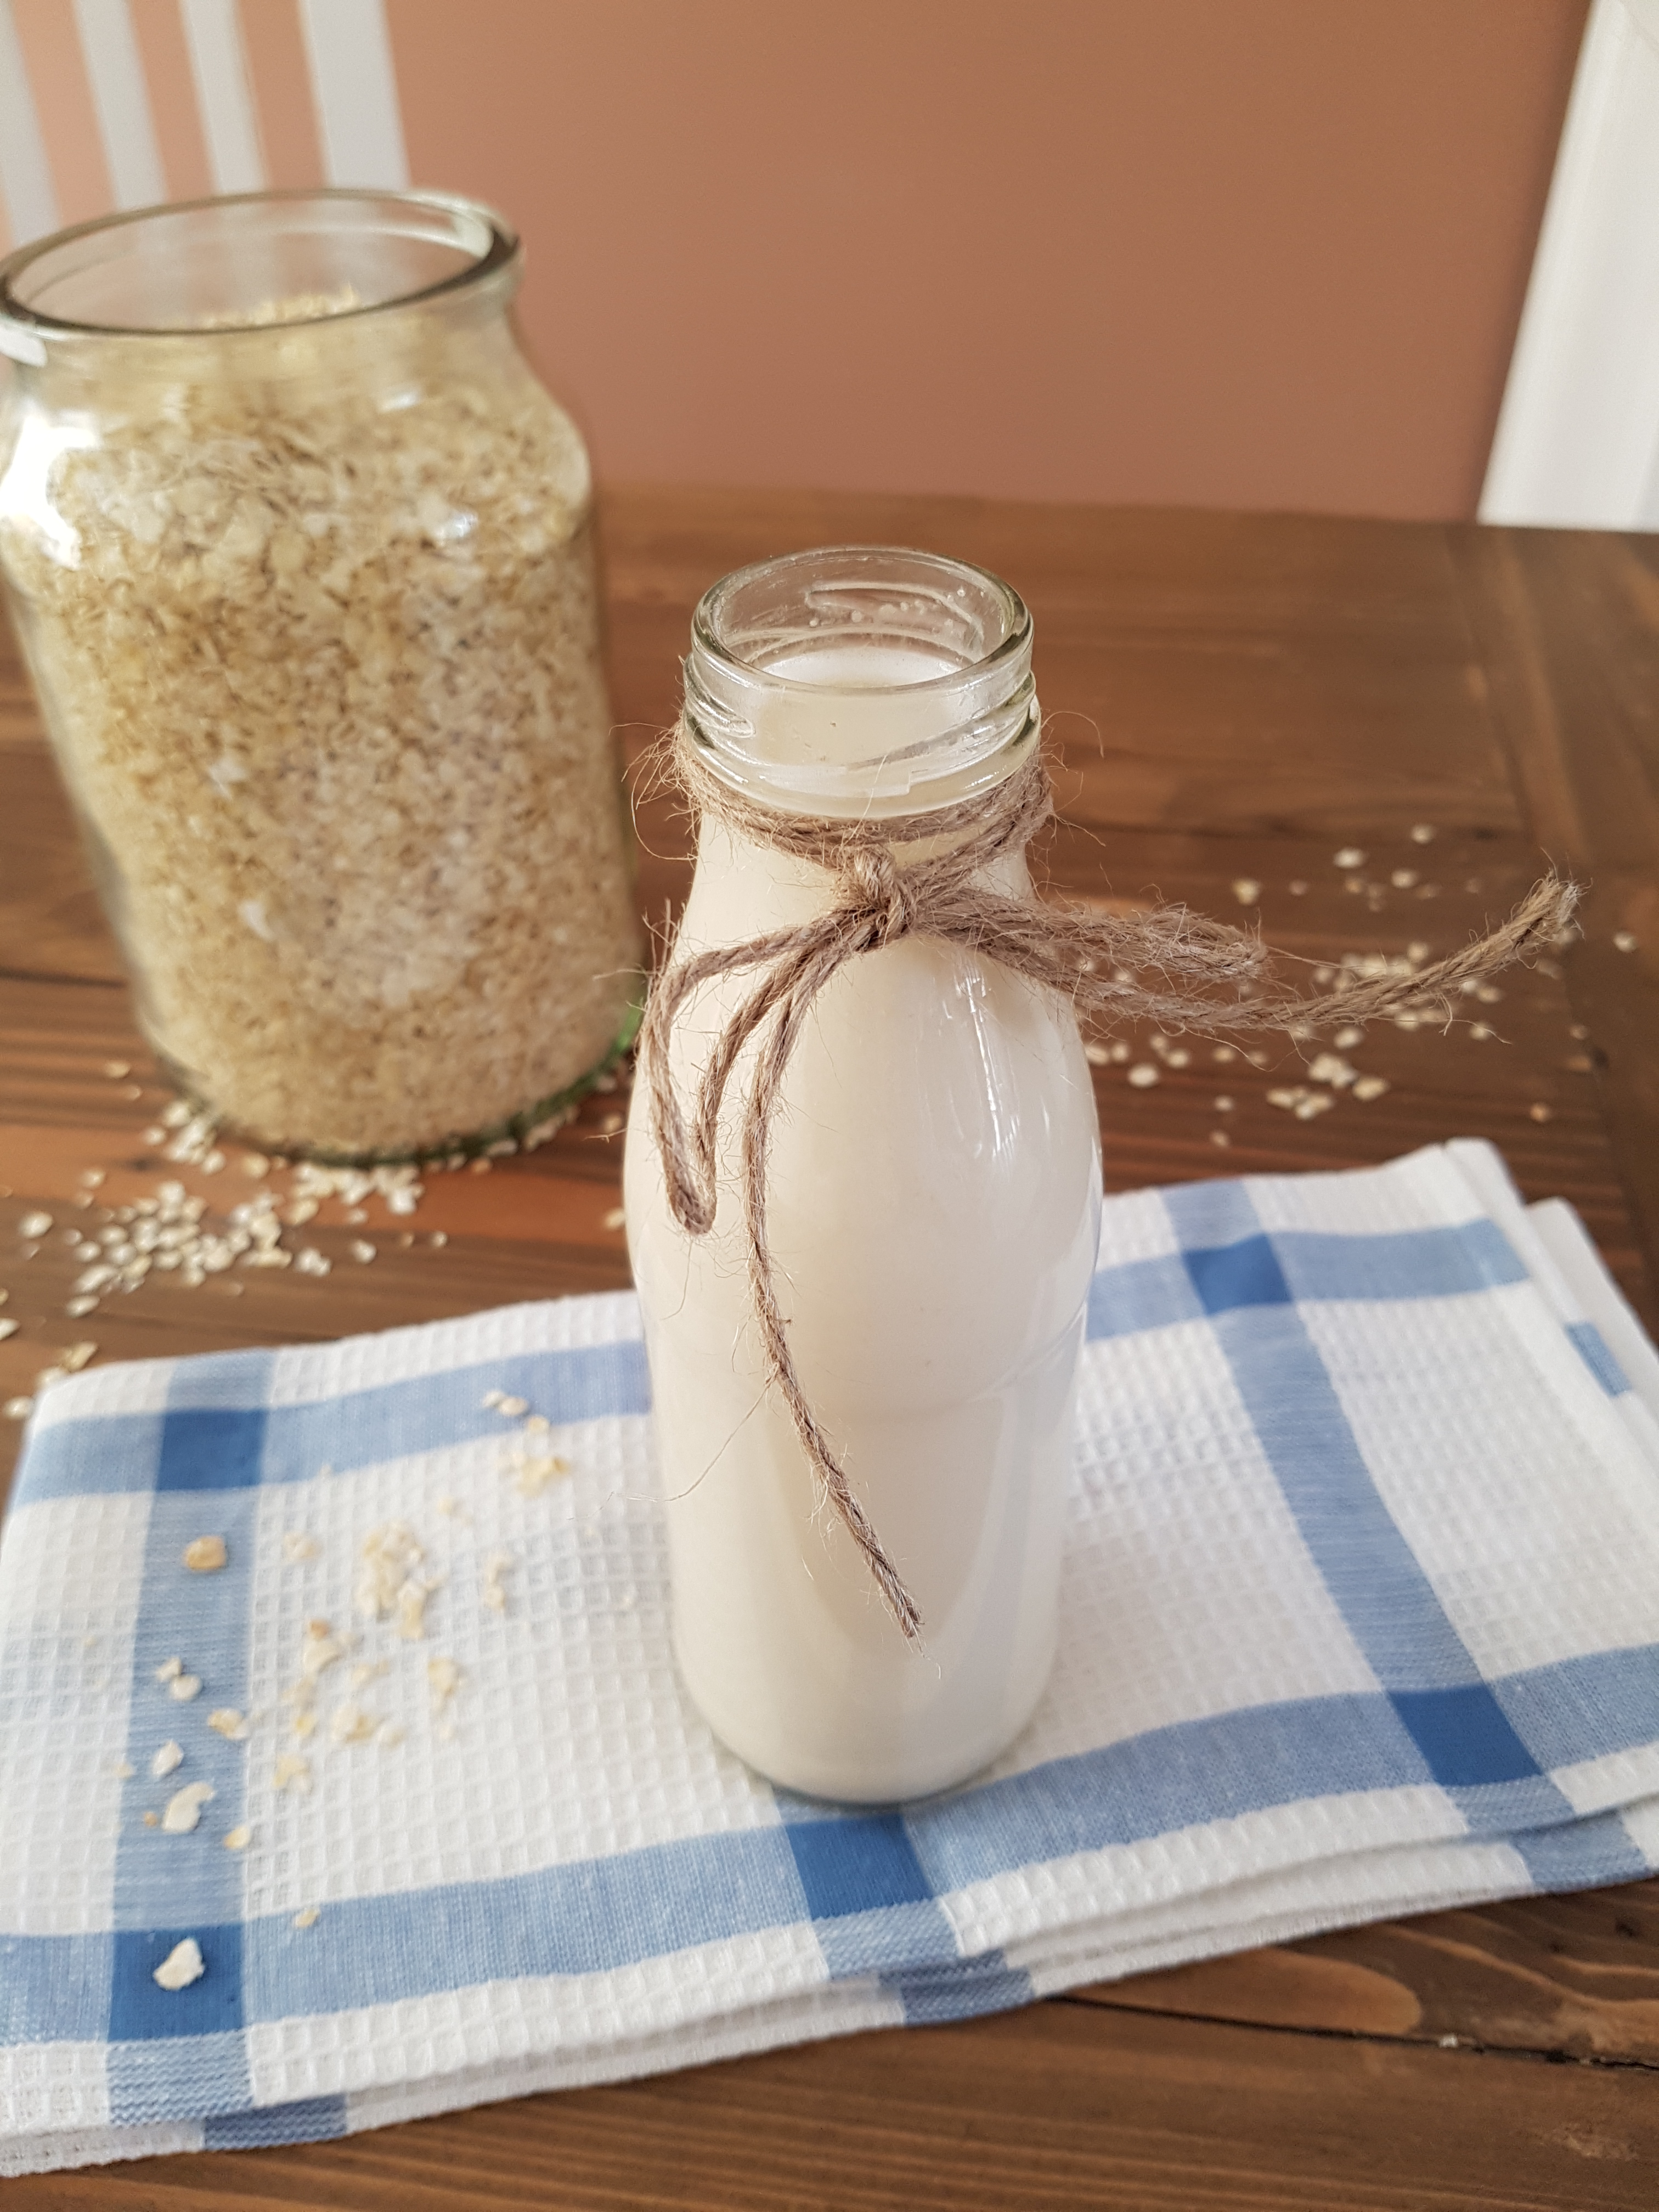
It dod not take much experimenting as this worked out quite well at the first shot. I blended 1 cup of quick oats with 3 cups of filtered water. This ratio produces a very thick and creamy milk which I love but you could also try a ration of 1:4 which would produce a slightly thinner milk. Just experiment! I don’t add any sweeteners but you could try adding a tablespoon or so of your favourite liquid sweetener (maple syrup, date syrup or coconut syrup would probably work best). You could also try adding some vanilla essence or cocoa powder or any other flavour you fancy. Then, just strain the milk in a bottle, chill and enjoy!

Note, there will be sediment so you need to shake your bottle well before every use. This is all natural, so it is not a 1:1 replacement for store-bought mylks which often have a lot of stabiliser and thickeners added. It is not perfect but I think it is a good and economical alternative to store-bought plant milks!

Homemade Oat Milk
Homemade Oat Milk
Homemade Oat Milk

Makes about a pint of oat milk

1 cup quick oats (use certified gluten-free of gluten free)
3-4 cups filtered water
optional: 1 tbsp liquid sweetener, pinch of salt, vanilla essence

Blitz all ingredients on a high powered blender until smooth, milky and the oats are completely broken up. Strain the milk into a bottle. The leftover oat pulp is delicious scooped out and also serves as a great thickener for smoothies and nicecreams! Store your homemade oat milk in the fridge for up to 5 days. Remember that there will be sediment so shake your milk bottle thoroughly before use.

Enjoy!

Salted Caramel Protein Bites {vg, gf}

I know it’s getting a bit much with all my energy/bliss ball-y things lately (see here, here and here). But one bite into these beauties and I knew I could not wait another day to share these with you. I know you guys love salted caramel. And I know you love protein bites. Enter…salted caramel protein bites!

These came about as I tried to recreate one of those crazy expensive and filled-to-the-brim with junk store-bought protein bars. The combination of dates and oats has never disappointed me and I figured that with the addition of my favourite vegan protein powder I’d be able to make the perfect protein bar. But then it just seemed easier to go down the bliss ball route again. So here we are. Unfortunately or fortunately, I tasted the “batter” while making these balls and got so addicted that I devoured a considerable part of the mix (so you might well be able to yield more than 30 balls out of this recipe). I could not get over how much these tasted like salted caramel!

I hate the word amazeballs, but it pretty much does them justice!

Salted Caramel Protein Bites

Makes 30 bites

2.5 cups rolled oats
3/4 cup packed pitted dates (any kind)
1/4 cup coconut syrup (you can try other liquid sweeteners, but I find the coconut syrup really gives it that deep malty, caramelly taste that we want)
1/4 cup filtered water
4 rounded tbsp (ca. 40-45 g) vegan vanilla protein powder (I use Amazonia Raw Fermented Paleo Protein)
dash of vanilla extract
healthy pinch of Maldon sea salt

First, blitz the oats in a high-powered blender until you reach a rough flour consistency. Add the remaining ingredients and blend until the mixture comes together and holds its shape but is not overly sticky. Shape into balls and store in the fridge.

Enjoy!

Maca Espresso Energy Balls {gf, vg, nut free}

I hope you love all my recipes, but you gotta love these maca espresso energy balls. If you don’t – seriously, what’s wrong with you? Just kidding, I mean, no kidding. These energy balls are so crazy insanely delicious it is actually a sin I haven’t put them on the blog sooner. They are buttery, scrumptious, decadent…I am lost for words. And they pack a serious nutritional punch. All this requires five super-healthy ingredients and five minutes of your time. Yes, that’s right.

Maca Espresso Energy Balls

Want to know what’s in them? Five superfoods that will get you out of your afternoon slump before you have time to yawn:

Medjool dates – chock-full of fibre, aminoacids, potassium, zinc, magnesium, calcium, iron, B vitamins and lots of other goodies.
Oats – one of the healthiest foods on the planet, they contain a type of fiber called beta-glucan, which helps lower levels of bad cholesterol. Plus, manganese, selenium, magnesium, vitamin E and zinc to boot.
Carob or Cacao – carob contains gallic acid which has antibacterial, antiviral and antiseptic properties. Carob also contains vitamins A, B1, B2, B3, D and E. It is a lower fat and naturally sweet alternative to cacao. However, you can totally use cacao instead, which has 40 times the antioxidants of blueberries and is the highest plant-based source of iron.
Maca – rich in vitamin B vitamins, C, and E. It provides plenty of calcium, zinc, iron, magnesium, phosphorous and amino acids and is known to balance hormones and mood. It is also a caffeine-free source of energy.
Espresso coffee – loaded with antioxidants and may even protect against diabetes. Improves cognitive function, mood and fat burning

If that wasn’t a reason alone to get rollin’ – these will also be the easiest energy balls you’ll ever make. Just pulse the ingredients in a high-powered blender and after 15 seconds (!) you will have a malleable dough. No mess, no fuss. Just what you want when you need an energy kick. You can eat them straight away but they will firm up and improve texture in the fridge. They would last a while, at least a week – though I highly doubt that you’ll leave them for that long!

I have mentioned before that I am in love with Medjool dates. The feeling that you are eating something naughty and indulgent when it’s a gem of nature can only be topped by eating bananas! And it’s not only the taste, the texture is just so exquisite, it’s like a buttery caramel fudge made with butter, cream and lots of sugar! None of those nasties in these little babies, however. They are gluten free, dairy free, vegan, nut free, soy free, refined sugar free, and – unlike most recipes for energy balls or bliss balls – very low in fat.

The oats will make sure to fill you up so you don’t need to reach for the bag of Skittles on your co-worker’s desk, while the dates proved slow-releasing carbs without the sugar crash that would normally lead you to yet anouther trip to the vending machine. Carob, maca and just a little bit of coffee (that can of course be caffeine-free if you want) provide a gentle energy kick without the jitters. Maca espresso energy balls for the win!

Maca Espresso Energy Balls

Makes 12 balls

115 g Medjool dates
60 g rolled oats
2 tsp carob (or cacao)
1 tsp maca
1 tsp instant espresso powder


Just blitz all ingredients in a high-powered blender until a doughy ball forms. Shape into 12 balls and store in the fridge.

Enjoy!

Carrot Cake Bliss Balls {vegan, gluten free, nut free, refined sugar free}

The other day, I got upset at my hubby for buying expensive Medjool dates instead of those dry, hard, brittle dates from the drygoods section that are indefinitely cheaper. (When you have a midget and a mortgage, you tend to worry about financials.) How wrong of me! One bite and it was bliss all the way. I just could not get over that wonderful caramel taste. It reminded of the most exquisite butterscotch toffees. Then, that luxurious velvety texture…I had to admit once more that hubs had been right all along, and that he had hit the jackpot with these beauties. Bliss. Seriously. And what better way to make use of a blissful ingredient than bliss balls? Carrot cake bliss balls it was.

Carrot Cake Bliss Balls

I am not a newbie to bliss balls (see here), but have always been reluctant to splash out on Medjool dates rather than dried dates. The latter, obviously, require some soaking before you can do something bliss ball-y with them, so not having to soak the Medjool dates was another win for lazy, I mean, busy me. It so happened that I had some carrots to use up, too, so something in my head screamed “carrot cake”. While I don’t have a particular sweet tooth, I have a bit of a weakness for carrot cake (as can be seen here, here, and here).

What I love about carrot cake is that you can fix your 3.30 snack attack without the sugar rush as the carrots and nuts in carrot cake provide for some fibre and protein to soak up the carbs that would otherwise wreak havoc in your bloodstream. Plus, the wintery spices give it a bit of a festive and mysterious touch. In short, I figured that Medjool dates+carrots+oats+a few spices and a bit of coconut might be worth a try. Yes, even the precious Medjool dates could not be precious enough for some healthy experimenting.

I have to say that this is one of my recipes I am most excited about, if I dare say so myself! I can’t believe just how good these are, with none of the guilt! And as they are low in fat and refined sugar free, they are even material for a kid’s party – none of the kids will notice they are devouring something healthy, and you don’t have to worry about the sugar crash. They are also nut free, as coconut is botanically not a nut and most people who are allergic to tree nuts can safely eat coconut. Coconut also provides vitamins and magnesium, with the carrot adding a beta carotene and fibre boost and the dates being an excellent source of iron, manganese and long-lasting energy.

These balls are so easy to make with just a few ingredients, so there is no reason not to make these today and fight the munchies!

Carrot Cake Bliss Balls {vegan, gluten free, nut free, refined sugar free}

Carrot Cake Bliss Balls

Makes 18 (possibly more if you don’t eat as much of the batter as me! :-D)

2 large carrots, grated
10 Medjool dates, pitted
1 cup oats
3 tbsp desiccated coconut
2 tsp cinnamon
2 tsp molasses or coconut syrup
1 tsp ginger
1/2 tsp nutmeg

Just blend all ingredients in a high powered blender until you reach a malleable consistency. Shape into walnut sized balls and enjoy straight away or store in the fridge.

Enjoy!


Cookie Dough Bliss Balls {vg, gf}

Do you like polishing off raw cookie dough from a mixing bowl? I know you do. Would you like it even more without butter, sugar, white flour, eggs and salmonella? Then you’re in for a treat.

These were a bit of a lucky dip for me. As you know, I love all things legumes. They are a great meat replacement, make hummus (one of my favourite foods) and you can use the liquid from tinned chickpeas and white beans to create healthy egg-free desserts (it’s true!). Beans, chickpeas and co. are also a great replacer for eggs and oil in baked goods and sweet treats, which sounds right up my alley!

I am admittedly a bit late to jump on the bliss ball bandwagon. I like substantial meals – even in between meals! – and bliss balls always seemed a lot of effort for not much benefit! Well – my stance has changed with these little beauts!! Which is even more surprising as I just shoved everything together that I thought might or might not belong in bliss balls: cannellini beans (I know…), oats, dates, seeds, protein powder, tahini and all the other good stuff. Gave it a good blitz, rolled it in balls and stored it in the fridge – and there was bliss! Minimal effort, minimal mess, maximal bliss. Legumes for the win!

I love it how these taste like raw cookie dough, and I think you’ll love it too! And you can tell your mum that you are officially allowed to have these – no more secretly guiltily licking off spoons. These goodies are loaded with omega-3s, fibre, antioxidants, magnesium, protein, iron and much more for a happy mood, glowing skin, brain power and healthy digestion. Let’s tuck in!

Cookie Dough Bliss Balls {vegan, gluten free, refined sugar free}
Healthy Cookie Dough Bliss Balls

Makes 25 bliss balls

1 425 ml tin of cannellini beans, drained and rinsed (reserve the liquid and make mousse au chocolat!)
1/2 cup hemp seeds
1/4 cup LSA or flax seeds
1/2 cup rolled oats
1/2 cup pitted dates
3 tbsp vegan vanilla protein powder
2 tbsp coconut syrup or maple syrup
2 tbsp tahini
1 tsp vanilla extract
pinch of sea salt
optional: cocoa powder, coconut flakes etc. for rolling

Start by pulsing the beans together with the dry ingredients (hemp seeds, LSA, oats, protein powder, sea salt) in a high-powered blender until well blended. Add the wet ingredients (dates, coconut syrup, tahini, vanilla extract) and blitz in 15 second increments until well incorporated. You will probably need to add a bit )1-2 tbsp) of filtered water or plant milk to achieve a dough-like consistency. The dough should be easily malleable. Shape 25 little balls, roll in optional toppings if desired and store in the fridge.

Enjoy!


Healthy Vegan Iced Coffee

Now this is a big deal! Are you guilty of spending too much money on iced coffees and frappés from a certain coffee shop with nine letters? Frozen drinks with lots of sugar, fat, artificial ingredients and other nasties? I used to when I was in my twenties. I was lucky enough that the only damage they did back then was the damage they did to my wallet. But why would you want to put crap in your body and spend top dollar? Seriously, even if you order the “light” version of these commercial frozen coffee drinks, do you know all the ingredients that are in it? Do you even want to know?

Wouldn’t it be nice if you could make yourself a healthy iced coffee that tastes better than anything you get in the shops, is good for you, ready in a minute (I dare say you queue much longer if you buy an iced coffee) and costs a fraction? This one has been a bit of a lucky find. One afternoon (yes, afternoons are when this stuff happens), I was hungry and thirsty at the same time and needed caffeine. Sounds familiar? I also craved my daily protein boost, so I quickly threw together everything I could think of to help me with this: almond milk, water, coffee, cacao, maca and protein powder. An ice cold drink was in order so I added some ice to this concoction. A quick blitz and while I expected something like a smoothie, the result was very similar to the iced coffees I binged on a good ten years ago. Success!

A drink that is surprisingly close to a store-bought iced coffee, but much, much healthier and not overly sweet! I actually did not add any sugar at all, with the sweetness coming from my vegan vanilla protein powder. If you don’t want to use a flavoured protein powder, then dates would be a great natural sweetener with an additional magnesium boost. The maca gives an additional energy boost, and you could add any other supplements or superfoods you are normally using to give you that morning or afternoon lift. If you are worried about the jitters but still love the taste of coffee you can of course use decaf coffee!

Healthy Iced Coffee {vegan, gluten free, refined sugar free}
Healthy Iced Coffee
Healthy Iced Coffee

Serves 1
½ cup plant milk
½ cup filtered water
1-2 tsp (decaf) instant coffee
2 tsp raw cacao
1 tsp maca
1 tbsp vegan vanilla protein (I use Amazonia Raw Fermented Paleo Protein)
2 handfulls of ice

Just blitz all ingredients in a high-powered blender and…

Enjoy!

Oil-free Blueberry Muffins {vg, gf}

Back in the days when I ate wheat and dairy and generally all things processed and sugary I had a staple recipe for blueberry muffins, which – on the rare occasions that I baked – I always fell back to. I loved it as it was lower in fat than other muffin recipes, replacing most of the fat with buttermilk. It was also dirt-easy to make, requiring just one bowl – perfect for a fast food-addicted 20-something university student without a dishwasher! The muffins were always a success and the recipe was customisable meaning you could use any fruit you wanted in place of the blueberries.

A solid muffin recipe is the first and most basic thing in a baker’s repertoire so once I got into this whole gluten free baking thing, I knew I had to tweak my old go-to. My new gluten-free version of this was just as popular but still relied on refined gluten-free flour and dairy. So after the first step – creating a gluten-free muffin recipe – I needed to come up with a way to make it wholesome and not rely on conventional gluten free flour mixes that with their less than ideal nutritional profile literally make you hungry while you eat! However, not only did I want to create a gluten free and oil free muffin, but also a vegan muffin. Yogurt and buttermilk are great in gluten-free muffins as they really provide that texture that we love and miss about conventional baked goods. The acid in the milk combines with the baking soda to yield moist and tender products. Using yoghurt or buttermilk also means you can nix most of the oil, butter and eggs! So how to replace dairy?

After a bit of research I decided to recreate the sourness from the yogurt/buttermilk with some apple cider vinegar in almond milk. Instead of conventional gluten free flour I used a mix of freshly ground oat flour, almond meal and flax meal (with the flax also replacing the need for eggs). Apple sauce and blueberries keep these muffins nice and moist, so there is no need for eggs or oil. I will probably still tweak the flour part a bit, as the flax gives a somewhat coarse texture but for the time being this is a great recipe if you want a tasty and filling muffin that is gluten free, vegan, refined sugar free, oil free, low in fat and refined grain free and is easy and quick to make with some simple ingredients you likely have in your pantry!

Oil-free Blueberry Muffins {vg, gf}
Oil-free Blueberry Muffins (vg, gf)

Yields 16 mini muffins

½ cup almond milk
1 tb apple cider vinegar
2 cups oat flour

1/3 cup almond meal
1/3 cup flax meal
½ cup coconut sugar
½ cup apple sauce
Pinch of salt

pinch of cinnamon
2 tsp of baking powder
dash of vanilla
1 cup of fresh or frozen blueberries

Preheat oven to 180 °C and lightly grease a muffin pan or use paper muffin cups. Mix the almond milk with the apple cider vinegar in a medium bowl and set aside for the two ingredients to react. Then add oat flour, almond meal, flax meal, coconut sugar, apple sauce, salt, cinnamon, vanilla and baking powder and whisk just until combined. Fold in the blueberries and pour the batter into the prepared muffin tray. Bake for 15-20 minutes until a toothpick comes out clean.

Enjoy!

Gluten Free Vegan Avocado Brownies

Luscious chocolate brownies that are vegan, oil-free and gluten free sounds like an oxymoron, but if you have avocados, you can make the impossible a reality. With their neutral taste and creamy texture, avocados are the perfect replacement for nasty processed oils and antibiotics-laden eggs. Avocados are also a perfect complement to dark chocolate and cacao, so using avocados to make brownies was a no-brainer for me.

Now, every man and his dog seems to make chocolate cake with avocado as a “secret” ingredient these days, so I am probably not going to shock anyone anymore by saying that these yummy gooey brownies have avocado in them. Both my husband and daughter love avocado, and they are in season right now, so needless to say, we are going through quite a few at the moment. As they ripen very quickly, this recipe doesn’t only make sure that you get your dose of healthy monounsaturated fats in one super-fudgy yet good-for-you brownie, it is also a great way to rescue any avocados you might have lying around that are past their prime! I hate wasting food so if you can create something nutritious to fix your chocolate cravings while being good to your wallet and the planet too, then why not?

Honestly folks, if you don’t try this, you are really missing out! These brownies are seriously rich and chocolatey and so fudgey it’s ridiculous. Your junk-loving friends, relatives and kids will never be able to tell that they pack a punch: Besides superfoods avocado and raw cacao, there is oatmeal for healthy carbs, protein and fibre, vegan protein powder to keep you full and satisfied as well as coconut flour, psyllium and flaxmeal for some more protein, fibre and nutrition! Needless to say, they are gluten free, vegan, dairy free, soy free, refined sugar free and oil free! How about that? Like most of my recipes, this is a fuss-free affair – melt chocolate, mix everything together and bake for 20 minutes. Easy as that!

Shall we get baking?

Gluten Free Vegan Avocado Brownies

60 g vegan dark chocolate
150 g brown rice syrup, divided
flesh of 1 large ripe avocado, mashed
1 large ripe banana, mashed
50 g ground rolled oats
2 tbsp rice or pea protein powder
2 tbsp raw cacao
1 tbsp flaxmeal, almond meal or LSA
2 tsp coconut flour
1 tsp psyllium husks, flaxmeal or chia seeds
1 tsp gluten free baking powder

Preheat oven to 180 °C or 350 °F and grease a 20x20cm baking pan. Melt chocolate and 100 g brown rice syrup in a double boiler until melted and smooth. Let cool slightly. In a different bowl, mix avocado, banana and 50 g brown rice syrup until smooth. Stir in melted chocolate mix until smooth, add all remaining ingredients and blend until smooth. Spoon into baking pan and bake for 20 minutes.

Enjoy!

Spicy Detox Juice

Summer is finally here in Melbourne! Yay! That calls for light and delicious detox juices and smoothies with loads of goodies in! Juice cleanses are all the rage now – and rightly so. There is just no better way to reboot your digestive system, reset your tastebuds and alkalise your body than one to three days of light soups, smoothies and juices. Unfortunately, commercial juice cleanses are pretty dear, so if you can have your own little juice cleanse, why not? The few minutes of extra work are worth the extra dollars in your bank account, I think! And even if you don’t need or want a complete cleanse, this spicy detox juice is just the right thing to enjoy on a warm and sunny afternoon on your balcony, or to rehydrate after your workout.

It’s a great way of getting a considerable part of your daily serve of fruit and veg in even if you don’t feel like eating much. Turmeric, chili, cayenne and ginger fire up your digestive system and your circulation while mint and cucumber provide coolness on a hot day. This cocktail is brimming with vitamins, fibre, and antioxidants, a great anti-ageing potion and helps your body to flush out toxins. I love it on its own, but it also goes well with light, summery fare.

Antioxidant Cocktail with kale, mint, apple, orange, carrot, cucumber, turmeric, ginger, cayenne and chili
Spicy Detox Juice

Serves 1

1 small apple, cored and cubed
1/2 cup orange juice
1/2 cup filtered or coconut water
a handful of ice cubes
half a cucumber, chopped
1/2 cup grated carrot
handfull of kale
1 tsp of barley grass or your favourite greens powder (optional)
fresh mint
a pinch each of turmeric, cayenne, chili and ginger

Blitz all ingredients in a high-powered blender and…

Enjoy!

Beetroot Acai Smoothie Bowl

If you could eat gelato while taking in three serves of veg and two serves of fruit, does that sound to good to be true? Well, you’re in for a treat! With this beetroot acai smoothie bowl, you’re not only giving your body five serves of fruit and veg with bucketloads of vitamins, minerals, antioxidants and fibre but also high-quality protein as well as omega 3s! And as long as you have some grated beetroot and kale ready (I’d recommend to always keep a serve in your freezer!), it comes together so quickly and easily that you don’t even have to get up early!

As you might have guessed from the hint I dropped above, this beetroot acai smoothie bowl contains beetroot, but wait! I totally understand that not everyone is as crazy as me (or Aussies in general) about beetroot, but you should really give it a try! Besides beetroot’s nutritional benefits such as for your blood, kidneys and skin, it imparts a lovely purple colour to this smoothie. If you use a good-quality vegan protein powder, the earthy taste really shouldn’t be too pronounced. If you’re still skeptical, start with a small serve of beetroot and then work your way up. It’s a great addition to your morning routine and also a colourful change to the ubiquitous green smoothies. Or add a frozen banana – this will make your smoothie bowl even sweeter and creamier and bring this smoothie up to three serves of fruit instead of two!

While the Australian recommendation today is to consume five serves of veg and two serves of fruit and no longer 3+2, I think getting in 3 veg and 2-3 fruit in the AMs is still a great achievement. If you want to take it up a notch, feel free to add some more veg to this, such as zucchini which also adds some bulk without altering the flavour, or sweet potato (yes, you can have raw sweet potato!)

Beetroot Acai Smoothie Bowl

Serves one

1 cup plant milk
2 cups mixed berries raspberries
a handfull of roughly shredded kale
a handful of spinach
half a cup handful of grated beetroot
frozen banana (optional) (more carbs, but also more flavour and nutrition!)
1 tbsp dry acai powder
3 tbsp vegan vanilla protein powder
Toppings: 
chia seeds, hemp seeds, granola, goji berries, coconut flakes etc.

Blitz all ingredients bar the toppings in a high-powered blender, scoop into a bowl, top with your favourite toppings and…

Enjoy!