Spicy Pumpkin Basil and Chili Dip

Roasted Pumpkin Chili and Basil Dip

I admit I suffer from a serious and acute dip mania at the moment! After my harissa turned out beautifully, I was motivated to experiment a bit more. I have not tried baking gluten-free bread yet, – sorry, but I’m still pretty new on the gluten free journey – but once I have achieved the holy grail of gluten-free bread making, it’s good to know what to dip it into, don’t you think? (Update: I made gluten free bread! The results can be found here, here and here.)

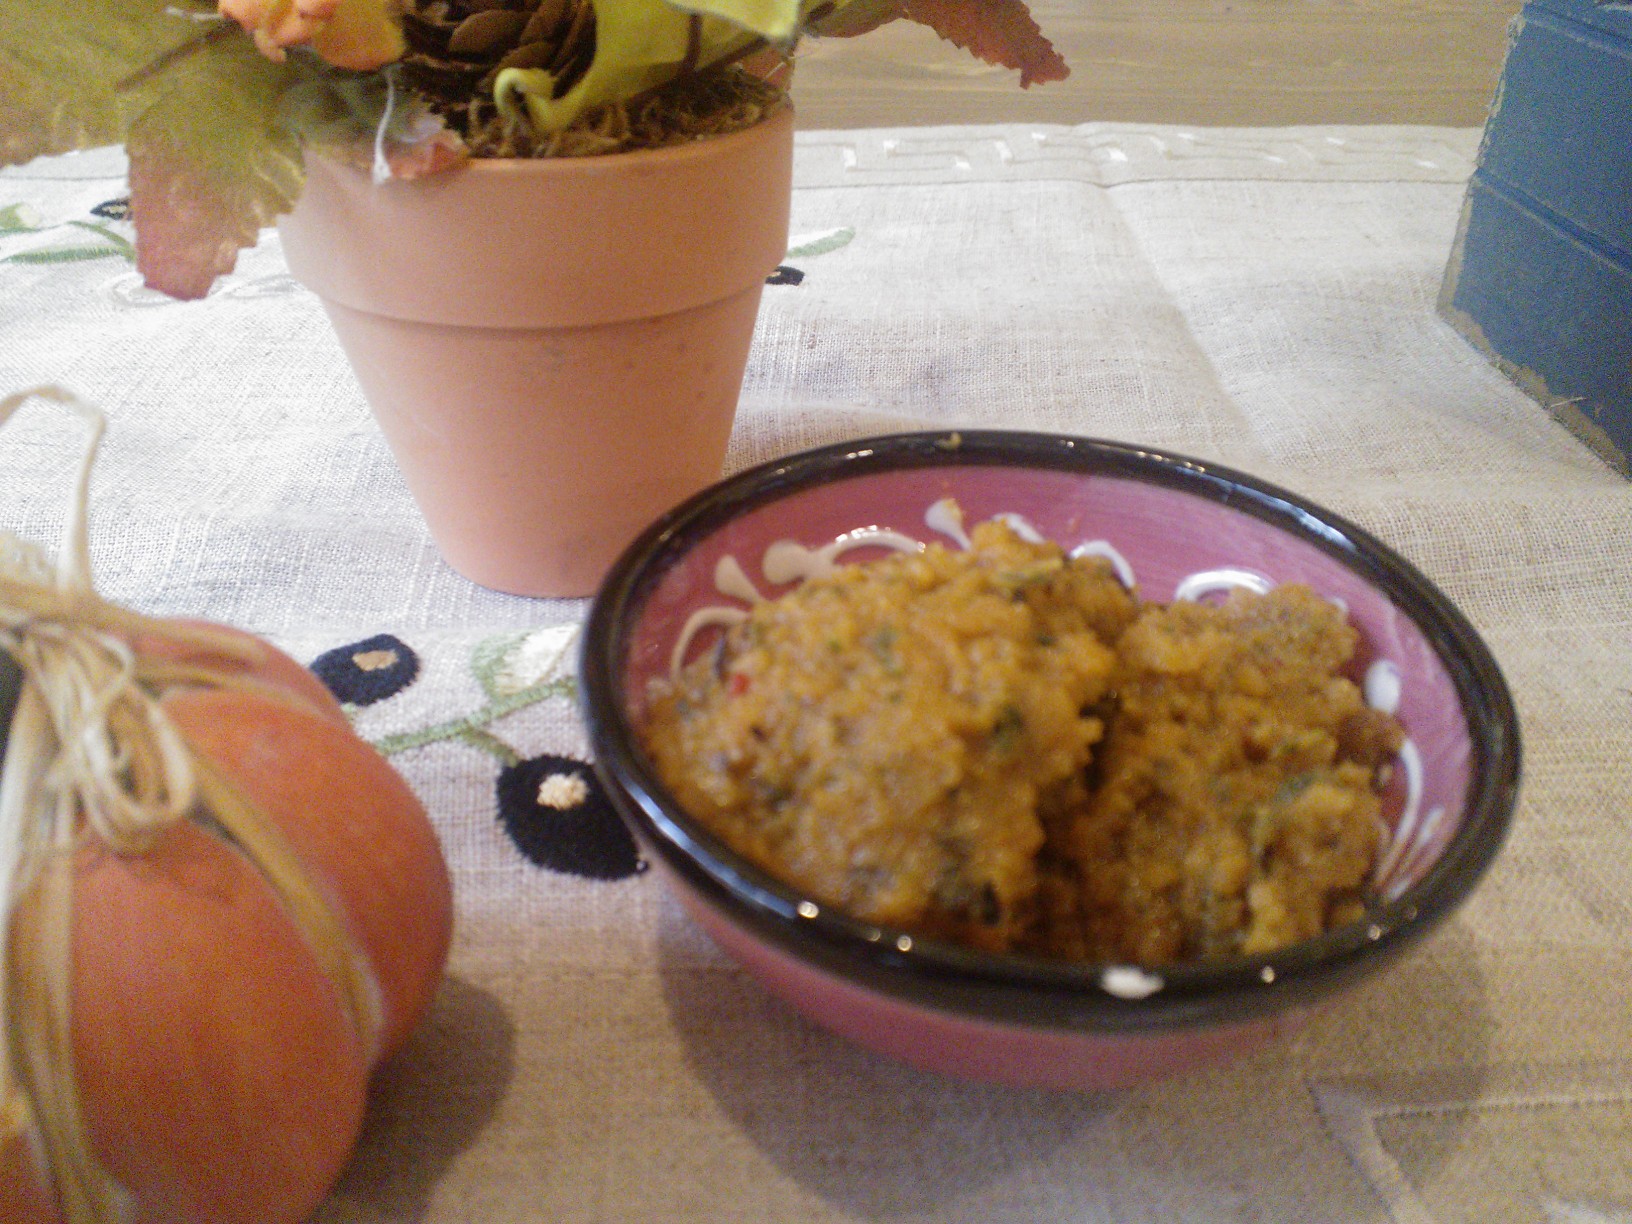
Although unlike the Northern hemisphere, it’s not really pumpkin season in Oz right now, the delicious and versatile vitamin A bomb is omnipresent in this part of the world all year round – and since we happened to celebrate Halloween just over a week ago, I assume we all still have some leftover pumpkin in our freezer, and what better way than to turn it into a tasty dip?

Pumpkin has such a unique flavour, which makes it so different from your average dip or pesto. I decided to marry it off to some chickpea – must be my love for falafel coming through here – to give it a mysterious middle eastern touch. Of course, there had to be chili in it, as with most of my savoury dishes. I used hot chili powder from the middle eastern shop, as the naughty mint in our back yard killed my chili plant (*sniffle*), but it turned out alright nonetheless.

My first version didn’t feature any basil, as I didn’t have any and couldn’t be bothered going shopping. It was good, but trust me, you don’t want to leave out the basil! You might try parsley, too, though I haven’t tried that. The version featured here is pretty low in fat – pumpkin is already so luscious and creamy that unlike a traditional pesto, you just need to add a tablespoon of healthy olive oil to make it yummy. In my next version of this dip, I am going to put some cashews or almonds in it – I think this will be beautiful!

Makes approx. 200 g

100g roasted or char-grilled pumpkin, chopped
50g chickpeas from the tin, drained
1 tbsp good olive oil (try chili or lemon infused olive oil for that extra kick)
1 tbsp apple cider vinegar (you can use any vinegar – I just wanted to make this dip even more healthy!)
1 tbsp lemon juice (optional, but gives great flavour)
fresh basil, chili, salt, pepper, garlic and paprika to taste – you can always adjust the spices afterwards

Process all ingredients in a food processor until smooth. Serve immediately with crudités or gluten-free bread or keep in the fridge in an airtight container for 3 days. Extra hot tip: Mix it with my harissa paste – you won’t regret it, it’s superb!

Enjoy!

Vegan Espresso Icecream

Creamy Espresso Gelati

I was never much into chocolate or lollies, but icecream was one of the sweet things I ALWAYS needed to have. I couldn’t go past a gelateria whenever I was out and about, and I always had a couple of tubs of the frozen delight in my freezer – until the diagnosis of dairy intolerance ruined it all. My newly bought icecream maker seemed to be doomed to abandonment in the shed. Alas! So I thought…until I found that I can make yummy, creamy, luscious, and decadent icecream creations with one of my favourite newly discovered cooking ingredients – coconut milk! Yes, you can make delicious icecreams and gelatis without dairy, and you won’t really taste the coconut in the final product, so don’t worry. This icecream is the happy marriage of strong and black Italian espresso with creamy and sweet coconut milk – oh my!

Inspired by Channeling Contessa

600 ml full-fat coconut milk or cream
160 ml espresso (I used Nespresso Grand Cru Roma)
100 g sugar
1 teaspoon vanilla

Creamy, dairy free frozen delight

Whisk all ingredients in a saucepan over medium heat, stirring continuously until well combined. Bring to the boil and simmer for 5 to 10 minutes. Remove from heat and stir in vanilla. Let cool, and then transfer to fridge. Chill in fridge overnight – the longer the better! Then churn in icecream maker according to manufacturer’s instructions. After 20 minutes or so, it will be like a Frappuccino – transfer to a freezer safe dish and put in freezer, stirring every now and then. After a few hours in the freezer, it’s all ready to go! On the second day, it gets a bit harder, and you might have to let it thaw for a few minutes before serving.

Enjoy!

Raspberry Champagne Sorbet with Mint

It's decadent, it's pink, it's tangy, it's refreshing, it's Nat's Raspberry Champagne Sorbet!
It’s decadent, it’s pink, it’s tangy, it’s refreshing, it’s Nat’s Raspberry Champagne Sorbet!
Raspberry Champagne Sorbet with Mint

I thought it was time to venture into new areas of dessert making that did not involve an oven, and since I have had an ice-cream maker for a while, sitting unused on the bench, I thought it was a good idea to make use of it instead of just dusting it, as usual – and I think I am gonna do this more often now! It came in handy that we had some champagne left from a gathering a couple of nights ago, and the mint in our yard is overgrowing, so my mind came up with this concoction. It is a raspberry champagne sorbet with mint, and it is divine, whether you are entertaining the in-laws or having a girl’s night. It is lovely and pink and yummy. It is especially refreshing in summer, but also great on New Year’s Eve. In fact, you can just have it anytime, and it could not be easier to make!

It contains regular sugar though – in ice-creams and sorbets, you cannot really replace the sugar, as the texture won’t work out any more, and you need the sugar to keep it smooth, or it gets brick hard (I learned that the hard way). I know there are sugar free ice-creams out there, but not only are they made in high-power machines which are able to whip more air in than an ice-cream machine for home use, but they are filled with nasties, and we would rather have sugar than thickeners, fillers, emulsifiers, starches, preservatives, and who knows what! Trust me, this is worth every calorie! And the sugar content is rather low when compared to other ice-cream recipes anyway.

375 g frozen raspberries
375 ml champagne
70 g sugar
juice of 1 lemon
mint to taste

Dissolve the sugar in the champagne and bring to the boil; then add the lemon juice and simmer for 5 minutes. Take the syrup from the heat, add berries and mint and puree everything with a stick blender. Transfer to a container and chill thoroughly (for several hours or according to the instructions by the ice-cream maker’s manufacturer). Churn in your ice-cream machine according to instructions.

Enjoy!

mhh...straight off the spoon is best!
mhh…straight off the spoon is best!

Vegan Frosting II

Dairy Free Frosting on spoon

I experimented a bit more with my dairy and soy free frostings, as I found that Xanthan does not only get lumpy, but is also a bit hard on the stomach for some folks!

This coconut frosting is relatively easy and quick and tastes great! It also has a better texture than my previous frosting and uses arrowroot instead of Xanthan.

1/2 tin of coconut milk
a bit of erythritol to taste
pinch of salt
teaspoon of arrowroot, dissolved in a teaspoon of water
a drop of vanilla
100 g coconut oil
20 g Nuttelex or other dairy free spread (you can use butter if not strictly vegan or dairy intolerant)

Simmer coconut milk, sweetener and salt and simmer for 10 minutes. Remove from heat and add the arrowroot paste and vanilla, bring back to the boil and swiftly whisk out any lumps. The mix becomes shiny and of goopy texture. Remove saucepan from the heat source and quickly stir in coconut oil. Let cool, transfer to container and chill for 2 hours. Once nice and cool, remove from fridge and beat with the spread until it looks like frosting. Voilà! Your vegan frosting is ready to use! Great on my carrot cake! Be careful: This frosting gets very firm in the fridge, but will melt very quickly when outside the fridge.

Enjoy!

Funneled frosting
Funneled frosting

Sweetened Condensed Milk – Dairy free and sugar free!

Condensed Almond Milk

Who doesn’t like puddings, custards, fudge or millionaire’s shortbread (aka caramel slice)? And who wouldn’t want to have these treats sugar-free, dairy free and low-carb? Who of you vegans, low-carbers and dairy intolerant folks has not pondered old favourite recipes calling for condensed milk – only to resign yourself to the fact that no dairy and no sugar means saying good bye to your favourite treat?

Don’t fret! Rescue is nigh! Would you have thought that you can create a sugar free dairy free worry free version of this yummy ingredient (I prefer it straight from the spoon!) all by yourself? All you need is yummy-tummy almond milk – which you should have in your fridge at all times anyway, some erythritol, stevia, honey or other sweetener of your choice, a pinch of salt, and a drop of vanilla, as well as an hour or so of your precious time – so if you are like me, you don’t even need to leave the house! The great thing about almond milk (and other non-dairy milks) is that the risk of burning is considerably reduced.

Makes approx. 400 g sweetened condensed milk (equivalent to 1 tin from the shop)

1 l unsweetened almond milk
2 tbsp erythritol or other sweetener (I have used honey and agave before, which also works well, it just gets a bit more runny than with sugar crystals, so if you make condensed milk for fudge or millionaire’s shortbread, I would use a solid sweetener like erythritol, stevia or palm sugar.)
pinch of salt
drop of vanilla

Place all ingredients in a saucepan (the bigger it is, the quicker you will have your condensed milk!), bring to the boil, then simmer uncovered on low heat, stirring every few minutes until the mixture has reduced by about half and has turned a slight amber colour (this takes between one and up to two hours). At this stage, it will still be slightly runny, but that is okay – it will firm up, promise! Let cool in the pot for a few minutes, covered by a clean teatowel, then transfer to a glass jar and refrigerate. Enjoy straight from the spoon or in your favourite recipes. Lasts about one week in the fridge.

Enjoy!

Dairy free frosting

WP_000396
Who would think it’s vegan?

For all frosting addicts out there who cannot or don’t want to have milk, yes, I created a dairy free frosting that tastes like a cream cheese frosting! And no, it does NOT contain Tofutti or any other GMO-laden soy crap. It is made with coconut milk – however, you won’t taste the coconut much in the final product so don’t fret if you are not the biggest coconut fan in the world – you will still like it, I promise. You can find the recipe below.

1/2 can of coconut cream (full fat or light – both work fine)
1 teaspoon of honey
pinch of salt
80 g coconut oil
80 g vegan margarine (Nuttelex) or butter
1/8 teaspoon xanthan to thicken

-Heat coconut milk, honey and salt, bring to the boil and let simmer for 10 minutes
-add xanthan, stirring continuously, bring to the boil and remove from heat – the mix should have a shiny surface
-stir in coconut oil, whisking or using a blender
-set to cool for 15 minutes and transfer to fridge for another 2 hours (the longer, the better), until mix has firmed up
-when it is thoroughly chilled, transfer coconut mix to a mixing bowl (you might need to blend it again with a stick blender to make it really smooth), add the margarine or butter and mix with hand blender for 2 minutes until thick and fluffy
-decorate muffins with the frosting using a cake decorator or silicon spatula

Vegan, dairy free and soy free whipped cream

WP_000398
Carrot cake muffins with vegan whipped cream filling
WP_000397
Vegan whipped cream in bowl

What do strawberries, applestrudel and icecream sundaes have in common? – They are nothing without whipped cream! What do whipped cream, cheesecake and frosting have in common? It is a challenge to make them dairy free! However, after much experimenting, I have come up with a recipe for a dairy free (and soy free!) whipped cream which comes very close to the original without the saturated fats and the cholesterol! Living in Australia, I based this yummy and versatile cream on the delicious macadamia nut, which is packed with vitamin, minerals, antioxidants, fiber, phytosterols and heart-friendly mono-unsaturated fatty acids.

Update: If you don’t want/can’t have nuts, please have a look at my new, much easier, quicker, faster vegan whipped cream recipe, which is also lower in fat!

To add to these health benefits, there is plenty of coconut oil – according to experts one of the healthiest foods on the planet – please have a look at this or this article if you are interested in reading up on coconut oil.

This cream gets very firm, making it ideal for decorating and layer cakes. It can be served with any cake, dessert or fresh fruits – or just spooned straight from the bowl into your mouth! It is not difficult to make; however, you will need some time for soaking the nuts and a good food processor.

Ready? Here we go:

Ingredients

1 cup of macadamia nuts (raw, unsalted, unprocessed)
30 g coconut oil
30 g vegan margarine (Nuttelex)
1 teaspoon of stevia
pinch of salt
1 teaspoon of vanilla

-Process the nuts in your food processor, using the pulse function, until they have a become powder – it doesn’t matter if there are still some bigger chunks
-let the “nut powder” soak in 1 cup of filtered water for 2 to 4 hours until thick and white
-with a stick blender or your food processor process nut paste until smooth
-heat the nut paste with the coconut oil, stevia and salt, bring to the boil and simmer for 10 minutes, whisking constantly
-chill mixture in fridge overnight
-transfer chilled mixture in a bowl, add margarine and vanilla and mix with hand blender until thick and fluffy

Gluten free, low carb, vegan carrot cake muffins

WP_000398
Carrot Cake with whipped cream filling
WP_000396
Carrot Cake with vegan frosting

Those who think that gluten free cooking is complicated and tasteless hasn’t tried these fantastic carrot cake muffins – they are ready in a jiffy, packed with fibre (they really are satisfying!) and beta-carotene, low carb and low GI, and of course completely gluten free, dairy free, soy free, and sugar free! Have I mentioned that they are extremely yummy, too?

For all frosting addicts out there who cannot or don’t want to have milk, yes, I created a dairy free frosting that tastes like a cream cheese frosting! And no, it does NOT contain Tofutti or any other GMO-laden soy crap. It is made with coconut milk – however, you won’t taste the coconut much in the final product so don’t fret if you are not the biggest coconut fan in the world – you will still like it, I promise. You can find the recipe here and below. Update: I created a new vegan and sugar-free frosting without any nuts. Recipe here.

Alternatively, these muffins are even better filled with my vegan whipped cream! Highly recommended! (see left-hand picture above)

Watch out, these delicious little cakes will be gobbled up before you know it – so better make a bigger batch if you need them for a party! You can easily double or triple this recipe. They last well in the fridge (in fact, they taste even better the next day) and you can freeze them without any worries.

Makes 12 muffins

For the muffin batter
2 eggs or egg replacer to make it vegan
100 g of honey (can be substituted with organic maple syrup or agave nectar)
40 ml olive oil
100 g plain gluten free flour
30 g flax seed
1 teaspoon gluten free baking soda
50 g nuts (almonds and/or walnuts are best, but you can use any nuts) – more nuts improve the flavour even further
1 1/2 cups of freshly grated carrots – the more carrots, the more moist and delicious your muffins will be
1/2 teaspoon xanthan (if your gf flour mix doesn’t contain it already)
1 teaspoon cinnamon
1/2 teaspoon kosher salt (or Celtic sea salt)
1 teaspoon vanilla
10 dates (optional, but adds taste and texture – could be replaced with raisins and/or sultanas)

For the frosting
1/2 can of coconut cream (full fat or light – both work fine)
1 teaspoon of honey
pinch of salt
80 g coconut oil
80 g vegan margarine (Nuttelex) or butter
1/8 teaspoon xanthan to thicken

Muffins:
-Preheat oven to 180° C
-Beat honey, eggs, oil, vanilla in a large mixing bowl until smooth
-In a separate bowl, combine the dry ingredients: flour, flax, soda, xanthan, salt and cinnamon
-Add to wet ingredients and beat until smooth
-Mix in carrots, nuts and dates and transfer batter to muffin pan
-Bake for 30 min or until a toothpick comes out clean

Frosting:
-Heat coconut milk, honey and salt, bring to the boil and let simmer for 10 minutes
-add xanthan, stirring continuously, bring to the boil and remove from heat – the mix should have a shiny surface
-stir in coconut oil, whisking or using a blender
-set to cool for 15 minutes and transfer to fridge for another 2 hours (the longer, the better), until mix has firmed up
-when it is thoroughly chilled, transfer coconut mix to a mixing bowl (you might need to blend it again with a stick blender to make it really smooth), add the margarine or butter and mix with hand blender for 2 minutes until thick and fluffy
-decorate muffins with the frosting using a cake decorator or silicon spatula

Enjoy!

Tips
– use sugar free orange marmalade instead of honey, to get a more tangy and zesty taste
– add some ginger to the dough for some exotic spiciness
– mix some gingerbread or pumpkin pie spice in the frosting for a delish Halloween or Xmas treat
– replace the carrots with cooked pumpkin or sweet potato for an extra luscious treat
– you can of course make this a cake instead of muffins. This recipe is enough for one round 20 cm baking pan. Double this recipe for a bigger cake.