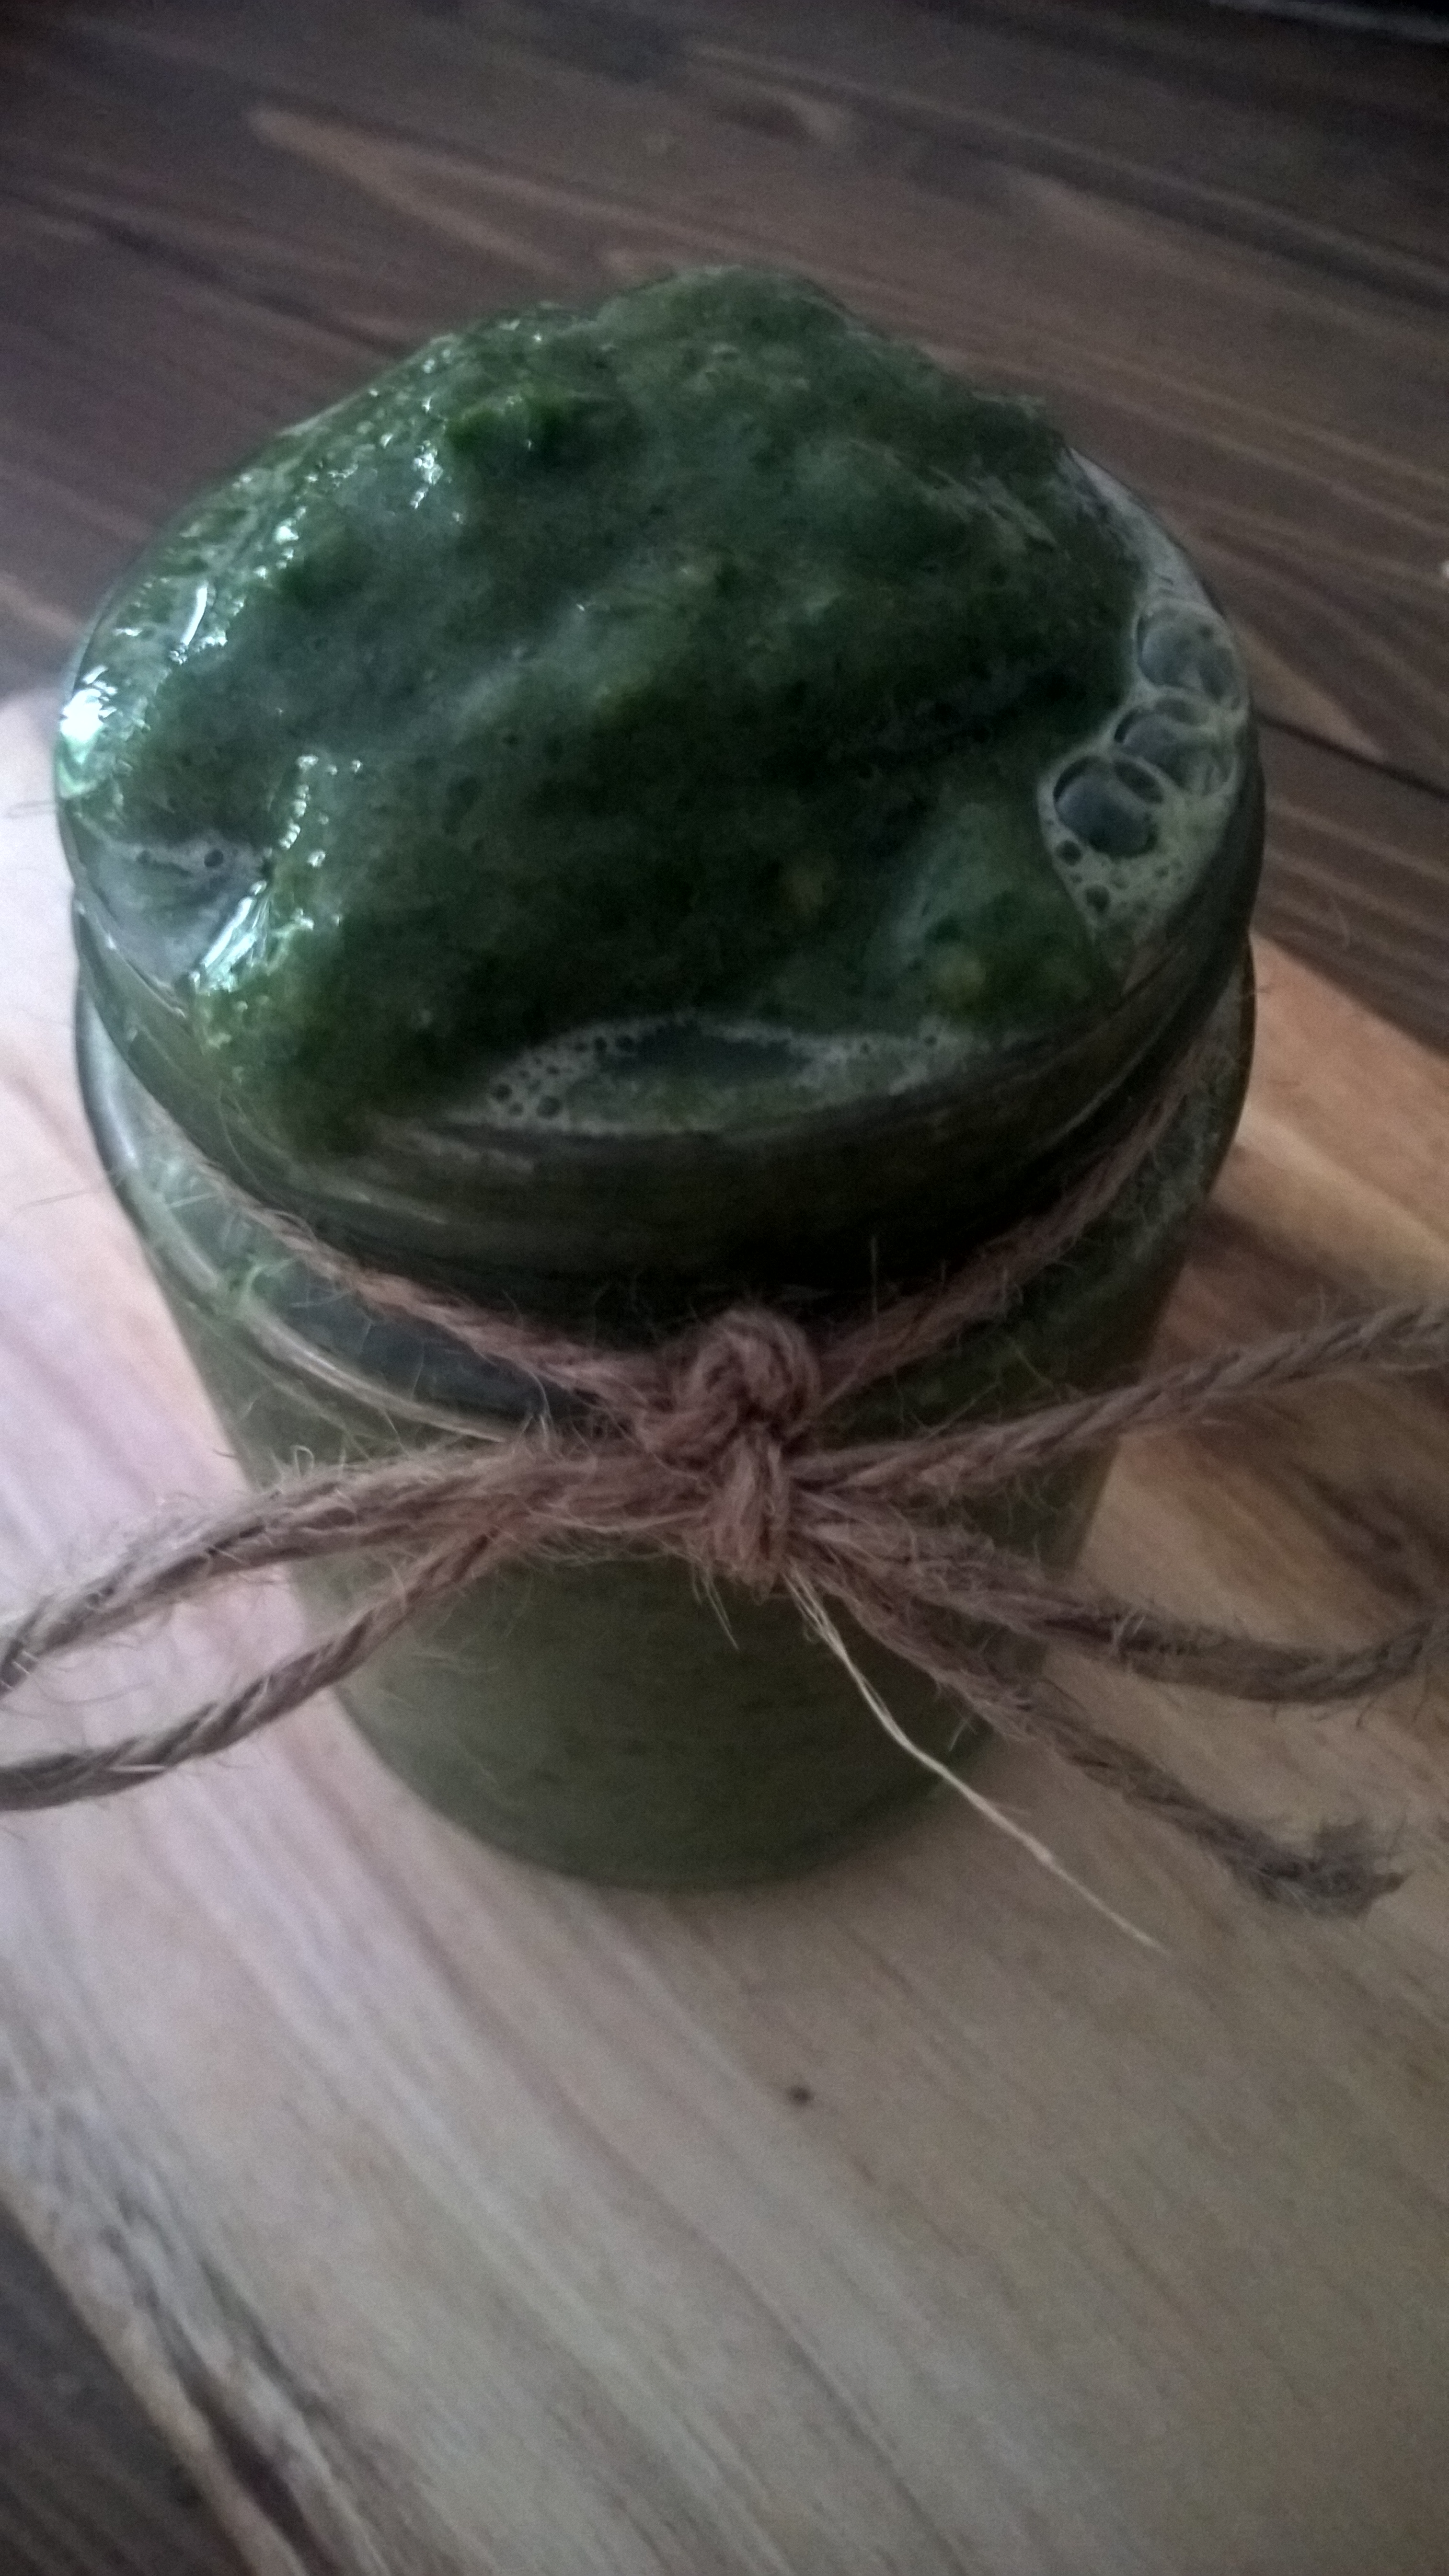
Anyone who has ever lived in Melbourne or has spent some time in this city knows that the weather here is pretty -ahem- moody, to say the least. Temperature differences of up to 20 degrees from one day to the next are not a rarity! Needless to say your immunity gets quite a good workout all year round which is why it is extra important to get those greens in!
I love smoothies and shakes as they are so filling and satisfying without clogging your stomach and you can put all the goodness you want in them in just a couple of minutes flat! They are my go-to breakfast if I don’t have time to prepare porridge or just crave something light before a workout. Smoothies also work great as an afternoon pick-me-up and I tend to put my supplements such as probiotics and maca powder in them. And because their texture is so creamy and luscious I always have the feeling I’m devouring a naughty icecream when I am actually consuming concentrated goodness!
I usually make a shake/smoothie (bowl) every day and experiment with different flavour combinations. I love this one as it is sooo good for you yet tastes really sweet and creamy thanks to banana and mango! It is also completely vegan while giving the impression you are having a milkshake. You can add some vegan protein powder to ramp up the protein. I happened to have a lot of kale and spinach from my vegetable box delivery so to prevent them from going bad, I actually washed and chopped the kale and spinach and froze them in individual portions in ziploc bags! This way, I always have some frozen greens as a “smoothie kit”. You can of course use fresh kale/spinach. The same goes for bananas. I think everyone should have frozen chopped bananas in the freezer at any given time but if you only happen to have fresh bananas like I did at the time, it’s completely fine to use a fresh banana and some icecubes.
Tropical Superfood Shake
Immune-boosting supershake
Makes 1 generous portion
2 cups “liquid” (I used half water and half orange juice, but coconut water, your favourite juice or your plant milk of choice would all be great options) 1 large ripe banana, frozen and chopped, or fresh plus a handfull of icecubes 1 cup frozen mango 1-2 handfulls kale and/or spinach, frozen or fresh green powder, maca, probiotic powder etc. (optional)
Blend all ingredients in a high powered blender until smooth (it might take a couple of rounds of blending).
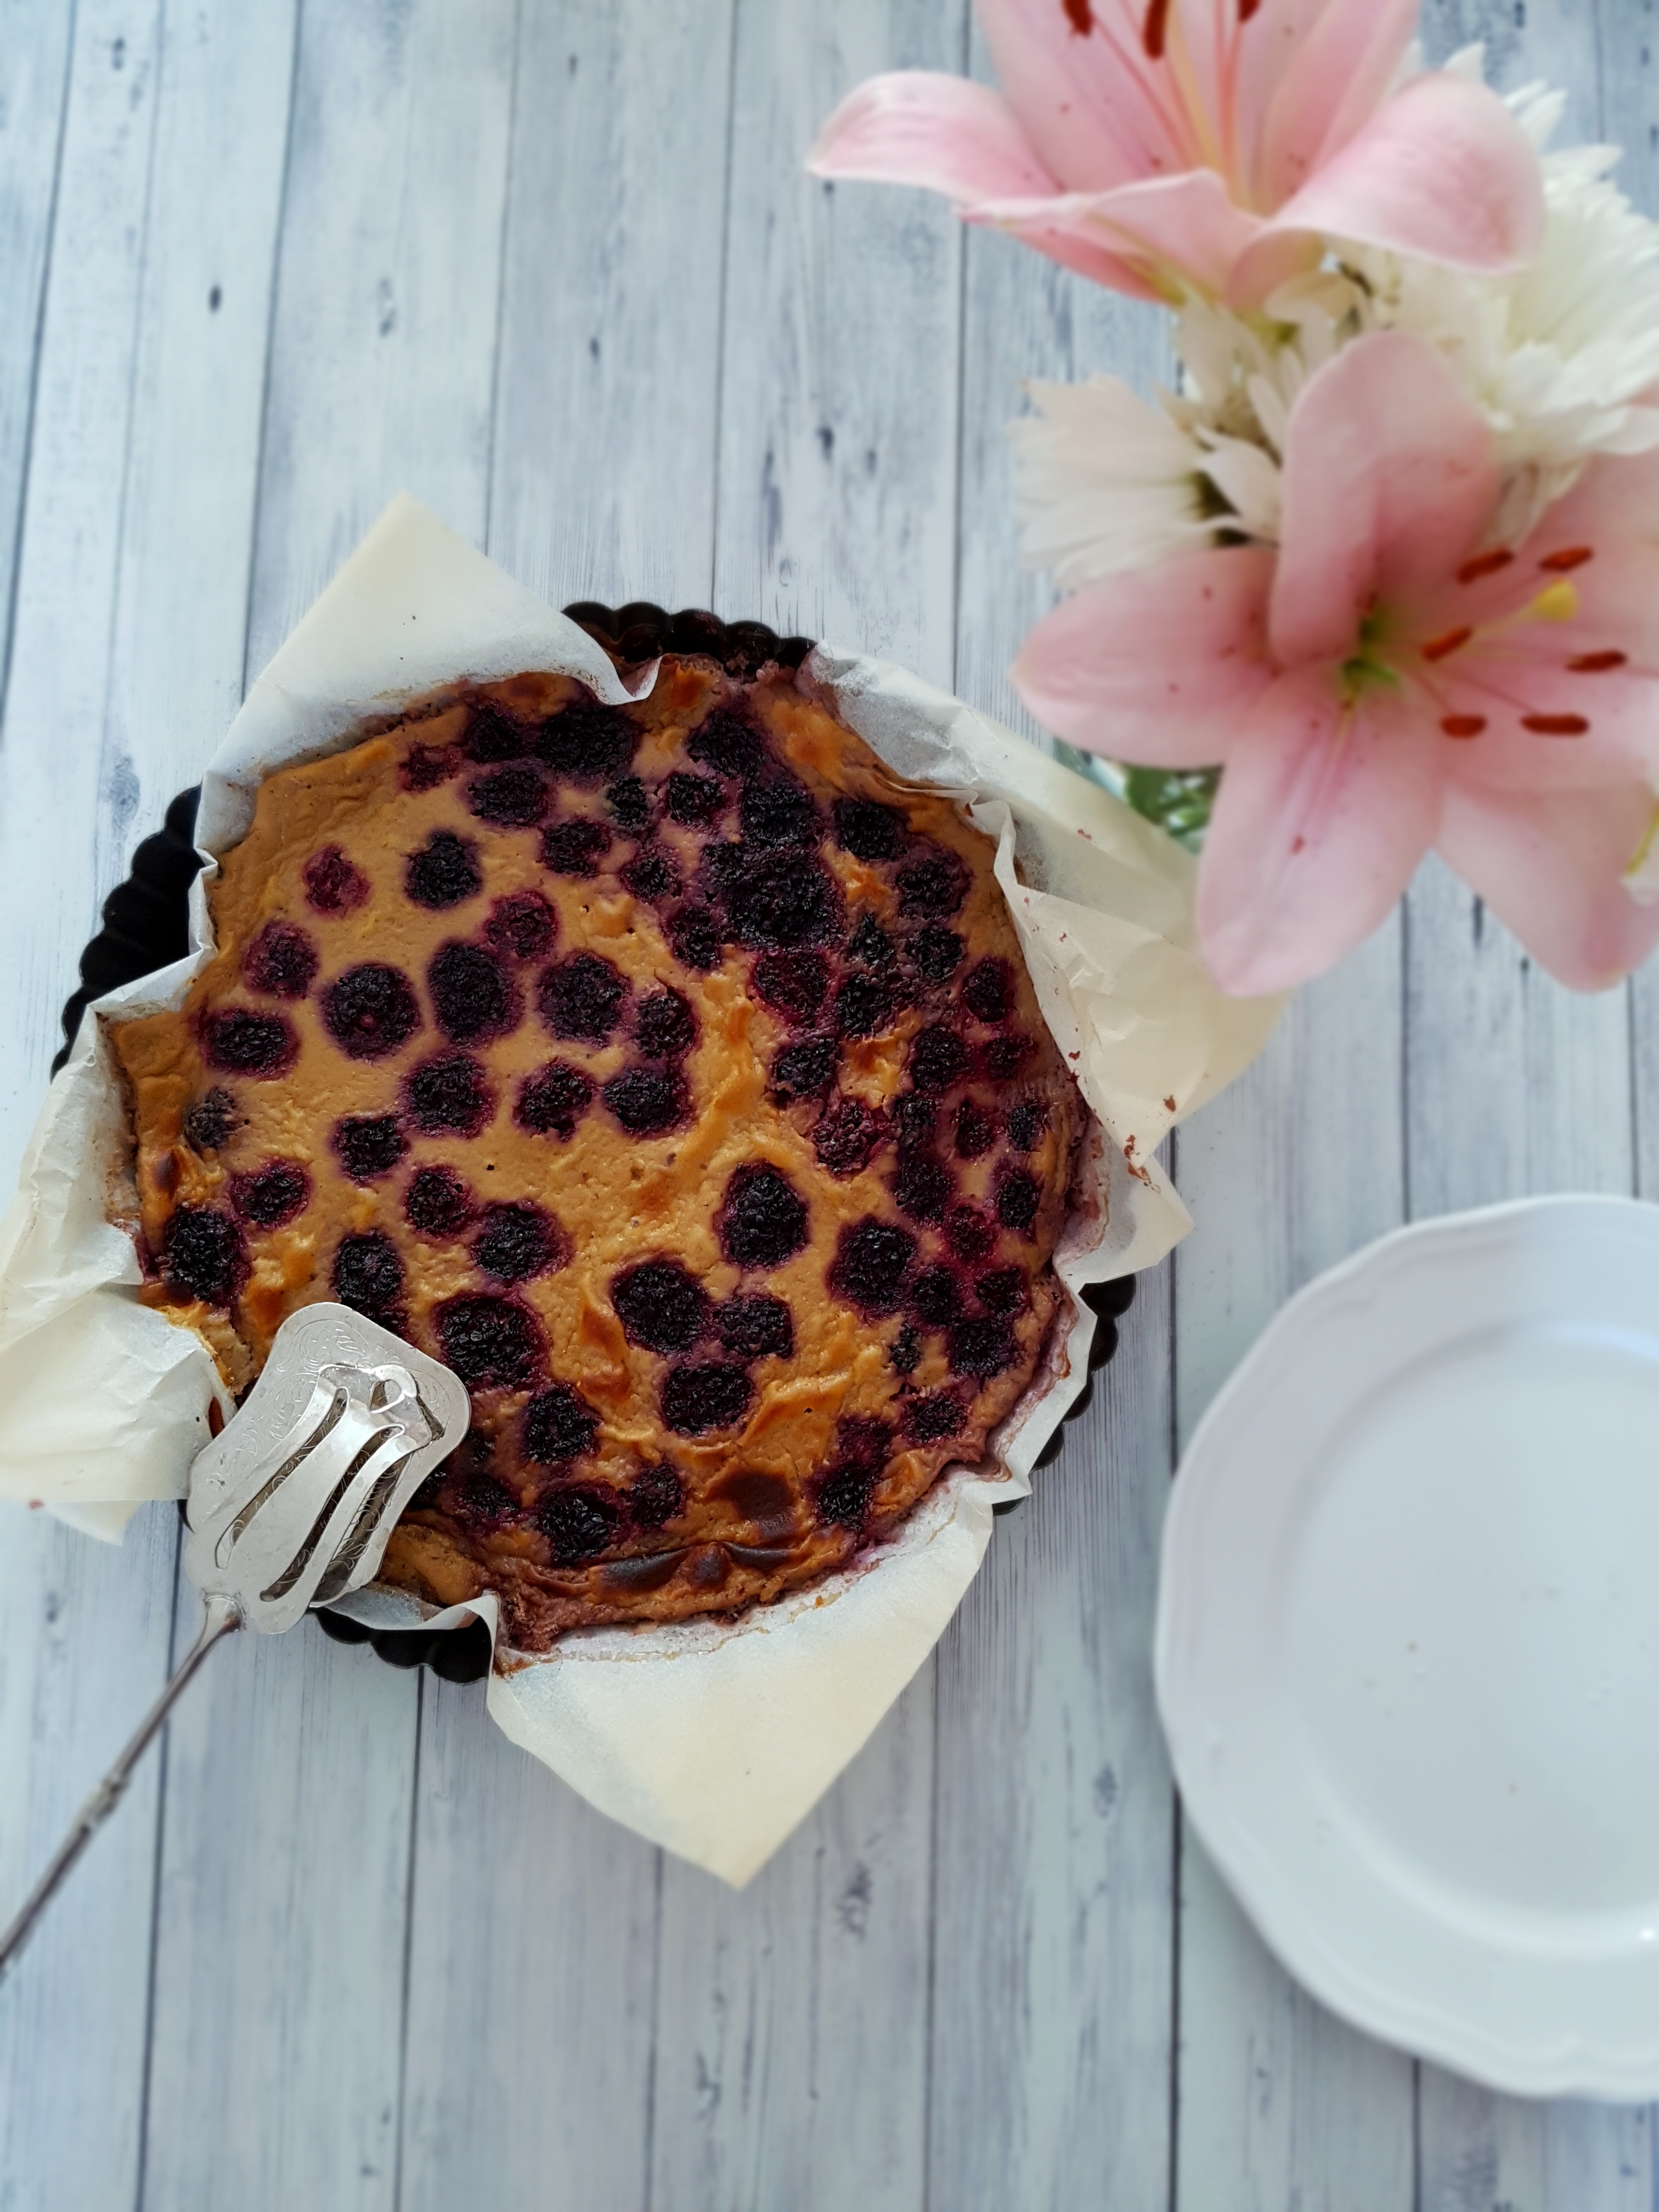
Note: This is an updated – veganised – version of a vegan clafoutis to my previous recipe for paleo clafoutis! I hope you enjoy it!
It seems I have a thing for French desserts at the moment – or rather, my take on them. While I love the timeless finesse that French desserts exude, a little makeover never goes astray, especially if it’s as delicious as this one! My previous paleo version of clafoutis already hit the spot, but when I embarked on a vegan diet, I knew I had to make this a vegan clafoutis as well. And I have to say, the result was pretty successful! So here is my vegan clafoutis. I use aquafaba (chickpea brine) instead of eggs (more about aquafaba here), so technically this is not paleo anymore. However, there is absolutely no nasties in here, no wheat, dairy, soy, refined sugar or oils, and also no eggs. I hope you enjoy this truly cruelty-free but no less delicious version of clafoutis.
Vegan Clafoutis
The thought about making clafoutis has been at the back of my mind for a while – actually, ever since I saw a recipe for cherry clafoutis in my French text book at high school. (Which, sadly, is a long time ago now. Very long.) Ever since then, clafoutis recipes have been popping up in magazines. and, naturellement, on the internet. This recipe is my own little invention. There is low-carb, fibre-rich coconut flour instead of conventional flours and starches, coconut sugar and maple syrup instead of sugar, plant mylk instead of milk, and no fat, oil or butter (I did grease the mould but dare I say that the amount of fat used is rather negligible).
I like my clafoutis so much that I will never go back to any other recipe. It is also very versatile – you can use any fruit, any milk and any sweetener you like. This little delight is as good as impressive dessert to impress guests as it is as for afternoon tea or even a satisfying breakfast – all this knowing that you are devouring a treat that is not going to blow your calorie budget (something you can’t say about French desserts), and that is a winner on the health front. Plus, it looks pretty.
Vegan Clafoutis
Vegan Clafoutis
Serves 8
4 tbsp coconut flour 4 tbsp LSA or ground chia seeds 4 tbsp coconut sugar
4 tbsp maple syrup healthy pinch of Maldon sea salt aquafaba from one 425g tin of chickpeas (approx. 3/4 cup) 2 cups plant milk (I used cashew) fruit of choice (approx. 1-2 cups, red fruit are a great option)
Preheat oven to 180 °C and prepare a tart pan by lining it. Mix coconut flour, LSA, sugar, syrup, salt in a bowl. Make a well in the centre and carefully fold in the aquafaba until mixed in. Beat in milk until you reach a homogenic consistency. Divide fruit between the four dishes and spread batter over the fruit. Bake for about 60 minutes or until lightly golden on top. Let cool completely and preferably store in the fridge before serving to firm up.
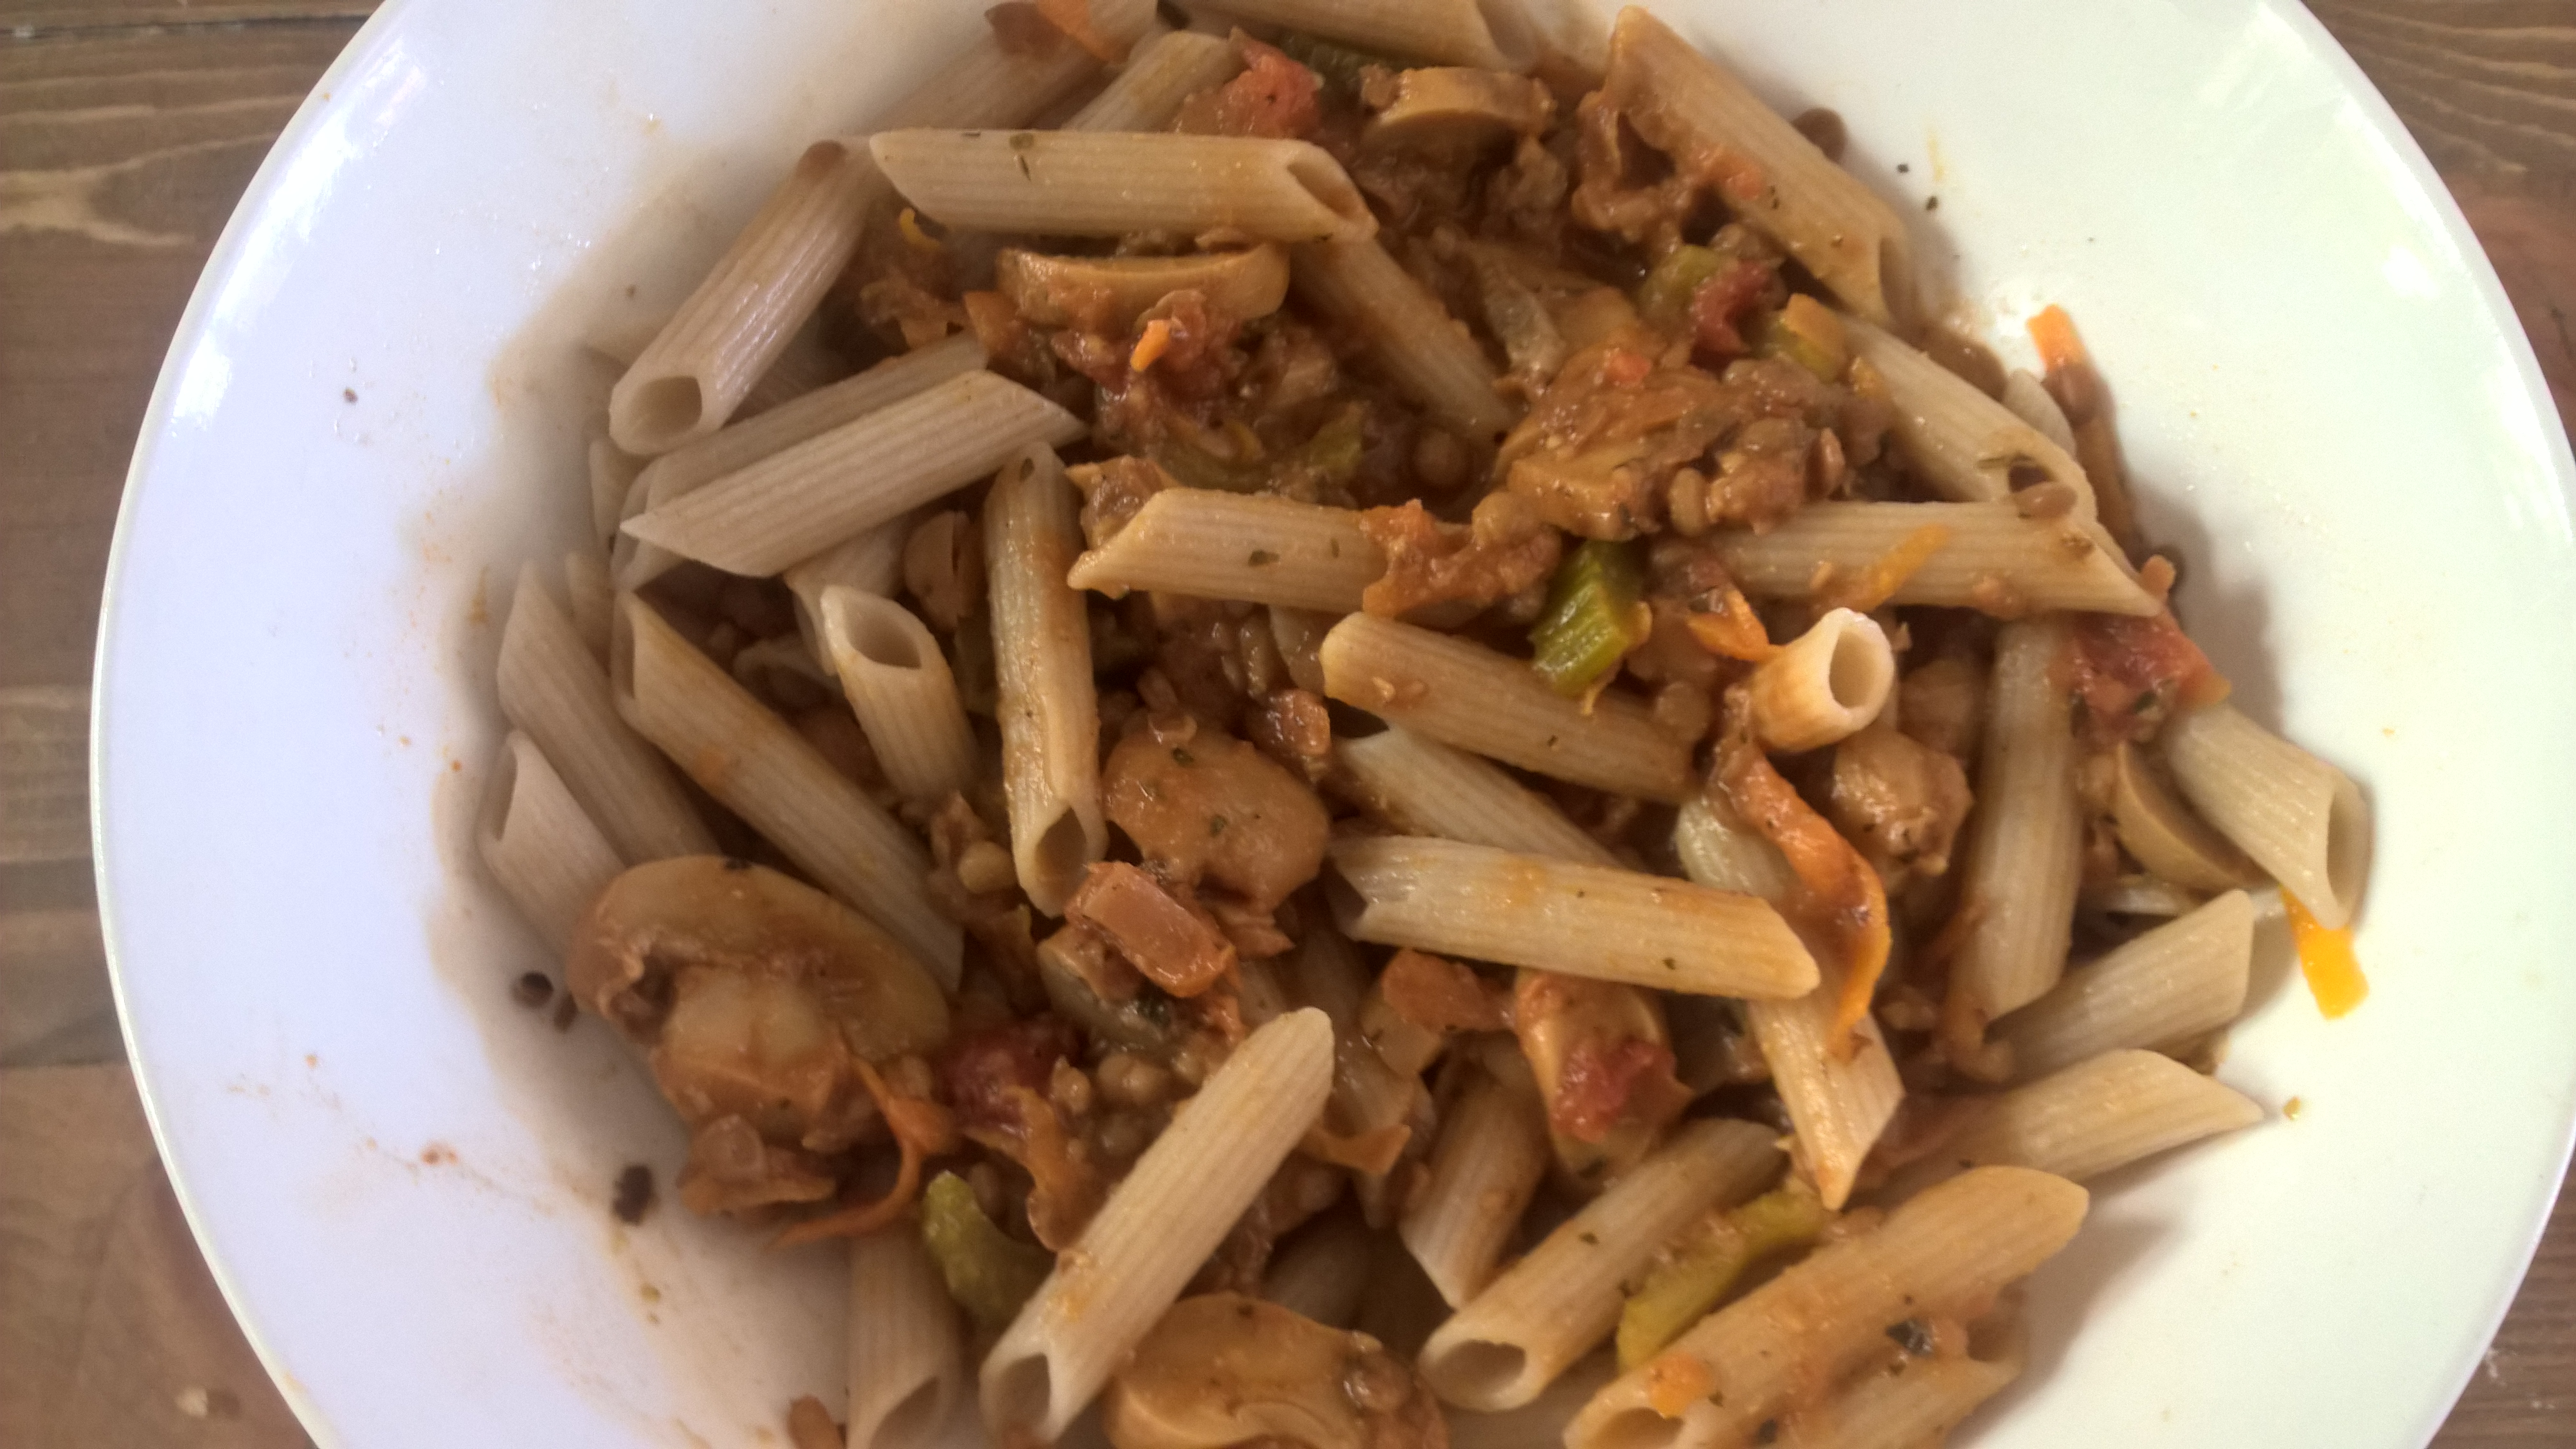
The idea of making a vegan “Bolognese” with legumes has been at the back of my mind for some time, and while the concept is not exactly new, I think I have come up with quite a cracker vegan lentil bolognese recipe which will convince even the most ardent meat lover! At the point of making this, I had run out of diced tomatoes in my pantry (yes, it happens). I had neither the time nor the inclination to run out to the shops and get some so I used the last bit of Maggie Beer tomato sauce we had in the fridge.
The result was divine, which is the best proof that you don’t need a tin of tomatoes or a jar of marinara sauce if you make bolognese (you’ll be hard-pressed to find a recipe for bolognese on the net, vegetarian or not, which doesn’t include a tin of tomatoes or a jar of marinara sauce).
Back to the vegan bolognese – you won’t miss anything in here. My husband, an avid meat eater, loved it and simply couldn’t believe there was no meat in it. This is comfort food at its best, and at the same time full of goodies while being very low in fat. Your vegan/vegetarian and omnivore friends will be raving alike. Serve it with gluten free pasta like I did (photo) or “voodles” (spiralised vegetables) and it’s gluten free as well. So what inspired me to make a lentil bolognese?
While mushrooms or quorn mince would be an obvious choice, there had to be a more cost-effective solution. I love the effect legumes have on my blood sugar and satiety levels – I don’t so much love their effect on my gut. However, I found the “smaller” the legume the more easily digested, hence lentils are usually my legume of choice. (They taste friggin’ delicious too.) I love kidney beans and chickpeas, but if I have too much of them, they just about kill me (or rather, my bowels). Of course I know the spiel about soaking and phytic acid and blabla, but I couldn’t find a huge difference between soaking dry lentils and just rinsing organic tinned ones very well, and if in doubt, I always opt for the easier and quicker option but it is of course up to you if and how you prepare your lentils.
With all this being said, you would assume that lentils are the hero of this dish, but they are actually not…it’s celery! What the…? Well, I have to admit I’ve never liked celery all that much, especially in its raw version. In fact, celery is probably the only vegetable I couldn’t eat raw to save myself (something I inherited from my mum). So while I have recently found a new organic box delivery service which I really like, their inclusion of celery in the last box was a bit of a letdown for me at first. But an unknown vegetable for the amateur chef is like a new country to the devoted adventurer, so I knew I had to experiment. My internet search about the uses of celery only yielded raw salad recipes – three strikes, I was out. Had to do it without the help of Uncle Google.
Soups and stocks usually contain traces of celery. I figured if I just cooked it long enough, maybe it would act a bit like vegetable stock without imposing the (imho yucky) raw flavour of celery. Bingo! This bolognese tasted so rich and just had this certain “je ne sais quoi”, and since I don’t cook with onions, I knew it had to be the celery which lended this dish “a depth of flavour”, according to my hubby.
So I’ll be sure to include celery more often in my creations. You never stop learning, do you?
Vegan Lentil Bolognese
Vegan Lentil Bolognese
2 generous portions
1 garlic clove, minced 2 carrots, grated or finely sliced 2 celery stalks, very finely sliced 1 tin organic brown lentils, drained and rinsed very well (or sub other legumes) a dash of tomato sauce or tomato paste or diced tomatoes (amount depends on your preferences) 250-350 ml good vegetable stock basil, oregano, salt, pepper and any other herbs and spices of choice other vegetables of choice (optional) (mushrooms are a great choice) nutritional yeast (optional)
Make sure to have all the ingredients readily prepared. You don’t want your garlic to burn while you are still slicing the celery! Heat the oil in a large saucepan, add the garlic and fry for a few minutes until soft. Add carrots, celery and lentils and heat through for another few minutes, than add the tomatoes and stock, bring to the boil and simmer until the desired consistency is reached. Adjust the amount of stock according to your preferences. Stir in the nutritional yeast for a lovely cheesy flavour. Season to taste and serve with gluten free pasta or voodles. (I’ve got no idea how long this stuff lasts and if it tastes better the next day – we finished it in one sitting!)
There’s something about curries on a Friday night, isn’t it? I know so many folks – us included – for who Friday night means snuggling up on the couch with a favourite Thai or Indian takeout and a good bottle of wine. It is as if all the stress of the week just disappears with a bowl of steaming, fragrant curry. So warm, comforting and satisfying! I have to admit, I love our local Thai (and judging from the Menulog reviews, I’m not the only one), but I also love to know what’s in my food and while takeaway-wise you can certainly do worse than Asian, it doesn’t hurt to make your own version of it once in a while – which is also more cost-effective.
While this recipe is by no means traditional and doesn’t claim to be, it is nonetheless yummy, filling, and very easy, quick and cost-effective to prepare. I don’t know about you, but that’s big ticks in my book! In any case, it is prepared more quickly than the arrival time of the average takeaway so if you are like us and starving on a Friday night, here we go! Granted, you don’t get a free can of soda like you get with our Thai, but maybe it’s better that way (it goes much better with a glass of good red, preferably organic, of course). Plus, you can rest assured that there’s no nasties in there, and that it will please herbivores and omnivores alike. It is low carb if you serve it with my new discovery that is cauliflower rice, and it is also very low in fat if you use almond or other plant milk instead of coconut milk. Needless to say, it is gluten free like anything on this blog, and it is also vegan (although you can use meat or fish instead of the tempeh).
Which leads me to the next topic – yes, tempeh is soy. Yes, this blog is meant to be soy free and I generally advise to stay away from soy. BUT – tempeh is actually fermented soy, which along with miso and natto is soy as it is meant to be (and how Asians consume it). The fermentation improves the digestibility of soy and according to a study the bioavailability of calcium in tempeh is higher than in cow’s milk! So how about telling that a dairy-proponent when they ask “But where do you get your calcium from?” While popular soy products such as tofu and soy milk give me terrible digestive distress, I never have any issues with the underrated tempeh, so I would recommend trying it if you usually have problems with soy. I just love that it is so versatile. Just pan-fry it for a few minutes and it is ready to go. Due to its neutral flavour, it absorbs other flavours easily, meaning you can marinate it in your favourite sauce, and it is a great filler for soups, salads and sandwiches to bulk up the protein.
Now, given that I’m a health nut, I am admittedly quite late to jump on the cauliflower rice bandwagon. But after trying this recipe, I am hooked! I’d highly recommend trying for yourself. The best thing for me – almost better than the calorie saving and the health benefits – is that cauliflower rice is quicker to prepare than traditional rice! And while we’re at it, did you know you can use cauliflower to make cauliflower mash to replace potato mash? Have you tried roasting the florets and having them as a much healthier, tastier and more easily digested snack alternative to nuts? You can try roasted cauliflower as a delish addition to your favourite salad, and if you are into creamy pasta sauces, there is this absolutely cracking recipe for a vegan paleo alfredo sauce that doesn’t call for cream, coconut, bucket loads of cashews or silken tofu, simply by achieving a creamy “alfredo” style sauce with cauliflower, plant milk and nutritional yeast! I used verjuice instead of the wine and added some mushrooms – yum! So the question is – what CAN’T you do with cauliflower? (It doesn’t drive you to work, I suppose)
Please don’t get me wrong – this is not a crusade against carbs! I don’t advocate a very low carb diet, and you can do this recipe great justice by adding your usual rice. But one cup of cauliflower provides 90% of your daily vitamin C, along with vitamin K, thiamin, riboflavin, niacin, magnesium, phosphorus, fiber, vitamin B6, folate, pantothenic acid, potassium, and manganese. Not shabby! Especially now in the shoulder season where an extra dose of vitamins and minerals never goes astray. Add to that a heap of fresh vegetables, anti-inflammatory and antioxidant spices and antiviral coconut oil, and you know why this curry makes you feel so good!
Serves 4-6
1 tbsp coconut oil 1 onion, finely chopped (leave out for low FODMAP) 1 tbsp minced garlic (great against candida, but leave out for low FODMAP) half a tbsp turmeric half a tbsp chili powder half a tbsp curry powder (feel free to add any other spices you like – this is what I had in the cupboard and it goes a long way) 2 400 g tins diced tomatoes, not drained 250 ml vegetable stock 100 ml plant milk of choice half a head of cauliflower, chopped into small florets (you can use the other half of the cauliflower for your rice) 500 g vegetables of choice (broccoli, green beans, peas, carrots, capsicum…), all cut into 1 inch pieces 300 g tempeh, cut into half inch pieces
Melt the oil in a large heavy-bottom saucepan, add the onions and garlic if using as well as the spices and fry for a few minutes until the onion and garlic are soft and the spices are fragrant. Add more oil or water if necessary. Add the diced tomatoes and stock, bring to the boil, then turn the heat down and stir in the milk once it has cooled slightly. Throw in all the veggies and simmer until the veggies are cooked to your liking. Double check the sauce and correct the spices if necessary – add more if too bland or tone it down with some milk if too spicy.
Meanwhile, prepare your rice and the tempeh. Marinate the tempeh in your favourite sauce such as tamari, then pan-fry (no oil needed) from all sides until golden brown, about 4-5 minutes. Serve the curry with your choice of rice (I recommend cauliflower rice!) and add the tempeh on top or mix it all in. Tatses great straight away and even better the next day!
Who doesn’t love a Twix bar? The combination of a crumbly biscuit, gooey caramel and creamy chocolate certainly never goes astray. Shame only that the original Twix bar is so full of sugar and industrial oils – not to mention that for us gluten free folks, it is off-limits anyway. So I thought I come to your rescue and create a healthy version of this popular treat.
As part of my subscription to a monthly box with organic goodies, I was regaled with a packet of coconut flour recently. Though by no means a coconut flour newbie, I have experimented a bit with the stuff lately and just love how it is so easy to create yummy and healthy goodies with it. As it sucks up all the moisture of any other ingredients you mix it with, it is also a great staple for lowfat baking as mixing it with mashed banana or apple sauce yields terrific results. Once I had nailed my shortcrust base, it was time to think of the caramel (knowing that I would use my favourite Lindt chocolate as topping). So it came in handy that Minimalist Baker has this recipe for making a one-ingredient date caramel. A one-ingredient date caramel ticks all my boxes for healthy, easy and yummy delicacies. And I tell you, the stuff rocks. I use it in yogurt, on icecream or porridge. It tastes just as indulgent, creamy and buttery as store-bought caramel – minus the fat and the sugar slump! For this recipe, I use the caramel of about 4 dates, but I’d recommend making the original recipe and keeping any leftovers in the fridge – they won’t stay there for long!
So once you got your biscuit and your caramel sorted, it’s time for the chocolate glaze! Just use your favourite dairy free chocolate for a true vegan delight. If you tolerate dairy and are not vegan, you could also use milk chocolate. It#s a matter of taste and experimenting. The date caramel is rather sweet so I try to offset the sweetness with a bitter-ish chocolate. Using milk chocolate would obviously yield a result closer to a “real” Twix bar (whatever is real about the stuff). It’s up to you – but this recipe is sooo easy and requires just 15 minutes in total so I think you should do it again and again and see how you like it best!
Makes one double-finger “Twix” bar
For the biscuit base 40 g coconut flour 40 g “babyfood” (i.e. unsweetened apple sauce, pureed banana or any other pureed fruit) 2 tbsp of plant milk stevia or erythritol to taste generous pinch of Maldon sea salt pinch of gluten free baking powder
For the chocolate glaze 40 g chocolate (dairy free preferred)
Preheat oven to 180 °C. Line a baking tray with paper. Mix all ingredients for the biscuit base until it comes together in a uniform mass. Roll a ball, then half this ball and shape two “Twix” like logs. Bake until slightly golden, about 10-15 minutes. Let cool slightly before adding the caramel.
Meanwhile, prepare the date caramel according to the recipe. Spread evenly onto the biscuit logs.
Break up the chocolate in little pieces, place in a microwave safe bowl and heat in microwave in 30 second increments. Once it is liquid and smooth, drizzle over the caramel logs.
Now, here comes the hardest part: If you can at all resist, place the Twix bars in the fridge to firm up. But there’s no harm in devouring these beauties straight away.
This carrot cake is almost an insolence. Yes, it is low carb AND low fat – for all of you that can’t decide between the two lifestyles (or simply want to eat a truly delicious carrot cake). Talk about having it all. There is many recipes for healthy treats out there, but this cake is gonna make them blush with envy. Not only is this cake moist, scrumptious and totally utterly delicious (tick tick tick). It is low carb and low sugar with the carbohydrates coming from carrots, banana and just a dash of honey (tick tick). It is low fat with the fat coming from eggs and flax (tick). It is high protein (tick), high fibre (tick) and on top of it all, gluten free, grain free, dairy free, nut free and soy free (tick tick tick tick tick). Another decisive advantage is that if you are lazy busy you can just throw all ingredients together in one big bowl in no particular order and without any laborious instructions such as “put the dry ingredients here…mix the wet ingredients there”, separating the eggs, or melting butter or coconut oil (helped by the fact that there is no fat or oil in there). It also neatly pours out of the bowl (thanks to the flax that keeps everything together)
Given the high amount of protein and fibre, this cake will fill you up for a while which is another plus, and the icing on the cake is the icing on the cake (forgive the pun). It is fat free and sugar free, made of cannellini beans – which is the reason why this cake is not paleo. If it wasn’t for the icing, this carrot cake would be perfectly paleo(ish). So for all our primal friends out there, just omit the icing or use your favourite paleo icing instead. As there is eggs and honey in it, this is not a vegan cake, but you might be able to experiment with chia eggs and rice malt/agave/maple syrup though I cannot vouch for the results.
As a word of warning, if you have IBS, follow a low FODMAP diet or otherwise have problems with fibre, this carrot cake might not be suitable for you or you might just want to go easy and enjoy a small amount. The coconut flour in this recipe is full of fibre which is great but might give certain people intestinal discomfort. Try it for yourself. Nothing ventured, nothing gained.
For one cake (approx. 12 large or 24 small slices)
2 heaped tbsp vanilla flavoured pea protein powder 3/4 cup coconut flour 1/2 cup flaxmeal pinch of salt 1.5 tsp baking soda 1.5 tsp cinnamon 0.5 tsp nutmeg 1 mashed banana 2 tbsp honey 2 tsp vanilla essence 4 eggs 300 ml plant milk 5 large carrots, grated
For the frosting 1 cup cannellini beans, drained and rinsed 4 tbsp stevia 1 tsp vanilla pinch of sea salt
Preheat oven to 180 °C and line a round baking tin with baking paper. Mix the cake ingredients in a large bowl until a homogenic mass develops (I did this by hand). Scoop into the mould and bake for 20 minutes until a toothpick comes out clean. Transfer to a cooling rack and allow to cool completely before frosting.
For the frosting, process all ingredients in a high-powered blender until completely smooth. You can use it straight away or place in the refrigerator to firm up even more. Tip: If you find the taste of the frosting to bland, you could add spices such as nutmeg or flavouring such as almond or lemon essence.
Update: I have updated and veganised this recipe which is now even more delicious and completely vegan! I hope you enjoy it!
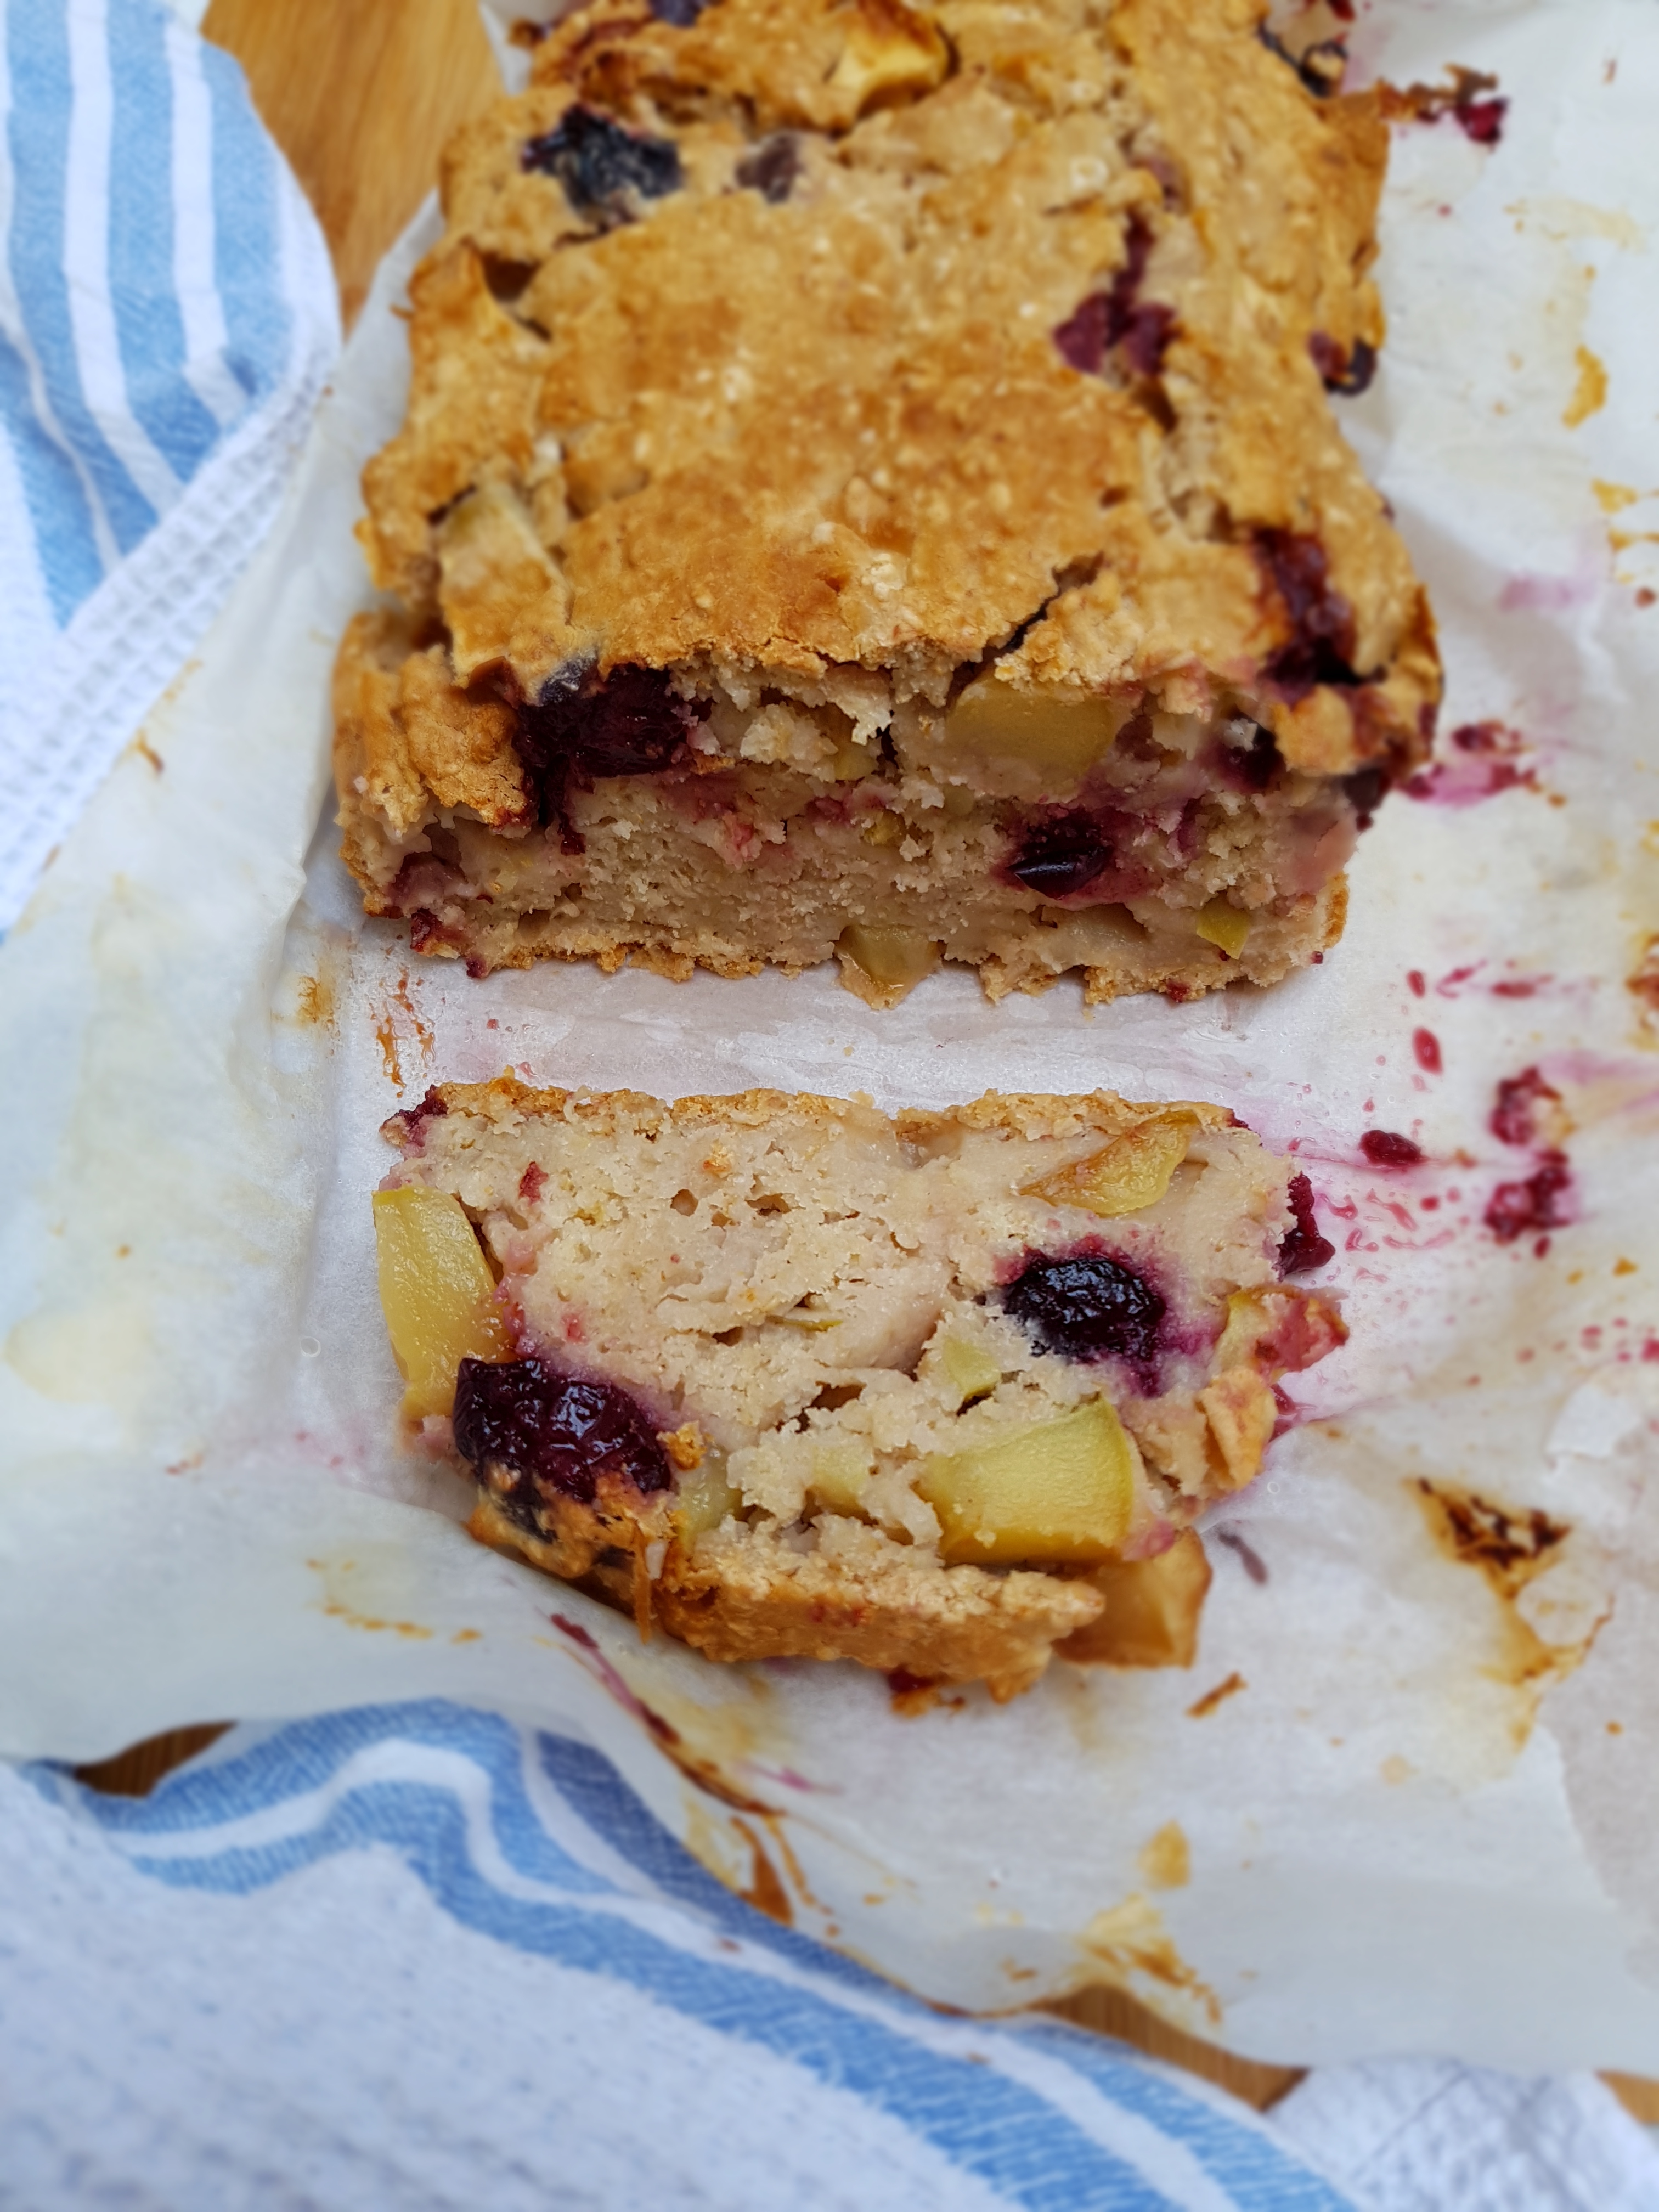
I love healthy and satisfying treat that are a cinch to make, especially since having a toddler, and this delicious, fudgy and moist apple & cherry bread just fits the bill. It’s so good that I just had to share it with you! My husband and kid love it, and it’s vegan, dairy free, egg free, gluten free, soy free and low in fat.
This crossover between a cake and bread can be done with whatever fruit you like/have available, and you could even include nuts in it (which wouldn’t make it lowfat but nonetheless delicious). It is very addictive, comes in handy as a quick snack or breakfast on the go, is very kid friendly, not overly sweet and still super yummy, and it’s a great companion with your afternoon cuppa – in short, go baking now!
The base is actually porridge – yes, oats soaked in water! So if you ever find yourself with leftover porridge, here is a great way to make us of it! No need to first mix the dry ingredients and then the wet – just throw everything together. Doesn’t get easier than that!
Apple & Cherry Bread
Apple and Cherry Bread {vg, gf, lf}
Makes 1 loaf/12-15 slices
1 cup almond milk 1 tsp apple cider vinegar 1 cup quick oats, soaked in cup water (porridge) 1 cup gluten free all-purpose flour
half cup brown rice flour 1/3 cup coconut sugar or raw sugar 1 tbsp gluten free baking powder half a cup unsweetened apple sauce dash of vanilla extract 2 apples, cubed, or other fruit 2 handfuls of frozen cherries or other fruit
Preheat oven to 180 °C. Line a loaf tin with baking paper (if using a silicone mold, you don’t need to line it). Pour the almond milk into a large mixing bowl, add the vinegar and set aside to let it react for a couple of minutes. Add the porridge, flours, sugar, baking powder, apple sauce and vanilla and mix until you achieve a homogenic consistency. Carefully fold in the fruit.
Pour the dough into the prepared tin and bake for 50 minutes until the top is golden brown and the bread passes the “toothpick” test. Turn off the heat and let the bread cool in the oven to firm it up. Once the tin is no longer hot to the touch, take out the bread and let cool completely. Serve as slices and store at room temperature, wrapped in aluminium foil.
I’d like to call this an “anti flu stew”. It’s got all you need to make you feel just that little bit better when you are fighting those viruses – and even when not. Lots and lots of fresh organic vegetables, beautiful spices, wholesome broth, supergrain buckwheat and antiviral coconut oil. Throwing this stew together was about as much as I was able to while succumbing to the childcare winter germs, but it was well worth it and kept me going for a few nights. If you are lucky, you might even have someone who does it for you. Envy!
This stew is of course not only for the cold and flu, but I was so amazed how I felt after having it compared to before that I stick to anti-flu stew. Actually, as the title suggests, the two stars are buckwheat and silverbeet, but I think it would work with any types of vegetables and grains. It somehow happened that I had a delivery of organic vegetables that day, and half the box was filled with silverbeet. Turning it onto a stew was more an experiment than anything else, but here we go. The silverbeet works a treat but, again, you can sub your favourite vegetable if you haven’t got an organic vegetable delivery with silverbeet in.
I tend to avoid garlic and onions as much as possible due to FODMAPS which are not my tummy’s friend, but since those organic vegetable people like to fill up the boxes with onions, I had quite a bit of onion and garlic, and as both have great antibacterial and antiviral properties, I set priorities and chose to fight those germs (and put up with a bit of bloat). But as always, you can omit garlic and onions even though that might slightly impair the flavour.
This stew freezes very well and tastes great even after days.
1 tbsp organic coconut oil 1 organic onion, peeled and finely chopped 2 organic garlic cloves, minced spices and herbs of choice (great options are cayenne pepper, chili powder, curry powder, paprika, cinnamon, coriander, ginger, bay leaves, parsley…) 1 bunch organic silverbeet, chopped (or other vegetable) 1 bunch organic broccoli, chopped (or other vegetable) 250 g organic carrots, peeled and chopped 1l vegetable stock 2 x 400 g cans diced tomatoes 1 x 400 g legumes of choice (I used butter beans) 1 cup raw buckwheat kernels salt, pepper and lemon juice to taste
Heat oil in a cast iron pot over low heat. Stir in garlic and onions and fry well until the garlic is soft and the onion translucent. This can take up to ten minutes. You can fry them for less than that, but the longer you fry them, the more easy on your tummy.
Add vegetables and give them a quick stir until the fragrances are released. Add the prepared vegetables and cook for a few minutes.
Deglaze with tomatoes and stock, add the buckwheat and legumes. Bring to the boil, then turn down the heat and simmer for 20-30 minutes, stirring regularly. Season to taste with salt, pepper, lemon juice and fresh parsley and serve. Due to buckwheat, this stew is very filling without the need of an additional starchy side dish.
If you asked me what would be better than a Snickers or Bounty, I’d have to say a Snickers AND a Bounty! Don’t you think? But wait – before you run to the nearest vending machine or fuel station to indulge in said lovelies, wouldn’t it be even more satisfying to make these babies yourself, knowing you’d have a healthy treat in the end?
This recipe allows you to whip up your own Snickers/Bounty bar in next to no time! Sure, it needs some chilling, but other than that, the process couldn’t be easier. And as there is no baking allowed, you save some energy, too. Good for the environment, good for your wallet. Oh, and like all my recipes, these bars are not only good for you and easy to prepare, they also taste amazing! And if you belong to the family of health nut cooks and bakers, you should have all ingredients in your pantry ready to go, which is an added bonus (if the weather in your place is like Melbourne at the moment, you surely don’t want to leave the house, not even for buying ingredients!).
Okay, but what IS this, I hear you asking? A Snickers, a Bounty, or what? Well – I think it takes the best of both worlds, i.e. peanuts and coconut. Of course, if you use any other nut butter than peanut butter, then the Snickers aspect would be lost, but it would certainly still be delicious! I could also call these superfood slices as something so yummy, satisfying and still good-ish for you must be a superfood slice, but it seems that these days, superfood slices need to involve goji berries and acai and these ones have neither (feel free to include them though – a goji Bounty bar, wouldn’t that be nice?). Coconut and peanut make a great item and the bitter chocolate topping cuts nicely through the sweetness and gives the whole creation a lift. So the only thing missing is a name!
Maybe just make them and then find a good name. If you come up with one, just let me know. 🙂
Makes 20 slices
For the base: 150g peanut butter (or other nut or seed butter) 100g desiccated coconut 80g rice malt syrup (or honey if not vegan) 25g raw cacao
For the filling: 150g peanut butter (or other nut or seed butter) 80g rice malt syrup (or honey if not vegan) 20g coconut oil, melted dash of vanilla essence
For the topping: 20g rice malt syrup (or honey if not vegan) 20g raw cacao 20g coconut oil, melted chopped nuts to decorate (optional)
Line a 20x20cm baking tin with baking or greaseproof paper. Mix the four base ingredients one by one in a large mixing bowl until very well combined. I’d recommend elbow grease here rather than a processor as you’ve got more control and won’t end up with a mess. It shouldn’t take long before a ball forms; adjust the wet/dry ingredients if you have issues with the consistency, but it shouldn’t be a problem. Press the coconut mass evenly into the prepared baking tin and make sure that it sits in there really firmly. If you can, use a heavy item such as a book to press it down even further. Put in the fridge to set.
Meanwhile, prepare the filling by mixing the filling ingredients until everything is mixed through and smooth. Spoon on top of the chilled base and spread evenly with a spatula. Return tin to the fridge.
Lastly, mix the topping ingredients – you might want to place this into the microwave for 20 seconds to make it nice and thin, but strictly no more than 20 seconds. Pour over the chilled slice, sprinkle with chopped nuts if you like and return to the fridge again for at least four hours or overnight before cutting in slices/squares.
This slice freezes very well and can be eaten straight out of the freezer, so it is a great option to make to have a healthy and filling snack on hand whenever you need it.
Anzac biscuits are naturally a must on Anzac day and you shouldn’t miss out on this just because of your intolerance or lifestyle choice! I hope you enjoyed last year’s Anzac biscuits but if they were too macaroon-y for you, here is a recipe that is closer to the original we all love and miss. This one uses banana flour which is a great source of resistant starch, keeping you fuller for longer. It functions like soluble fiber and is therefore great for digestion without being a burden on your gut, like unsoluble fiber. Add to that improved insulin sensitivity and lower blood sugar levels and you can enjoy Anzac day without your usual blood sugar rollercoaster.
These babies are vegan, making them the ideal companion for a cuppa if you are following a vegan or low-cholesterol diet, and depending on which sugar source you use, these could even be paleo. The choice is yours! With the fat coming from moderate amounts of coconut oil, desiccated coconut and just a few sliced almonds for that extra crunch, they are a guilt-free treat, and because they are so satisfying, there is less risk for you to go overboard on them. Despite their moderate fat content, they have a yummy buttery flavour. I also added lupin flakes for added texture, protein and fibre. Enjoy!
Preheat oven to 150 °C and prepare a cookie tray by lining with baking paper or a silicone mat. Combine the dry ingredients bar the baking powder, i.e. the flour, sugar, coconut, lupin and almonds in a large mixing bowl. Froth the baking powder with 4 teaspoons of hot water in a small bowl, and mix in melted coconut oil and rice malt syrup. Stir the wet ingredients onto the dry ingredients, knead until well mixed, then roll into balls and place on the baking tray. Lick the bowl clean. Bake for 20-25 minutes. Let stand in the oven for another few minutes, then cool on a plate.


 I’d like to call this an “anti flu stew”. It’s got all you need to make you feel just that little bit better when you are fighting those viruses – and even when not. Lots and lots of fresh organic vegetables, beautiful spices, wholesome broth, supergrain buckwheat and antiviral coconut oil. Throwing this stew together was about as much as I was able to while succumbing to the childcare winter germs, but it was well worth it and kept me going for a few nights. If you are lucky, you might even have someone who does it for you. Envy!

