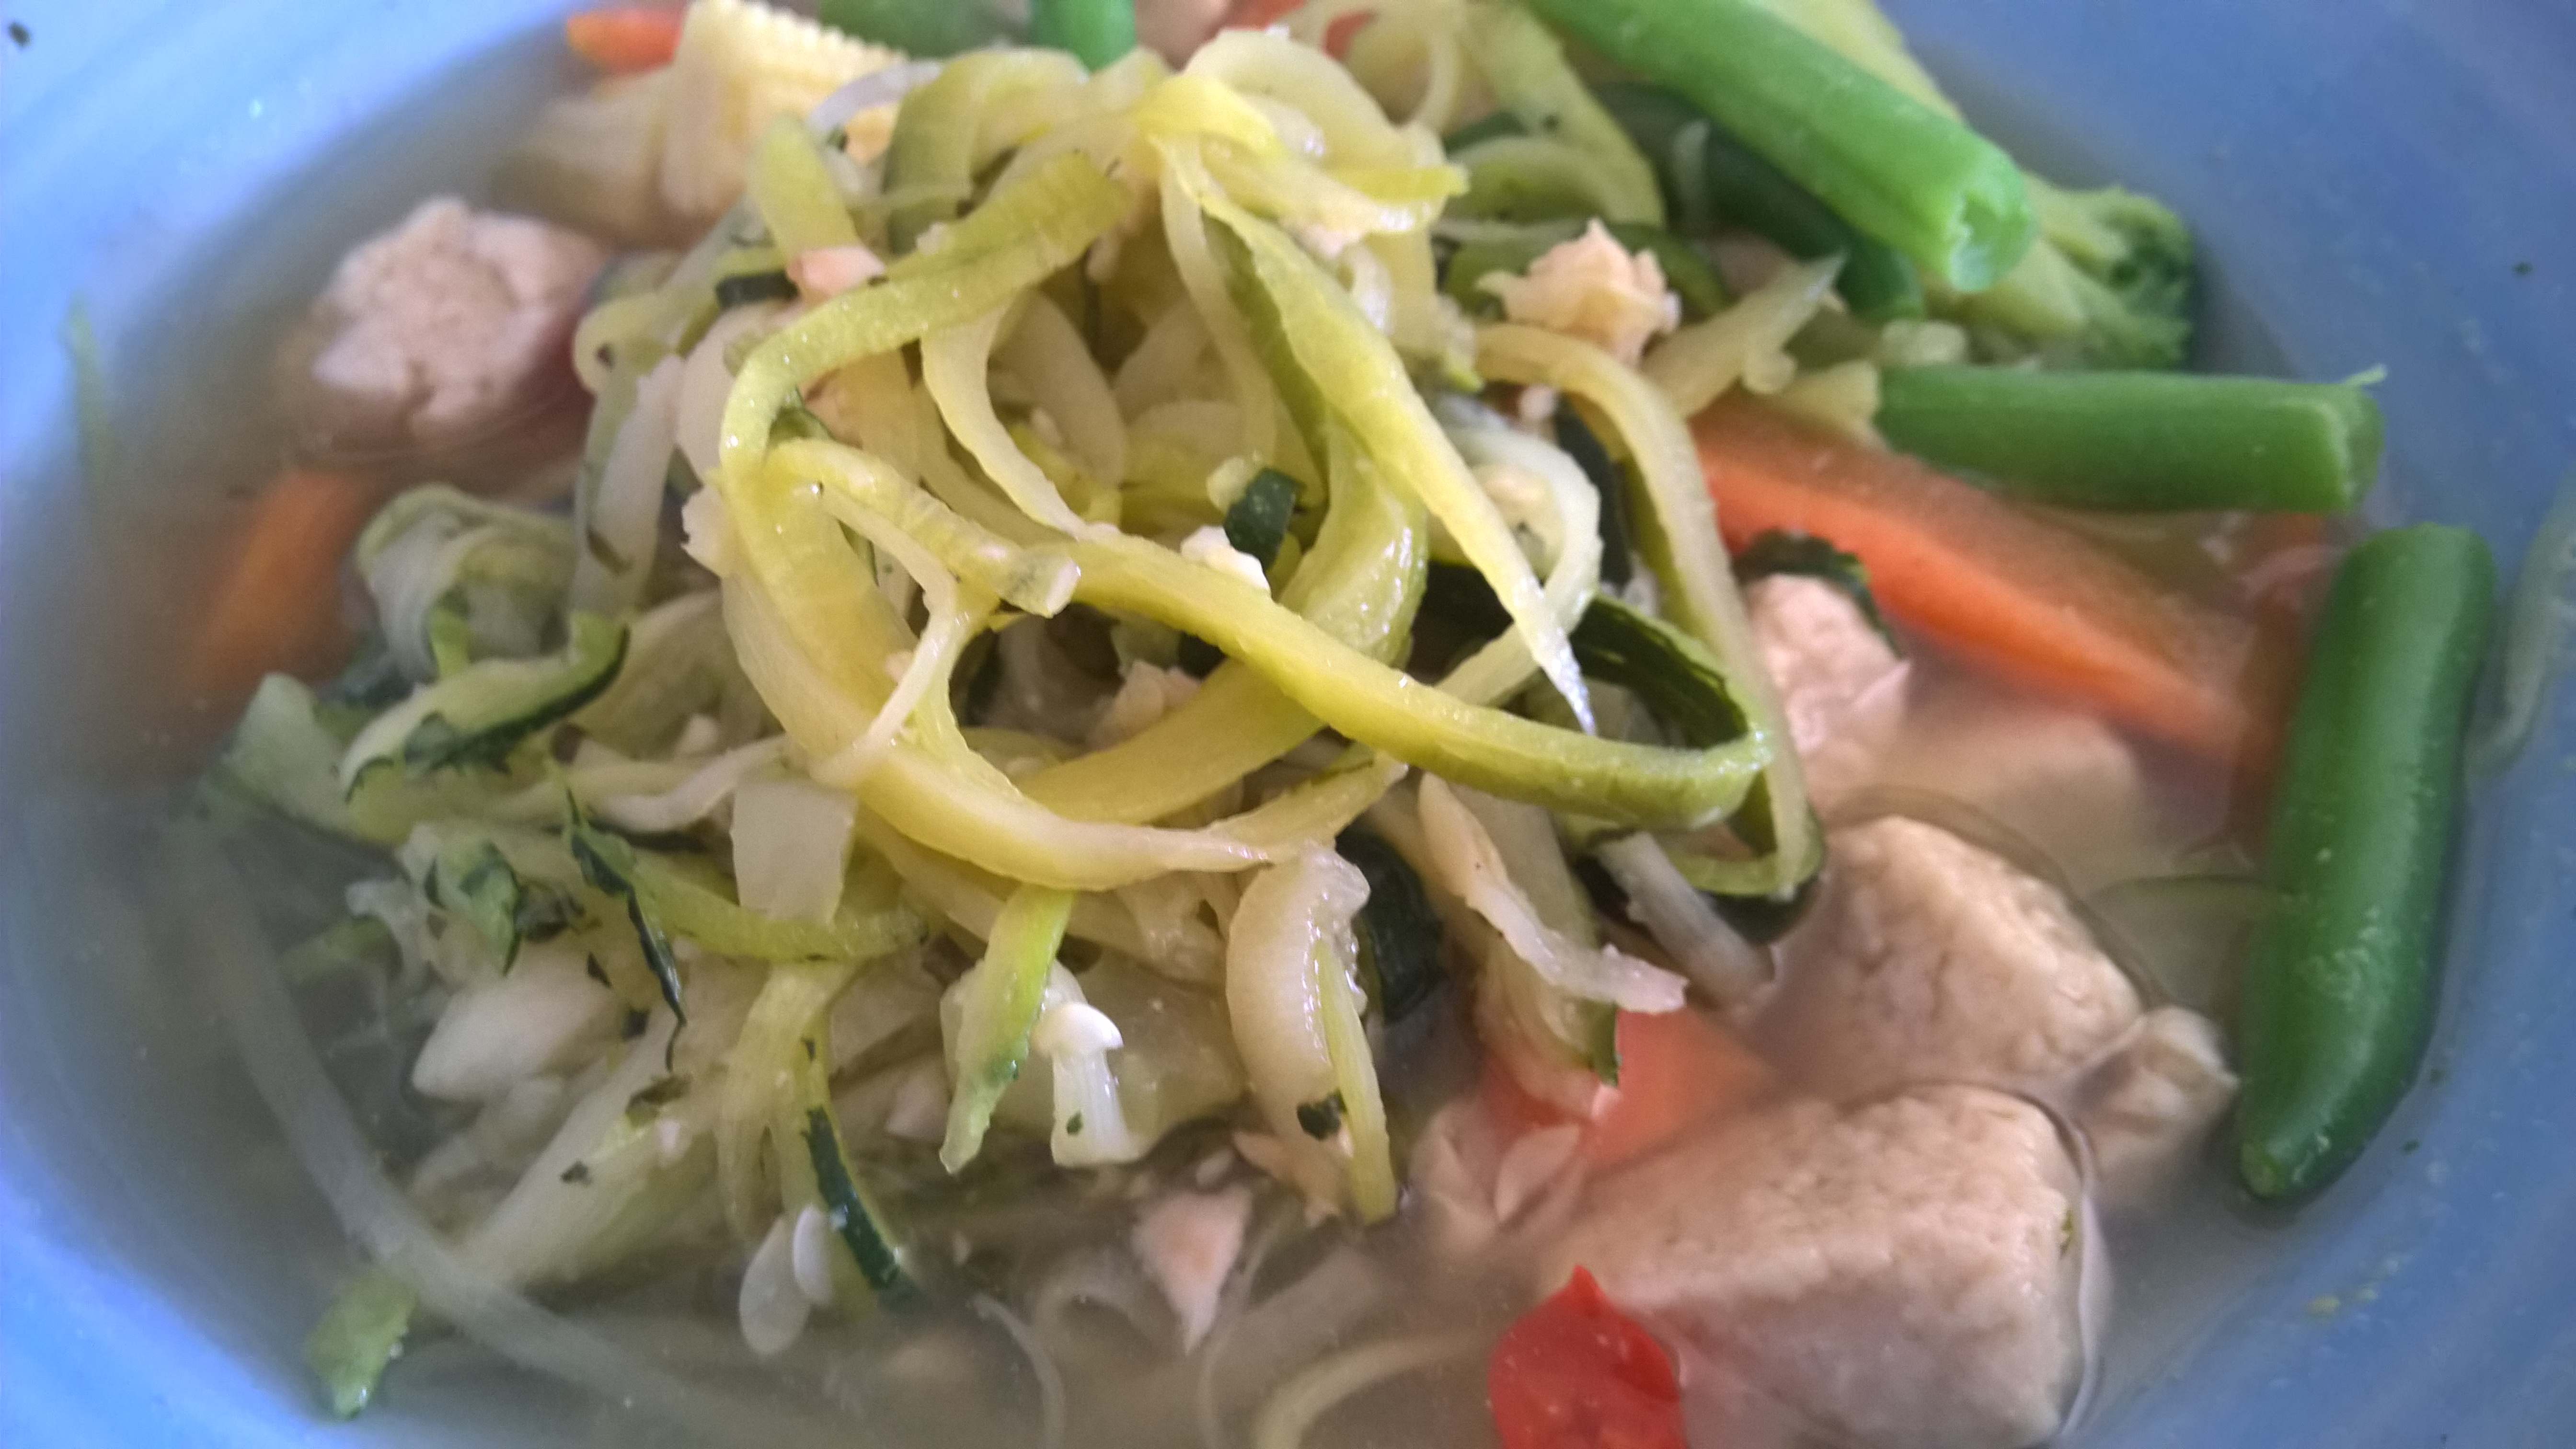
I’ve always liked Asian cuisines for their explosion of flavours, but since transitioning to a largely plant-based diet, I really appreciate curries, stir-fries, and Asian-style soups! The variety of fresh herbs, spices and vegetables in combination with rice or noodles and potentially some tofu or tempeh (if you tolerate soy) or quorn (if not strictly vegan) ensures maximum satisfaction sans meat and is a great option for when herbivores and omnivores get together as it will please to all tastebuds. Enter my healthy Asian broth.
This is my express version of a Vietnamese pho as it were. Of course, this is not a traditional pho, but it’s the quickest and easiest and -dare I say, healthiest- pho you’ll ever make. You can also just call it a broth. Depending on size and add-ons, this could be a quick lunch, afternoon pick-me-up, small starter or a bigger, comforting meal. For this particular version, I used “zoodles” (spiralized zucchini) to ramp up the veggie content and save my carbs for something else. But if you crave carbs, you could easily use rice or soba noodles. When it comes to the protein, I used quorn, but depending on your preferences and dietary requirements, you can of course use tofu, tempeh, chicken, beef, seafood or simply add more of your favourite vegetables. When it comes to cooking, recipes are generally just a matrix – you can mix and match!
Healthy Asian Broth
Serves 2-4
oil for frying (can use water, tamari or stock instead if oil-free) 2 garlic cloves, minced 1 inch piece ginger, grated (can be omitted) 1 l organic vegetable stock 400 g vegetables of choice 2 celery stalks, chopped 200-400 g protein of choice, cooked, prepared and cubed (quorn, tofu, tempeh, meat, fish….) dash of lemon juice zoodles/rice noodles/soba to taste, prepared fresh chili, to serve fresh coriander, to serve
Heat the oil, if using, in a nonstick frying pan, and add the garlic and ginger if using. Turn the heat down and fry spices until soft and aromatic. Add stock, bring to a simmer, then add vegetables and zoodles/noodles. Simmer for a few minutes, then add your prepared protein. Finish with lemon juice and serve with chilli and coriander.
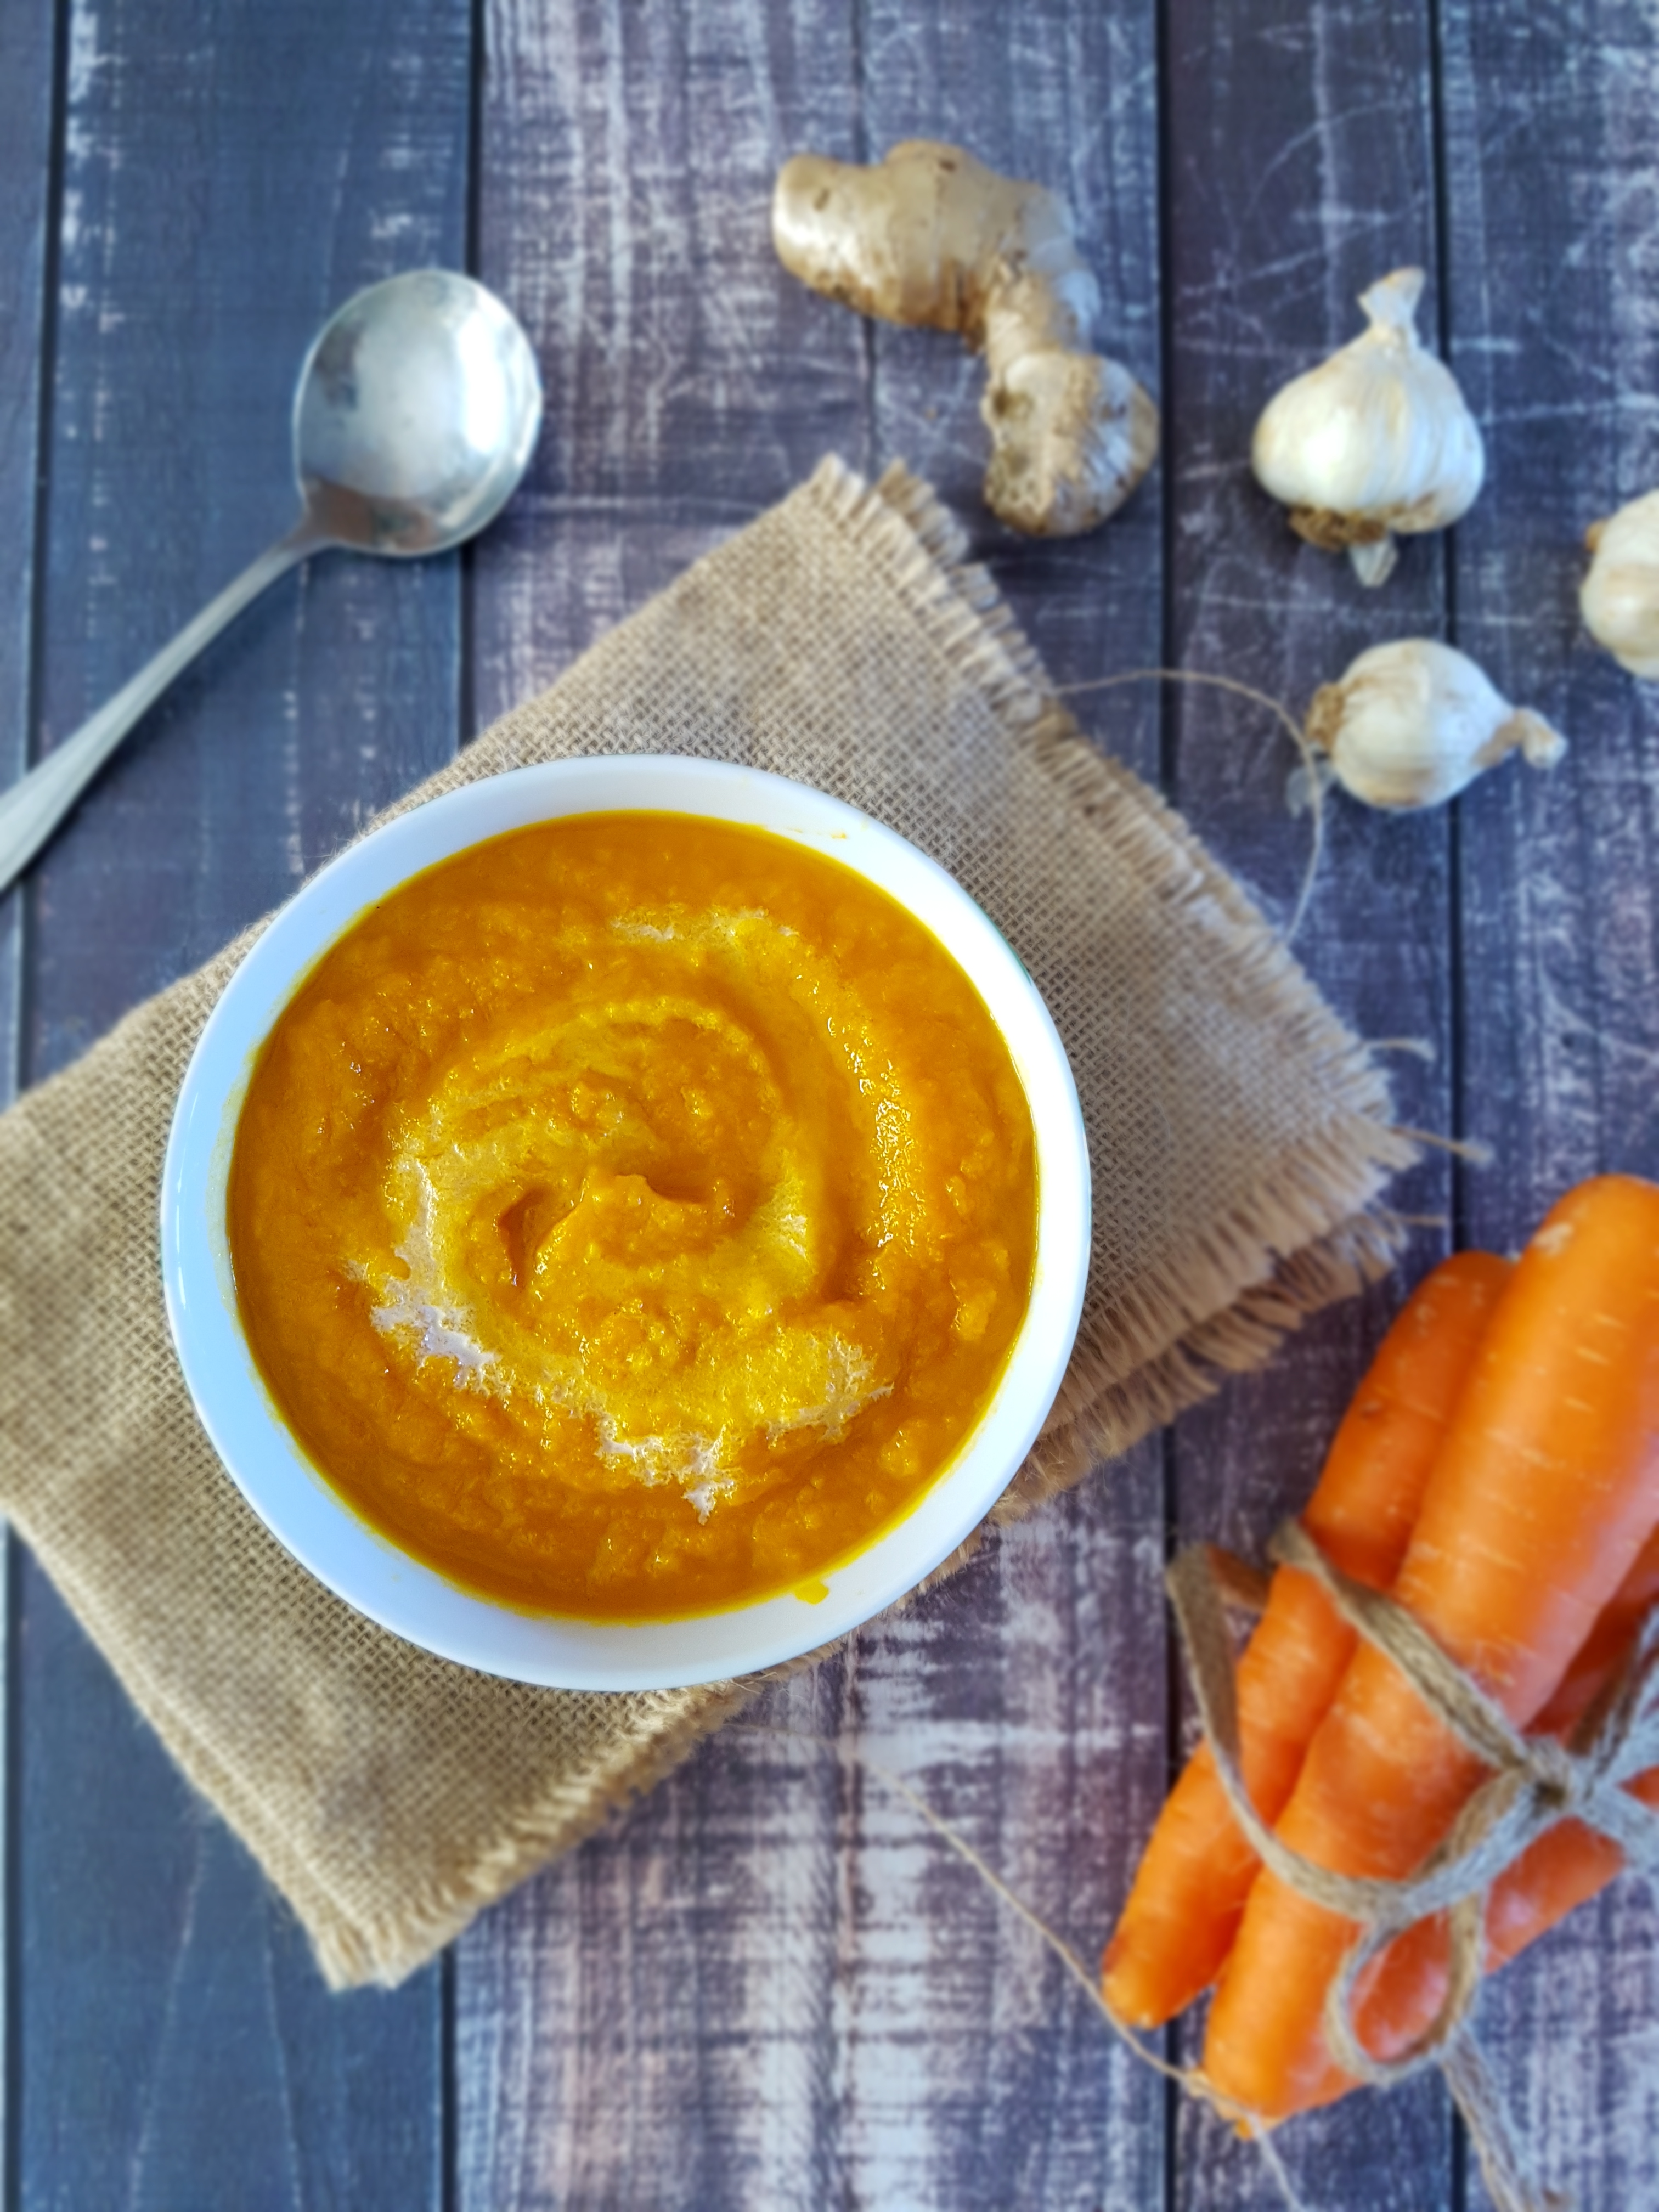
Nothing beats a good soup. And in my mind, you don’t need to wait for winter to enjoy soup! Whether as an elegant entree or healthy main meal, soup never fails to hit the spot. Soup is versatile, filling, and an easy and -yup- cheap way to fill your tummy while keeping your calorie budget low. It is great for entertaining as you can create an impressive meal with minimum effort as you can prepare it days in advance and it keeps well. It is also a fantastic way to use up leftovers. Enter my easy healthy carrot soup.
When I discovered that my organic Tasmanian carrots were losing their mojo, I decided to breathe new life into them by turning them into a delicious soup. This one is really really easy to make and you should have all the ingredients ready in your cupboard! By first steaming the carrots and then blending them with hot stock you allow the precious minerals and vitamins in carrots to be largely preserved, rather than when you cook the carrots for a long time in the stock, although you can perfectly do that too. The cooking time will be slightly longer then.
Easy Healthy Carrot Soup
Healthy Carrot Soup
Serves 4
750g carrots, washed, peeled, chopped 1 large onion, peeled and chopped 2 cloves garlic, minced 1 inch piece fresh ginger, peeled and chopped 1l vegetable stock salt and pepper Plant milk to finish (lite coconut milk is great)
Steam the carrots until tender. Cover the bottom of a large stockpot with just enough stock and heat up. Add the chopped onion, garlic and ginger and cook until they start to soften and release their aromas. Add more stock when the first batch has dried up. Add the steamed carrots and some salt and pepper and cook for a few minutes, then add the remaining stock, bring to the boil, turn down the heat and simmer for couple of minutes. Turn off heat, let cool slightly, then process with a stick blender, add a bit of plant milk for a creamier texture. Serve with roasted pepitas or pomegranate seeds.
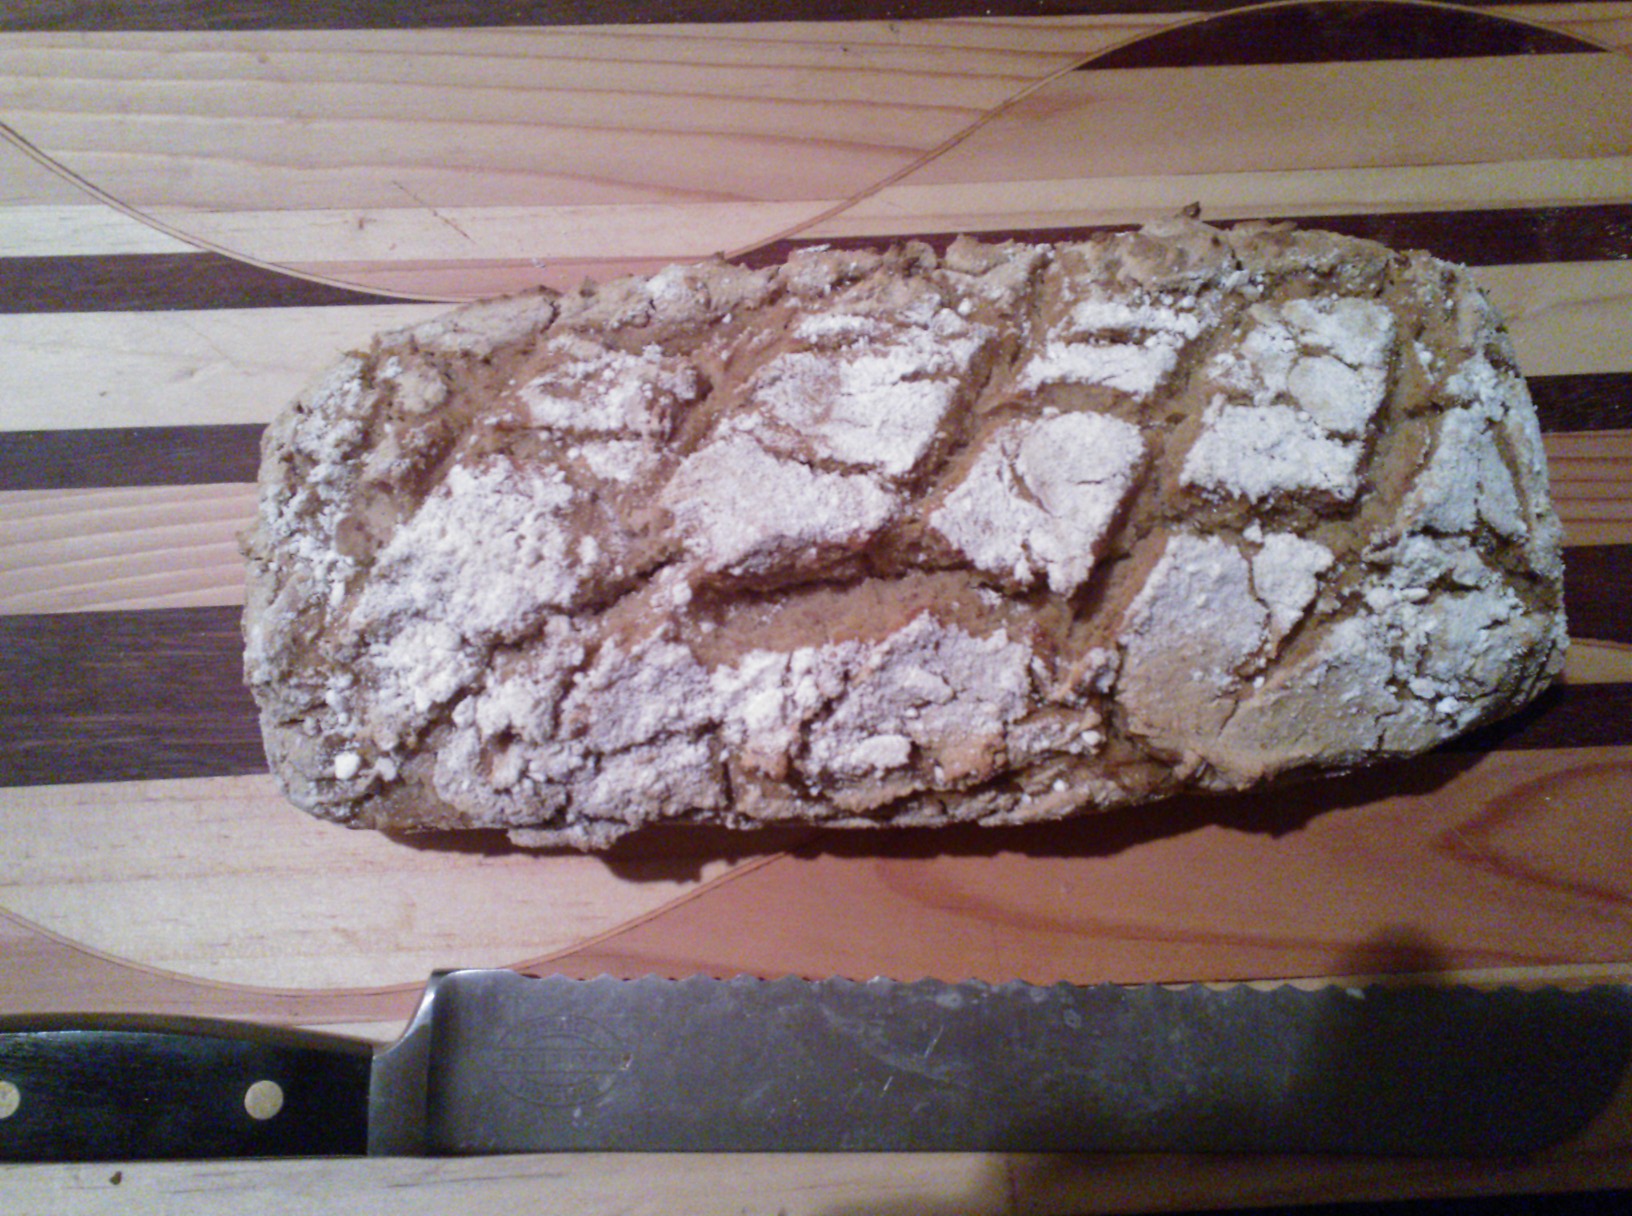
The net is swarming with recipes for “paleo bread” these days, which is great. After all, it’s good to know you can get on with your life even if – for medical or lifestyle reasons – you don’t eat “regular” bread. And let’s admit it, we all like bread, at least now and again, even the paleo police!
The thing about “paleo bread” is that it usually contains a bucke load of eggs – hey, don’t get me wrong! I loooove eggs – poached with smoked salmon and avocado smash. Not as an ingredient in bread. I’ve seen paleo bread recipes calling for as much as six eggs. Six! That’s cake. It’s not bread. I wanted bread! (Using six eggs in a recipe is darn expensive too, but that’s another story.)
The solution – chia seeds! The “chia gel” made of chia seeds with the triple amount of water is a perfect (and cost-effective) way to replace whole eggs. It also means you can meet your vegan friends and enjoy some nice bread together.
While in theory, you can always replace egg with chia gel, it works especially well in this recipe. The nutty flavours of besan flour and buckwheat flour complement the chia seeds well. This bread is perfect as an accompaniment for light savoury dishes such as soups and salads, and it is also amazingly good on its own or dipped in olive oil.
The best thing about this bread is that it is easy as, and in just a little more than an hour (the majority of which spent on waiting) you can enjoy delicious bread!
Makes one loaf
1 pint (473ml) filted water 2 tbsp extra virgin olive oil 2 tbsp organic apple cider vinegar Chia gel, made of 3 heaped tbsp chia seeds, dissolved in nine tbsp filtered water 125g besan flour 125g arrowroot 125g potato starch 100g brown rice flour 50g buckwheat flour 3 tsp sea salt 1 tbsp raw sugar 1 tbsp dried yeast
Preheat oven to 180 °C. Mix together the wet ingredients in one bowl, and the dry ingredients in another. Mix the wet to the dry ingredients and mix for 2 minutes on low.
Pour the dough in a prepared loaf tin. Cover with a clean cloth and let stand in a warm place for half an hour, and then bake for another half hour: Place on the medium rack and place an empty baking dish with icecubes on the lower rack (this step is not necessary but helps to achieve a crust). Quickly close the oven door and bake for 30-45 minutes or until the bread sounds hollow when knocking on it (this will depend on your oven, the time of year, temperature, humidity, and even the altitude of your home!).
Yes, the title is correct – this is a vinaigrette with watermelon in it! And it works just beautifully! If you don’t believe that a watermelon vinaigrette works, you better see for yourself, as this is whipped up in a matter of minutes, with just a handful of ingredients! I have tried it on Greek Salad, Salade Nicoise, as well as chicken salad, and it is absolutely fabulous no matter what you put it on! Delightfully sweet and refreshing without a hint of any industrial sugars, this low-fat dressing is sure to jazz up your summer salads!
Serves 2
3 cups fresh watermelon, roughly chopped 1 tbsp apple cider vinegar 1 tbsp lemon juice 1 tbsp extra virgin olive oil salt and pepper fresh mint, basil, and parsley
Blitz all ingredients in a food processor until the desired consistency is reached and serve with freshly prepared salad. Lovely! Keeps in the fridge in an airtight container for up to five days.
Before Sushi took rank 1 as my favourite food in my late twenties, it was undeniably falafel – and still is, actually. Especially since it is a bit easier to replicate at home than sushi! I love, love, loooooove falafel! Have I mentioned that I am in love with falafel? It is just one of those dishes that makes you think “who the eff needs meat”? Don’t get me wrong, I love meat! But falafel makes lving without a lot easier since it is just so delicious! To me, it is the perfect summer dish with fresh salad, a crispy gluten free pita, homemade hummus, and a glass of dry and ice-cold white wine. Falafel is also very good for you! Chickpeas provide protein, fibre, manganese, iron, and complex carbs, making you feel full for a long time! Chickpeas are also naturally low in fat, so one more reason to dig into those falafels – provided you don’t eat the conventional deep-fried version, which nullifies all the health benefits of the falafels.
Since I adore falafel but don’t believe in deep-frying (especially not deep-fried in recycled trans-fats, yikes!), I wanted to come up with a way to have them oven-baked, not fried. I am happy to announce that it worked! Falafel is naturally meant to be a rather dry dish, so in my view, it doesn’t really matter that the baked falafels might be a little bit drier than the store-bought ones. I think they are just as yummy, and if them being low-fat means that I can have more, I don’t complain either! I prefer not to use any oils besides olive oil and coconut oil; however, olive oil is not suitable for deep-frying, and neither is coconut oil, plus its flavour simply doesn’t work in middle eastern cuisine. So that’s why my falafels are baked!
Another issue is that falafel in a snackbar are most of the time glutenated as they contain wheat flour – a big, big no-no! So that’s why my falafel has chickpea flour, which makes a whole lot more sense as it improves the flavour a lot and naturally enhances the chickpea aroma. One more thing, please do not waste your money on those ready falafel mixes – there is nothing wrong with them per se, but they are basically just chickpea flour with a bit of salt and spices in them. They are chickpea pancakes and have absolutely nothing to do with falafel, no matter what the package says, and they are far too overpriced for what you get. If you want quick and instant falafel-style patties, just mix some chickpea (besan, garbanzo) flour with hot water, lemon juice, salt, and parsley and fry it, which makes for a filling and quick dish, but is simply not falafel! Again, you can make “falafel” patties by buying your own chickpea flour instead of expensive “falafel” mixes!
Which takes me to the second point – even though falafel is relatively easy to make, you have to start one day before you eat them – that’s because you need to soak dried chickpeas over night. Yes, you read right, unlike hummus for which we use canned chickpeas, falafel requires the dried chickpeas, which are half the size of the canned ones. Believe me – don’t try this recipe with canned chickpeas. I don’t say that it’s not delicious, but it’s just not the same! You really need to use the dried chickpeas!
This recipe is adapted from the Shiksa in the Kitchen, but I obviously don’t deep-fry the falafels, since this is a recipe for baked falafel – duh! There is another superb recipe in Yotam Ottolenghi and Sami Tamimi’s book Jerusalem, which recommends using a meat grinder.
Makes 30 falafels
375 g dried chickpeas, soaked overnight in a big bowl, covered in water twice their volume (or so that 5 cm water are above the chickpeas in the bowl) 1 onion, chopped (omit if low FODMAP) 1 garlic clove (omit if low FODMAP) 3 tbsp coriander, chopped 2 tbsp parsley, fresh, chopped 2 tbsp chickpea flour 1 tsp cumin 1,5 tsp salt 1 tsp ground coriander generous grind of black pepper generous pinch of cayenne pepper pinch of ground cardamom 1/2 tsp baking soda (optional)
Drain and rinse chickpeas well. Process with all ingredients bar the baking soda to a coarse paste. Do not overprocess it! Scrape the sides down while you are processing it. It should more look like couscous than a paste, but it must still hold together! Place in a big bowl and fluff with a fork to smash any chickpeas that are not processed. Chill mix for 1 hour before using. If you are using baking soda, use it right before baking. You can omit it, but the falafels do get fluffier with the soda.
Preheat the oven to 210 °C and line a baking tray with baking paper (or use a silicon sheet). With wet hands, shape balls or patties out of 2 heaped tablespoons of the falafel mix. Bake for 30 minutes in total, turning around half way through until lightly golden. Serve with gluten free pita, salad, hummus, and tzatziki.
Tip: It’s great to toss the falafels in a bit of sesame before baking!
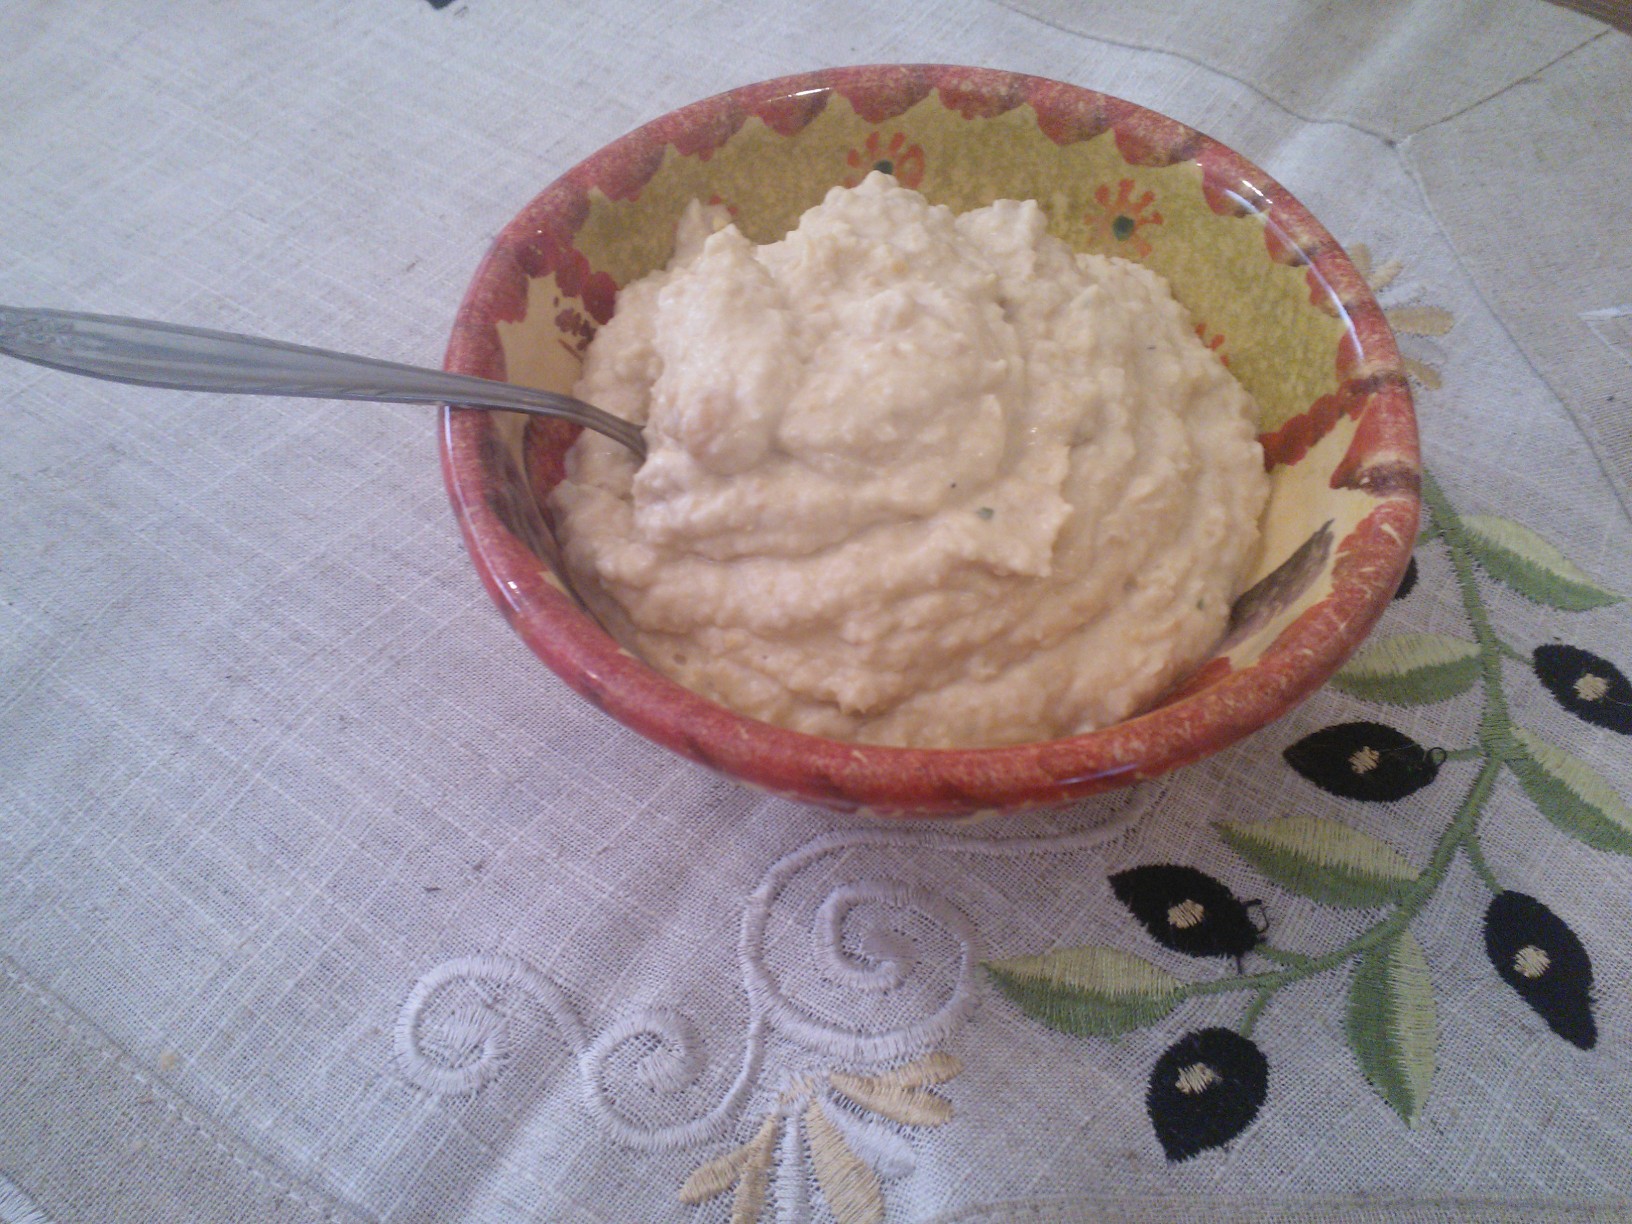
As you will know, store-bought hummus is brimming with things like canola oil and other creepies; what could be one of the healthiest foodstuffs around comes jam-packed with unhealthy fats, artificial flavours…and when you look at the so-called “skinny versions” – they are even worse! Not to mention, quite pricey too for a tiny tub! Actually, it is so easy and so quick to make hummus yourself there is absolutely no excuse not to make it yourself! Plus, you can control exactly what’s in it! And save some money on the side. I just use a dash of very good EVOO for a batch so my hummus is really quite low fat, but feel free to omit or use more olive oil than that! I wouldn’t recommend skipping the olive oil altogether, as it is essential for the flavour of this Middle Eastern dish.
1 can of chickpeas, drained and rinsed 5 tbsp lemon juice 1 tbsp extra virgin olive oil 1 tbsp tahini, hulled or unhulled depending on whether you like a more robust or more subtle flavour 1 tsp kosher sea salt spices to taste (a true hummus needs garlic, but you can omit if you are low FODMAP; I always do! Chilli is great if you like it hot!
Combine all ingredients bar the oil in a food processor while adding 40-50 ml of water. Process until smooth. Serve the hummus in a bowl, make a well in it and put 1 tbsp of oil in the well. Serve with toasted gluten free bread or crudités. Hummus keeps in the fridge for 3-5 days. I currently have a batch in the freezer, so will let you know if it turns out alright!
The good thing about experimenting is – even though it doesn’t always work, or, in fact, more often works NOT, you may stumble upon fantastic things you hadn’t imagined before. Take pita bread, for instance. I love falafel, just like anything else that belongs to Middle Eastern cuisine, and what is falafel without pita? So I tried to make pita – still working on it. My first tries were delicious enough, but they were not exactly pita, not enough pita to post a recipe on the web, anyway. However – my thought was “this would actually make quite a nice pizza”. Pita, pizza – the names are close enough, so I thought why not turn my pita experiment that didn’t work into a pizza experiment that works?
I must admit, pizza is one of the few things I genuinely miss being gluten free (having an Italian husband doesn’t help the cause!). Sometimes I would just like being lazy and grab one of these gluten-free pizza bases from the shop – a look at the ingredients (and nutrition facts) has so far been enough to deter me from wasting seven bucks on a processed gluten-free pizza base. Good on me!
It’s not that there is a lack of recipes for gluten free pizza out there, and I don’t doubt that they taste alright. But I just couldn’t find one that ticked all the boxes. Either they involved almond and/or coconut flour – and, as much as I like these two, almond and coconut just doesn’t belong on pizza! Or the recipes involved yeast and/or gums (a big no-no), or they seemed to be too complicated and involving too much time when you are hungry and impatient! I wanted a pizza recipe that doesn’t need proofing. I am not the biggest fan of a yeasty taste either, and I find it quite hard on the stomach which is not healthy.
This pizza is also WHOLEGRAIN – so it is really good for you. There is no complicated ingredients (you should have these when you have been baking gluten free), and if you get started right now, you could have a lovely healthy gluten free pizza that is delicious in less than 30 minutes. WTF? Exactly. My wholegrain pizza base ticks all the boxes. You can make this for your gluten-eating friends, and they won’t say “this is good for gluten free”, they will say “this is good”. In fact, I trust they will say “this is great”. Healthy? Tick. Easy? Tick. Yummy? You bet. And quicker than waiting for takeaway.
Gluten Free Vegan Pizza Base
Makes one baking sheet of pizza (probably makes sense to double or triple using several sheets and freeze leftovers)
50 g buckwheat flour 50 g brown rice flour 30 g millet or oat flour 30 g ground flax seeds 1,5 tsp sea salt 1 tsp baking soda 3 tsp vinegar 1 tbsp olive oil a pinch of sugar (or honey) 225 ml warm water garlic powder (optional) tomato paste (optional) oregano
olive oil to top (optional)
toppings to taste
Preheat oven to 220 ° C. As usual, mix the dry ingredients (flours, soda, salt, flax, sugar, garlic powder if using) until one colour. Add water, oil and vinegar and mix until you have a supple, uniform dough – a bit like a muffin batter, rather than the pizza doughs you might have made with gluten flour. Let the dough rest for 10 to 15 minutes before spreading it on a very well-greased or silicon baking sheet – the thinner you spread it the better. After all, we want a nice Italian-style thin crust pizza, not one of these American grease bombs which are as thick as a quilt! With a wet spatula or spoon (or using your wet/oiled hands), flatten the dough so that it becomes nice and even. We don’t want a pizza that is thin in one corner and thick and doughy in the other!
Bake the dough without toppings for roughly 15 minutes until dry and pizza-like. Now comes the fun part – the toppings. You will probably want to spread some tomato paste and oregano on the pizza as a classic, although this is not even necessary. For the pizza in the picture, I used a mix of different vegetables (kale, peas, fresh tomatoes, mushrooms, capers) and some tempeh as vegan “ham”. Olives, sundried tomatoes and vegan cheese would also be a great additionI Just try whatever you fancy! I recommend sprinkling the top with a dash of olive oil, which works wonders for the flavour!
Now bake the pizza base with the toppings until they have reached the consistency you desire – probably another 10, 15 minutes. Devour.
Gluten free bread sucks. Do you agree to this statement? I used to. No matter where in the world, and no matter whether from a breadmix, or a bakery – gluten free bread just sucked. And even if it tasted anywhere near something you would serve a human being, it was filled with crap. I know, I know what you are going to say – one doesn’t need bread, or any carbohydrates for that matter. There is absolutely nothing wrong with low-carb or paleo, ans, in fact, I believe many of the western world’s problems could be solved if people ate low(er) carb!
But, heck, I am German and married to an Italian – there is just no way I’m gonna give up bread forever, and even though I am gluten intolerant, there must be a way to make gluten free bread that doesn’t suck! Gluten free bread that doesn’t have a whole shelf of creepy ingredients in it. Gluten free bread that doesn’t have a dozen eggs in it (that’s not bread, that’s cake! And If I crave bread, I don’t want cake – sorry, Marie Antoinette!).
This was an experiment. One that turned out well. One that my (gluten eating) hubs couldn’t get enough of. One that reminded me very much of the texture of a good ol’ German sourdough – even though the taste is more in the tradition of the Irish soda bread. I didn’t have any dried yeast, so had to resort to soda. With an old trick I knew (putting a bowl of water in the oven), my bread got a lovely crust. And thanks to all-time favourite flax, this is egg free, but you won’t miss any eggs – the trick with the flax eggs worked! So this is not only gluten free, it is yeast free, gum free, egg free, and dairy free. And it doesn’t suck.
Gluten free? Check. Dairy free? Check. Yeast free? Check. Egg free? Check. Vegan? Check. Gum Free? Check. Soy free? Most naturally. Full of fibre and omega 3? Check. Sugar free? You have the option. Yummy? Check. Easy and quick to make? Check.
You can start now. You should have the ingredients. And it is really really easy. You don’t even need to preheat the oven – you really don’t!
Makes one loaf
150 g potato starch 100 g sorghum flour 50 g arrowroot 2 tbsp baking soda 2 tsp celtic sea salt 2 tsp sugar or honey 250 ml hot water (ca. 40 ° C) 3 tbsp ground flax seed, dissolved in 9 tbsp water (equals 3 flax eggs) 4 tbsp apple cider vinegar 1 tbsp olive oil
Mix the dry ingredients (potato starch, sorghum, arrowroot, soda, salt, sugar if using) in food processor with dough blade until one colour. Slowly add oil, flax eggs and honey, if using, with the blender running. Add vinegar and hot water and mix until you get a supple, uniform dough. There should not be any lumps in it whatsoever – it should be the smoothest thing ever. Turn off the processor, and with a silicon spatula, scoop dough into loaf pan. Sprinkle the loaf with sorghum or any other gluten free flour and notch several times with a sharp knife. Place on middle rack in an oven, and place another tray filled with water below the loaf pan. Turn the oven to 230 ° C and let bake for 35 minutes. Turn off the oven, and let the loaf cool on a wire rack.
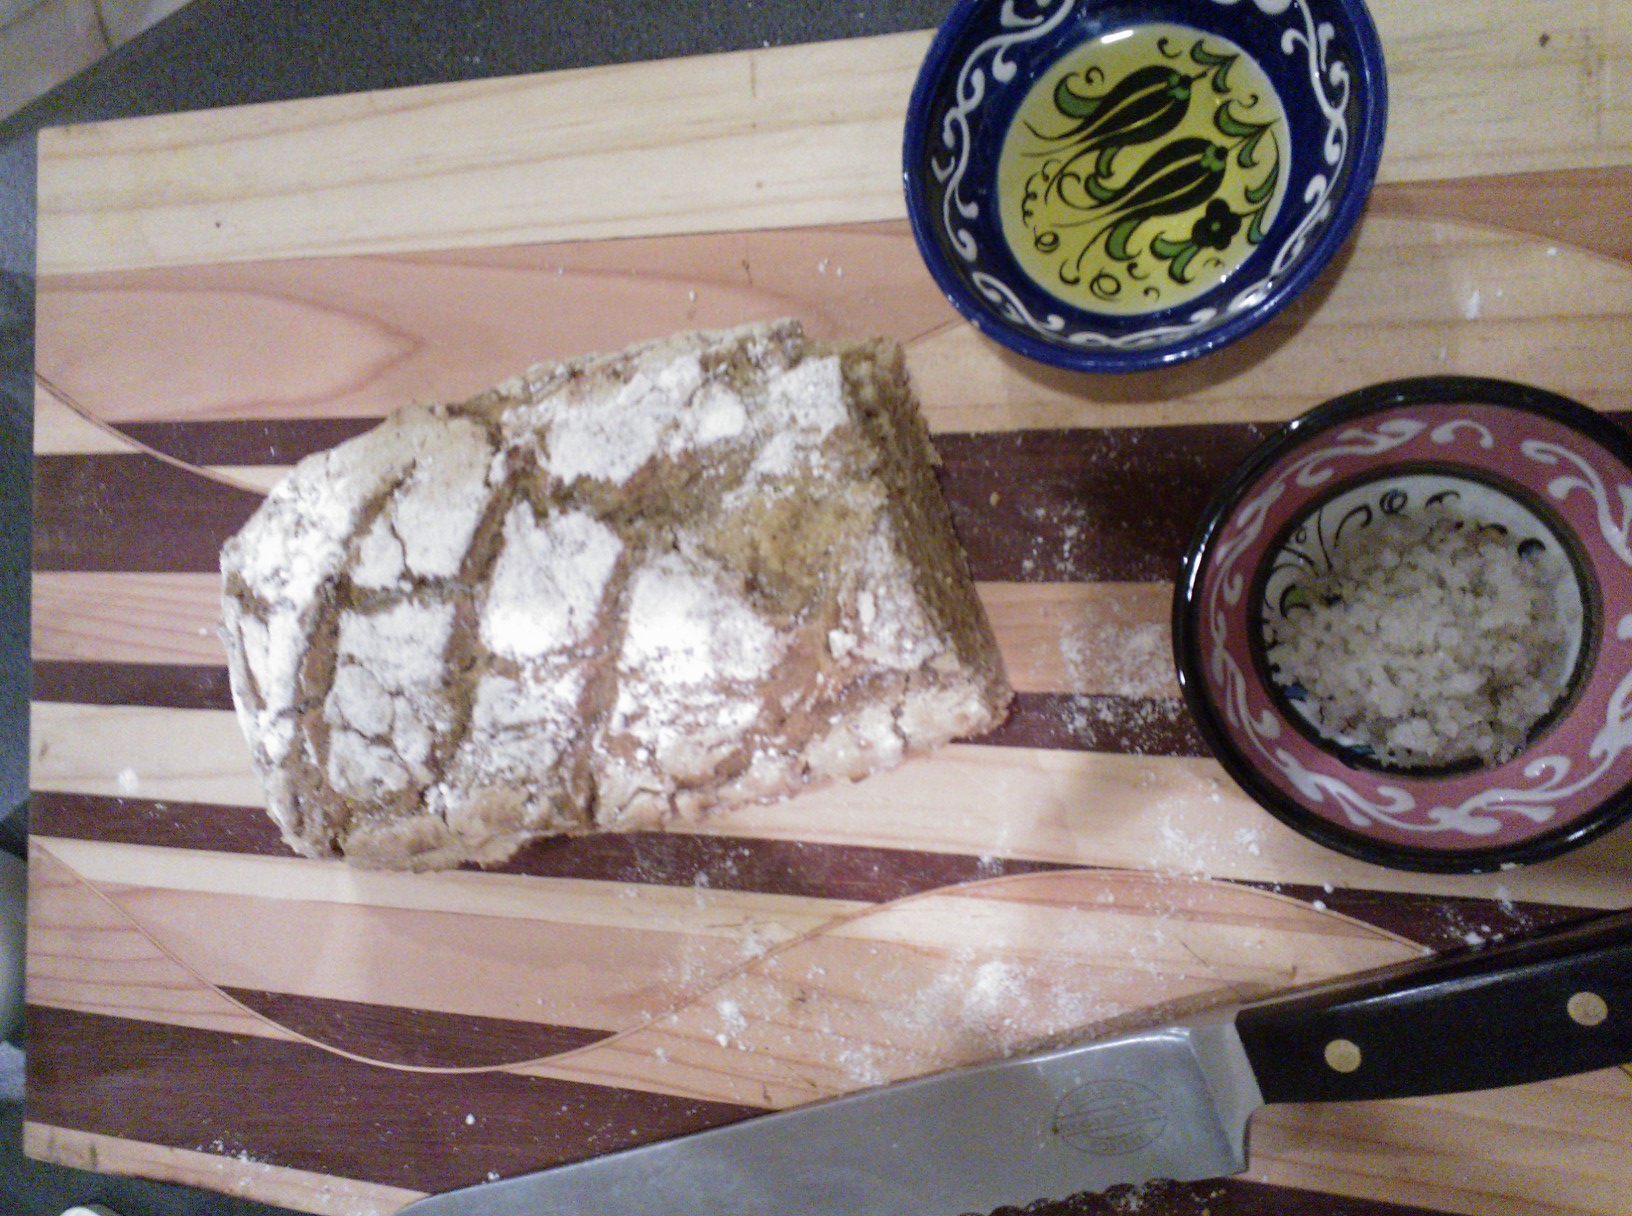
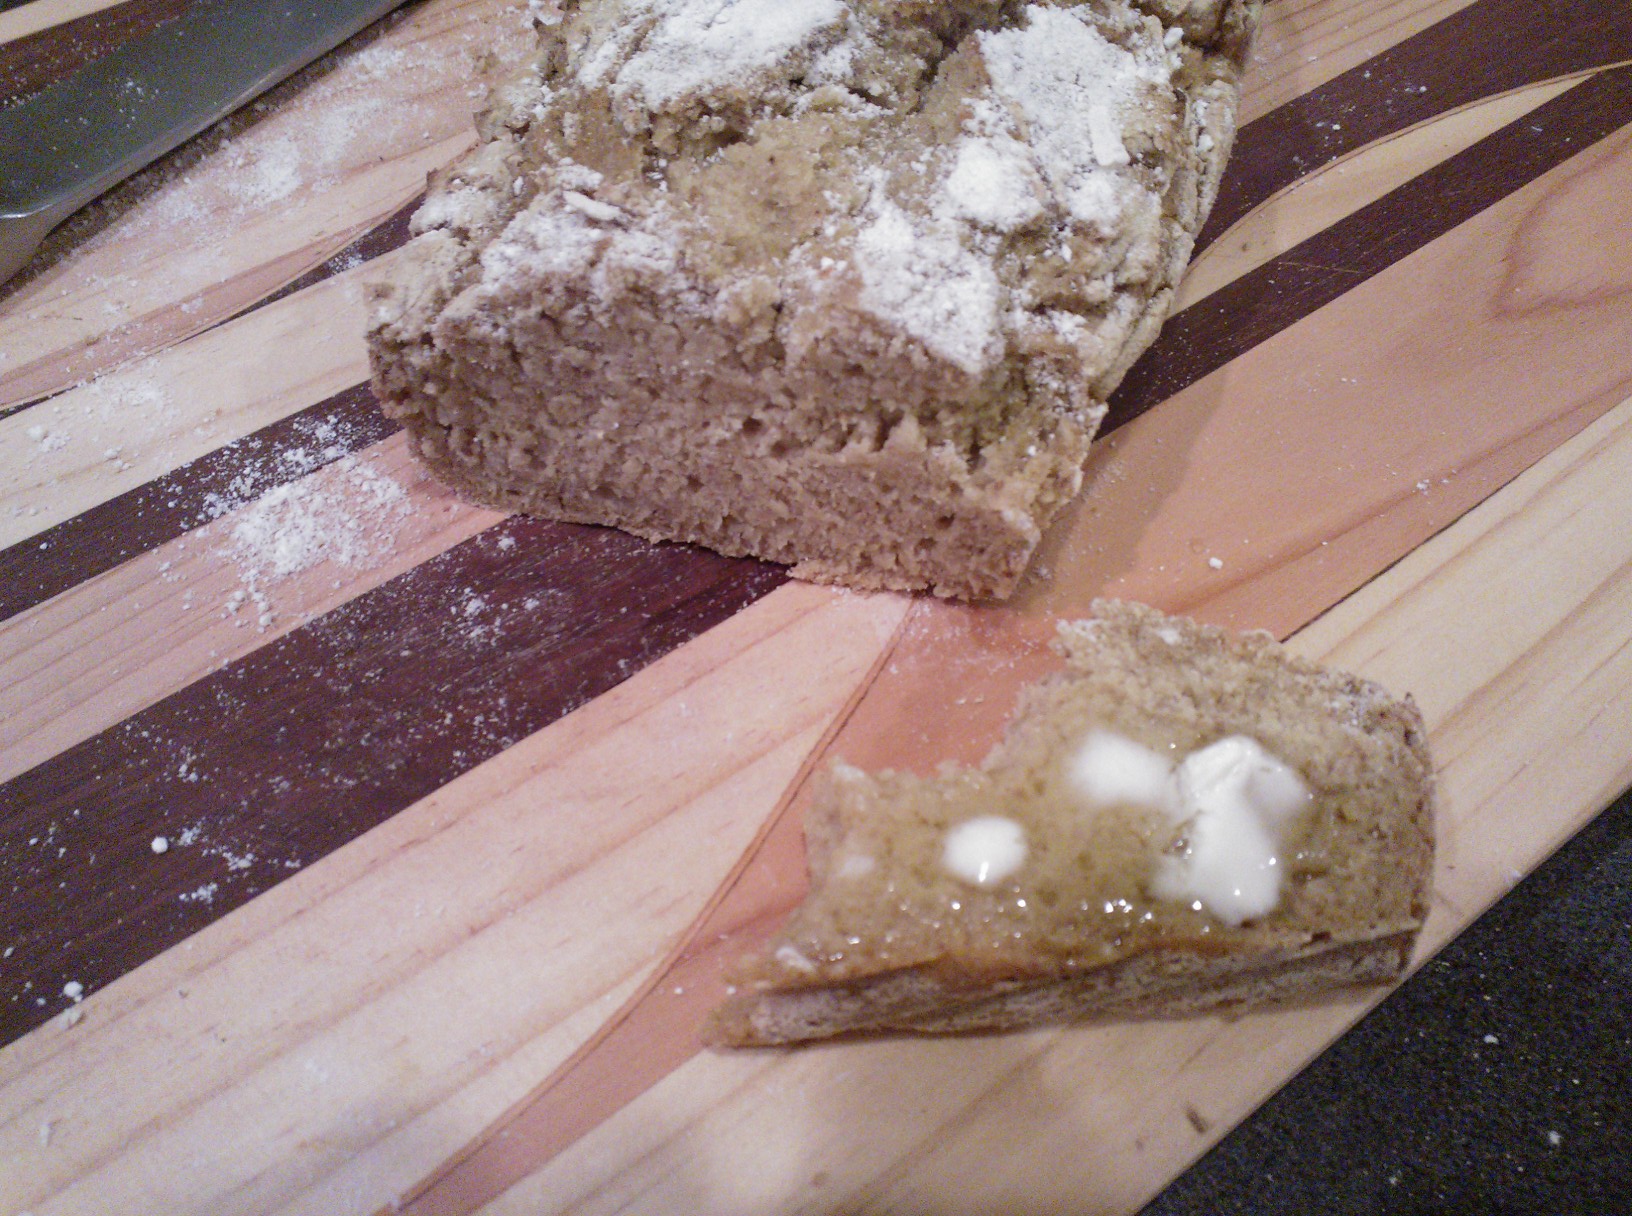
Delicious Gluten Free bread with Olive Oil and Sea Salt or…
Mediterranean Style Gluten Free and Yeast Free Bread
Today it happened. Today was the day I made the decision it was time to enter new gluten free territory. To try the object of desire of countless celiacs and gluten free folks. To make with my own two hands the thing that turns good olive oil and coarse sea salt into the most desirable, seductive ménage de trois, the loyal companion of a good merlot, the reliable foundation for freshly churned butter, the satisfying partner of a bowl of steamy, creamy soup: Bread. Gluten free bread.
I made gluten free bread! I still can’t believe my luck! I tried gluten free bread, and it worked! I can serve my half-Italian husband Italian-style bread to dip into oil and salt. To nibble straight of the loaf pan. To enjoy with a chunky piece of good, salted butter.
Gluten free bread.
No, not that gluten free bread you buy in the supermarket, no no! I mean – fantastic gluten free bread. Yummy. Delicious. Easy to make. And – yup – healthy. And satisfying. And it makes you happy. What? Yes.
You read right: Today I made a bread that is GLUTEN FREE AND YEAST FREE AND VEGAN. And is healthy. Let me tell you what you will get when you try my experiment:
-proteins from brown rice, buckwheat, millet, eggs, chickpea, flax for your muscles
-calcium from brown rice for your bones and teeth
-magnesium from brown rice, millet to calm your nerves
-fiber from brown rice, millet, chickpea, flax to promote digestion
-iron from brown rice, sundried tomatoes and chickpea to boost your power
-zinc from brown rice to fight infections
-niacin from millet and sun-dried tomatoes for hairs and nails and to lower cholesterol
-omega 3 from flax and chia for healthy heart and brain function
-healthy fat from olive oil and olives – see above
-antioxidants from millet and sundried tomatoes to protect you against cancer
-serotonin from millet to make you happy. 🙂
Great with olive oil, coarse sea salt and a dry Merlot
Yes, all that in less than 30 minutes! (hooray!)
Shall we?
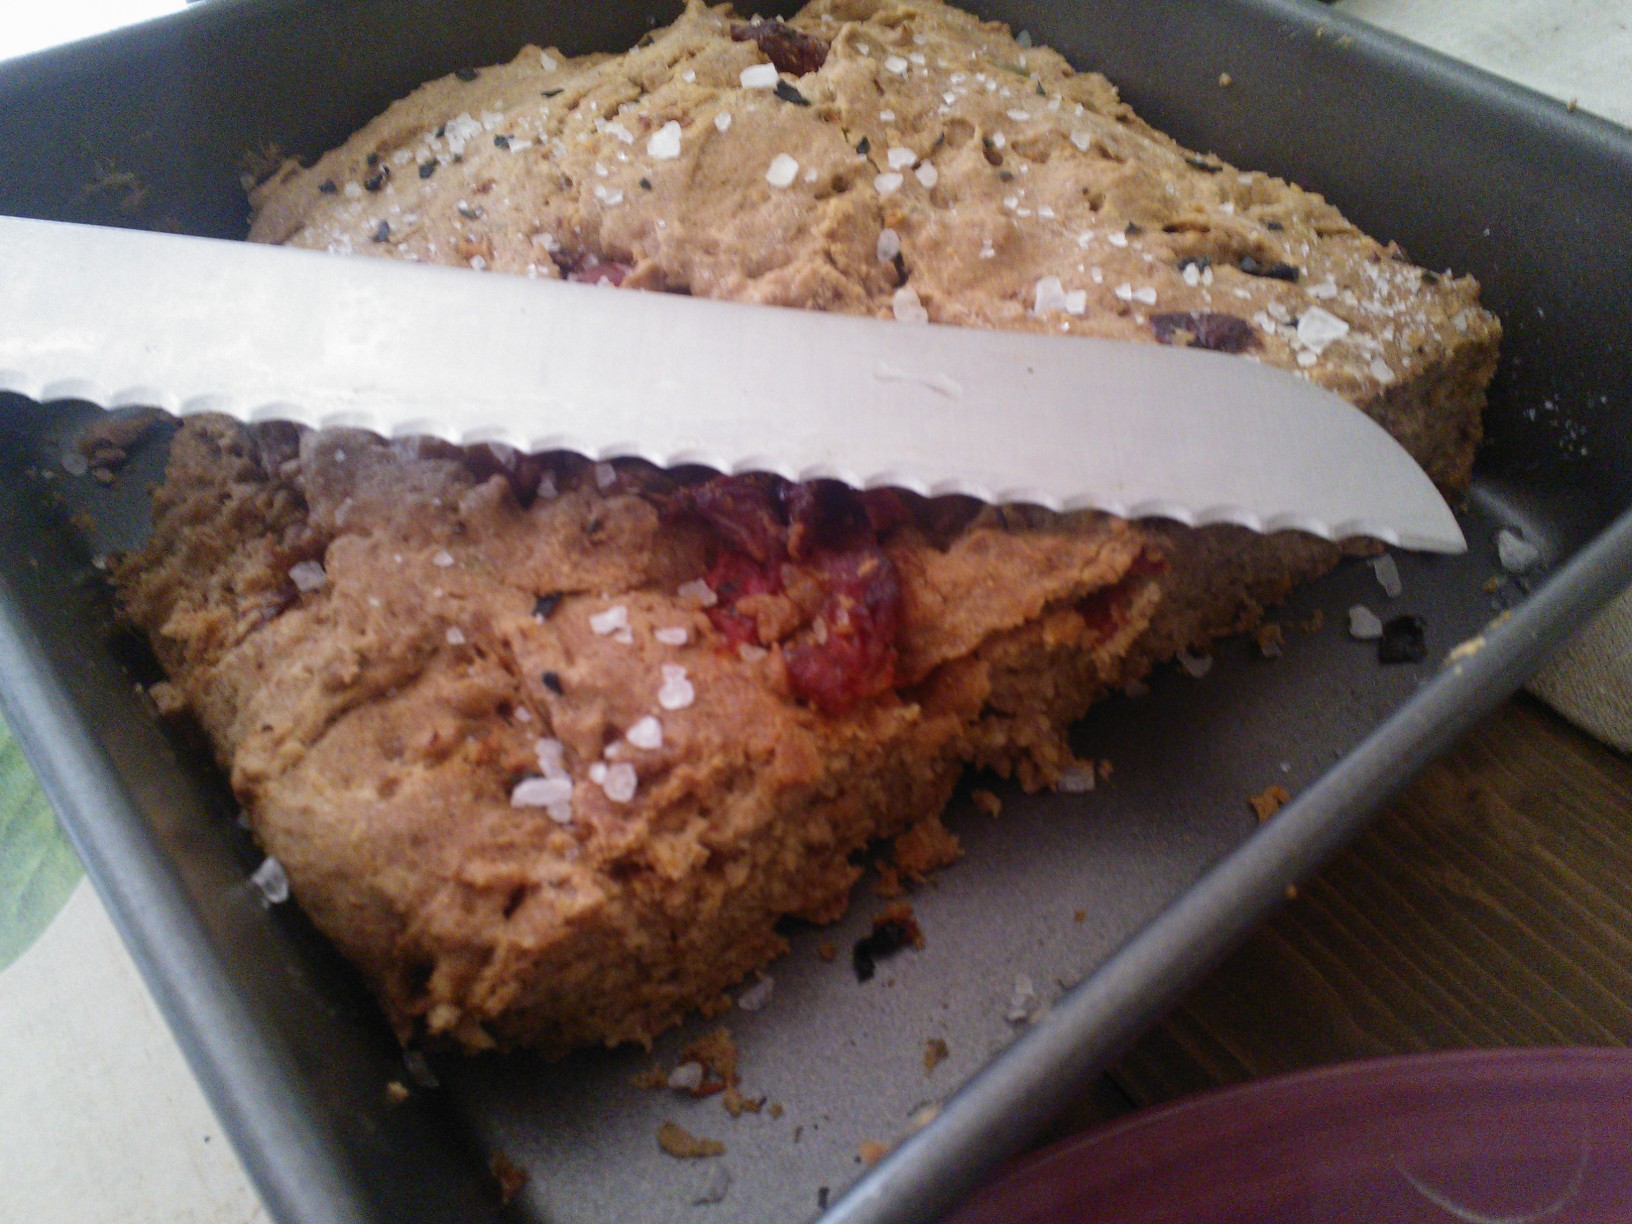
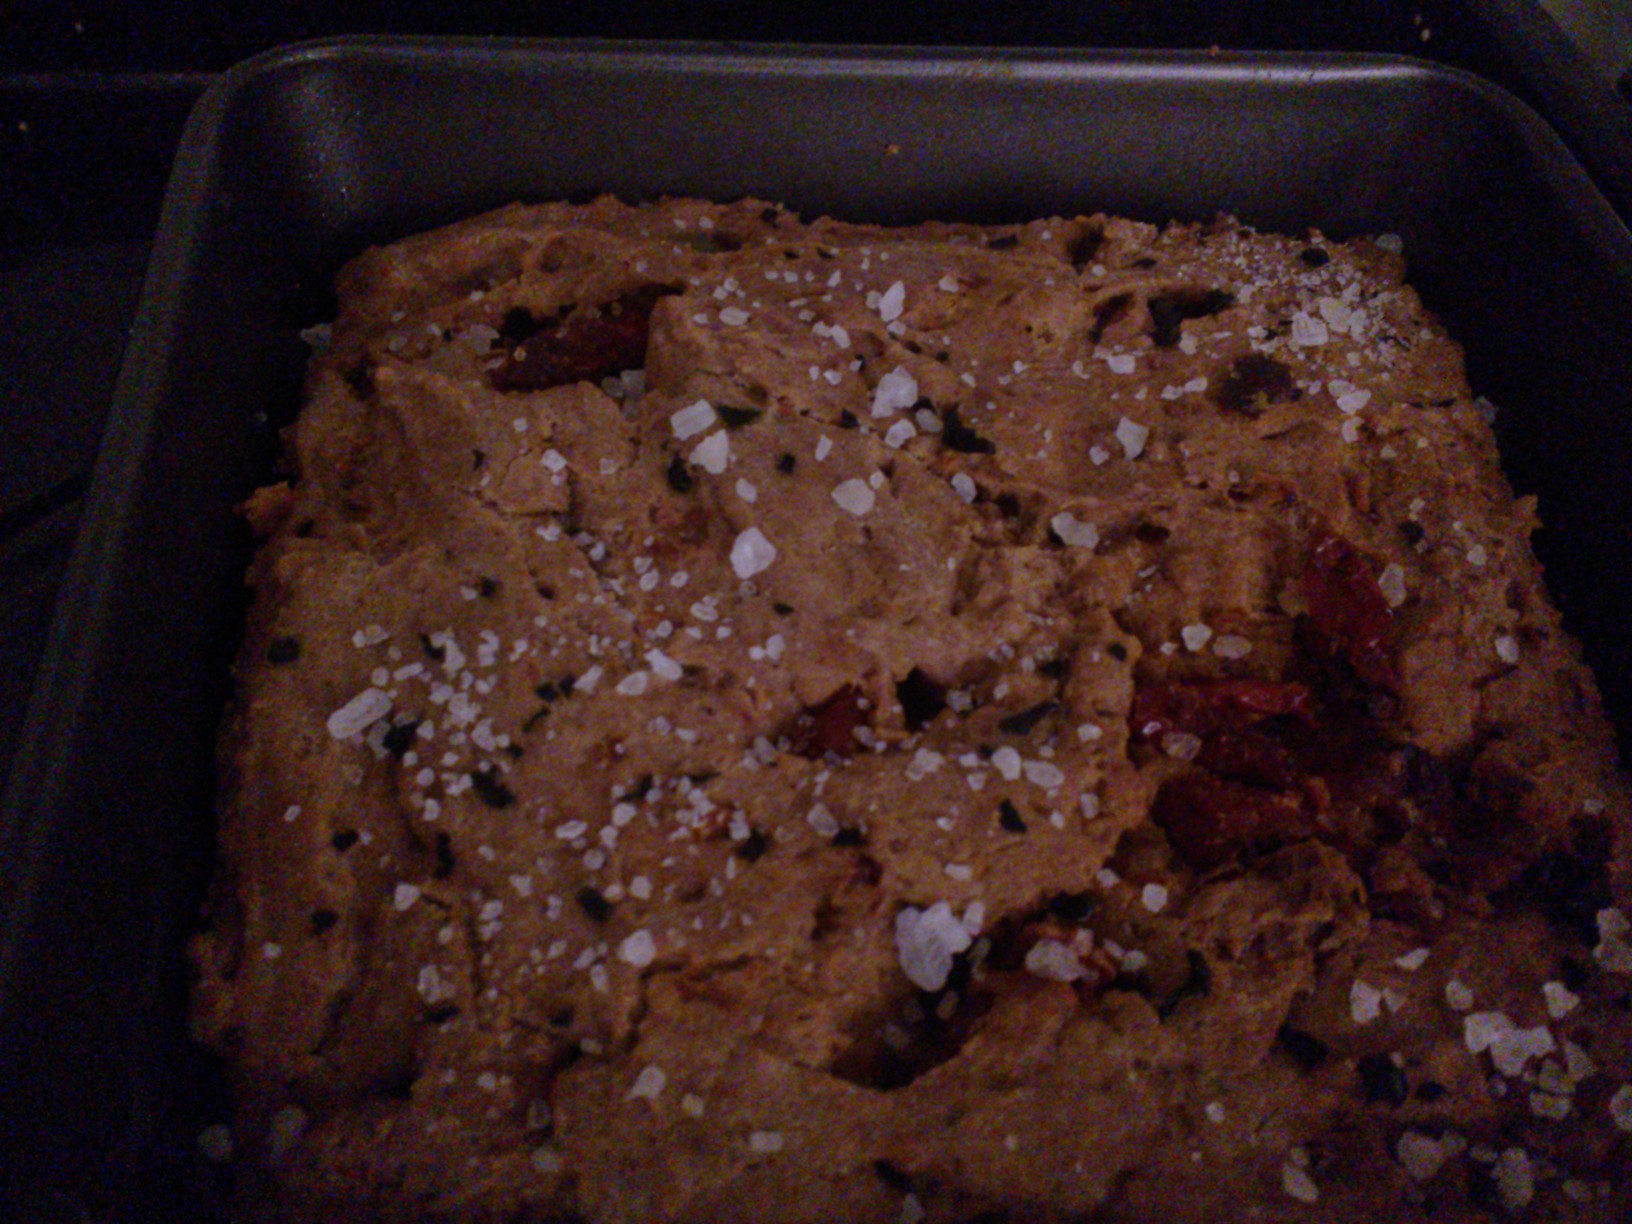
For one 20×20 cm baking pan
100 g brown rice flour 50 g millet 50 g chickpea flour 50 g buckwheat flour 25 g flax 25 g arrowroot 1,5 tsp sea salt 1,5 tsp baking soda 1 tsp xanthan 3 tsp apple cider vinegar 2 tbsp chia seeds, dissolved in 6 tbsp water (“chia eggs”) 5 tbsp olive oil (use a good brand) 1 tsp maple syrup or agave approx. 120 ml or more warm water sundried tomatoes, olives (as much as you like) or anything else you’d like to put in! coarse sea salt to decorate
Preheat oven to 180° C. Use your food processor or any other standing blender. Whisk together all dry ingredients (flours, flax, salt, xanthan, soda, arrowroot) until well blended (one colour). Add the chia to the dry ingredients. Add vinegar, oil, and maple syrup and beat in food processor for a few seconds until incorporated. Pour warm water through your processor’s feeder until batter becomes smooth, firm and sticky (the texture is a bit like marshmallow) and homogenous. You might need to experiment with the amount of water (approx. 120-150 ml). With a wet spoon or spatula scoop into oiled pan. and bake for 20 to 25 minutes. Brush with olive oil, sprinkle with coarse sea salt and bake for another 5 minutes.
Easy, healthy, and delicious
Turn off the heat and let rest in the oven until lukewarm. Remove from pan and serve. Goes well with olive oil, dips, or dukkah.
Tip: Try herbs, garlic, roast onions, chili or walnuts for yummy alternatives to olives and tomatoes!
I admit I suffer from a serious and acute dip mania at the moment! After my harissa turned out beautifully, I was motivated to experiment a bit more. I have not tried baking gluten-free bread yet, – sorry, but I’m still pretty new on the gluten free journey – but once I have achieved the holy grail of gluten-free bread making, it’s good to know what to dip it into, don’t you think? (Update: I made gluten free bread! The results can be found here, here and here.)
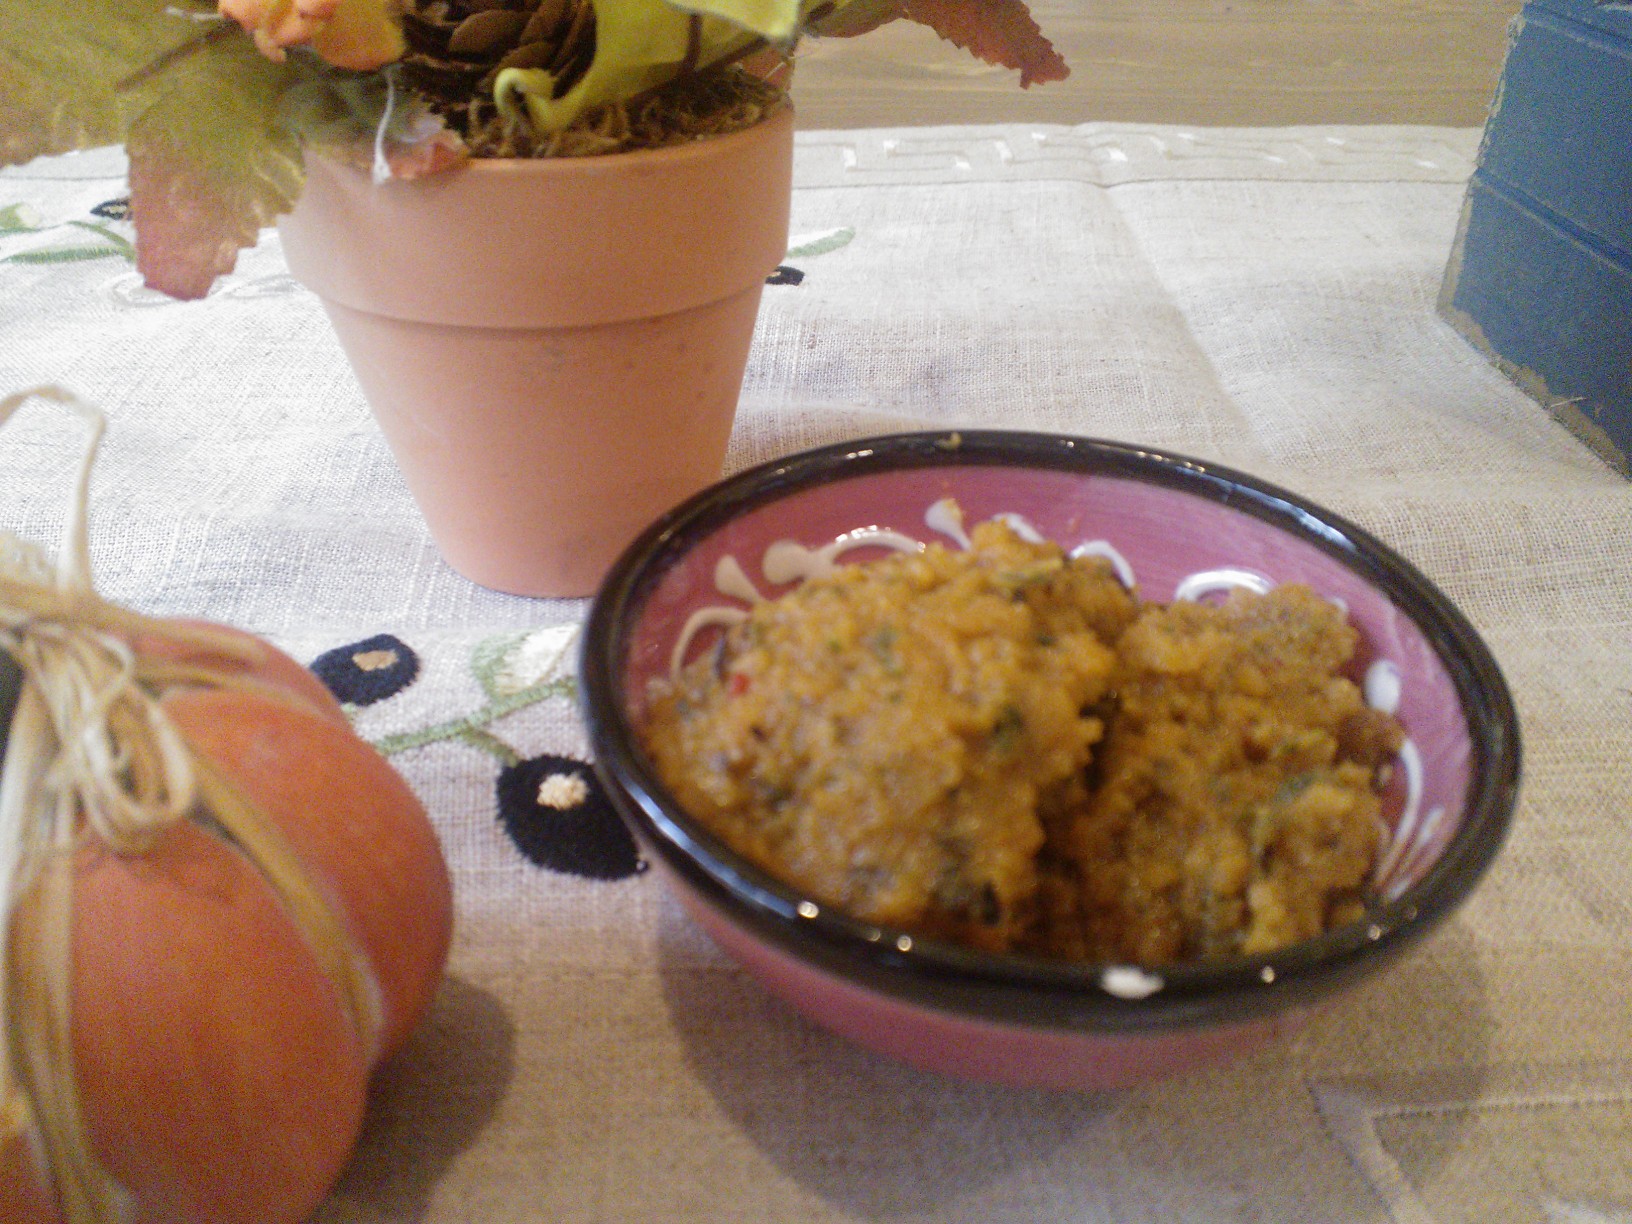
Although unlike the Northern hemisphere, it’s not really pumpkin season in Oz right now, the delicious and versatile vitamin A bomb is omnipresent in this part of the world all year round – and since we happened to celebrate Halloween just over a week ago, I assume we all still have some leftover pumpkin in our freezer, and what better way than to turn it into a tasty dip?
Pumpkin has such a unique flavour, which makes it so different from your average dip or pesto. I decided to marry it off to some chickpea – must be my love for falafel coming through here – to give it a mysterious middle eastern touch. Of course, there had to be chili in it, as with most of my savoury dishes. I used hot chili powder from the middle eastern shop, as the naughty mint in our back yard killed my chili plant (*sniffle*), but it turned out alright nonetheless.
My first version didn’t feature any basil, as I didn’t have any and couldn’t be bothered going shopping. It was good, but trust me, you don’t want to leave out the basil! You might try parsley, too, though I haven’t tried that. The version featured here is pretty low in fat – pumpkin is already so luscious and creamy that unlike a traditional pesto, you just need to add a tablespoon of healthy olive oil to make it yummy. In my next version of this dip, I am going to put some cashews or almonds in it – I think this will be beautiful!
Makes approx. 200 g
100g roasted or char-grilled pumpkin, chopped 50g chickpeas from the tin, drained 1 tbsp good olive oil (try chili or lemon infused olive oil for that extra kick) 1 tbsp apple cider vinegar (you can use any vinegar – I just wanted to make this dip even more healthy!) 1 tbsp lemon juice (optional, but gives great flavour) fresh basil, chili, salt, pepper, garlic and paprika to taste – you can always adjust the spices afterwards
Process all ingredients in a food processor until smooth. Serve immediately with crudités or gluten-free bread or keep in the fridge in an airtight container for 3 days. Extra hot tip: Mix it with my harissa paste – you won’t regret it, it’s superb!