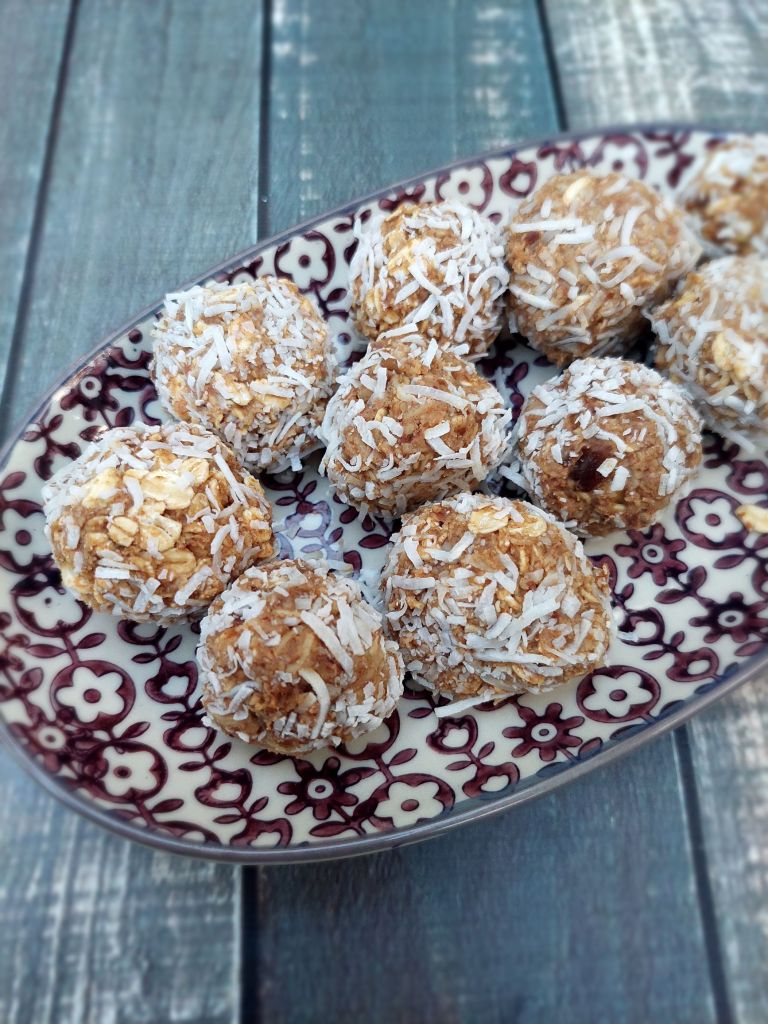
Bliss balls, energy balls, power balls – there are many names for these beautiful little babies that are not only your best mate when the 3pm munchies hit, but also a great addition to your little one’s lunchbox as they are completely nut free and allergy friendly and provide sustained energy thanks to rolled oats, dried dates and a smidge of protein powder!
Of course these are very customisable, but here I am offering my quick, easy, healthy and yummy version for a snack/treat/breakfast that my kids actually eat and that is just as good for grown-ups too!
Makes 24 balls
One cup packed dried dates (approx. 170g)
2/3 (two thirds) cup shredded coconut (approx 40g)
1.5 cups rolled oats (approx 120g)
One scoop vegan vanilla or choc protein
1 tbsp raw cacao
Pinch of salt
Start by soaking the dates in hot water until soft. Drain, but keep the date water. Blitz all ingredients in a high-powered blender while adding the date water gradually until the mixture comes together. If you add to much loquid you might have to add some more of the dry ingredients. It’s okay for the mix to be sticky but it should still be able to be formed into balls.
Roll into balls (roughly 22-28 depending on size) and roll in more coconut or oats as desired. Pop into fridge or freezer until ready to eat.
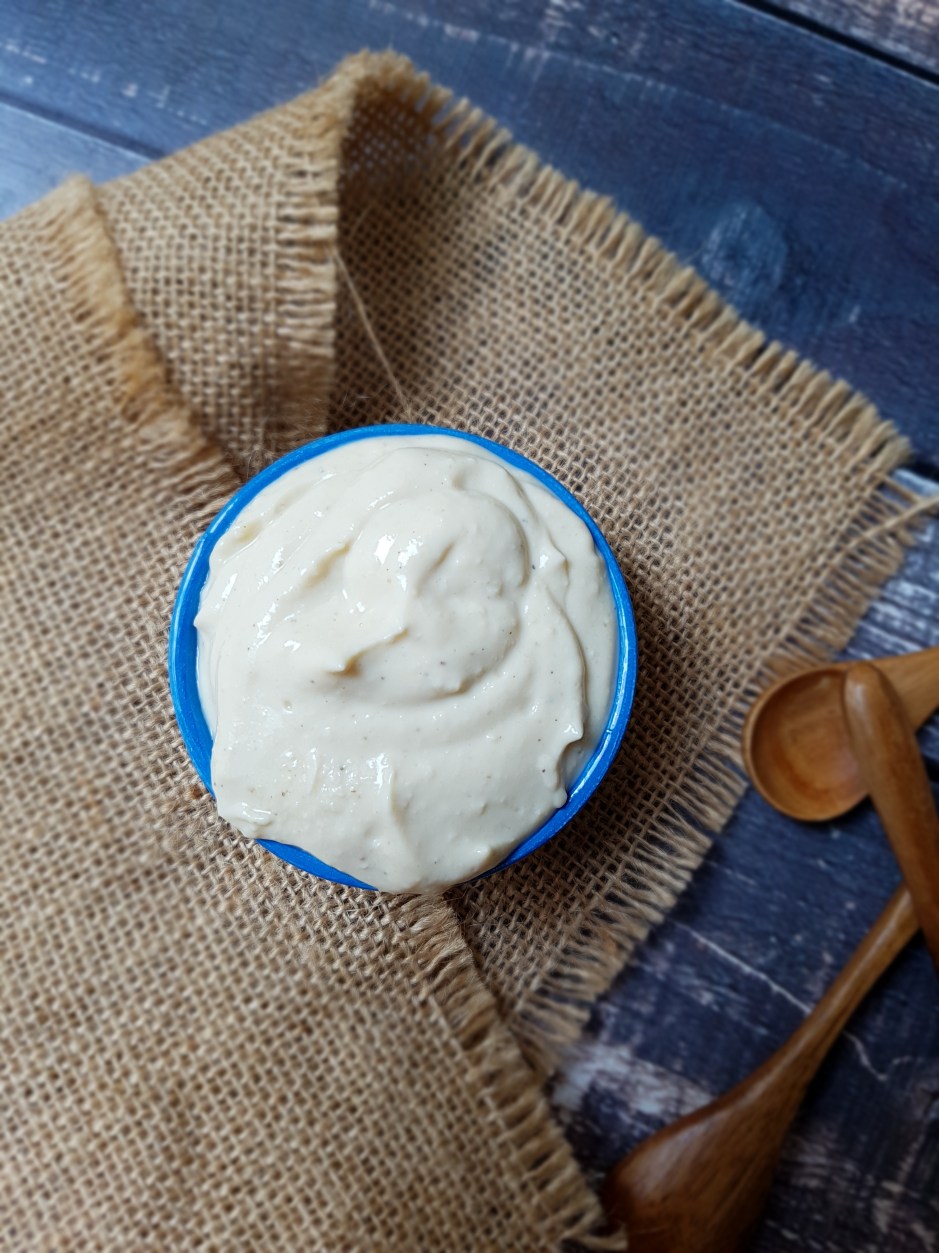
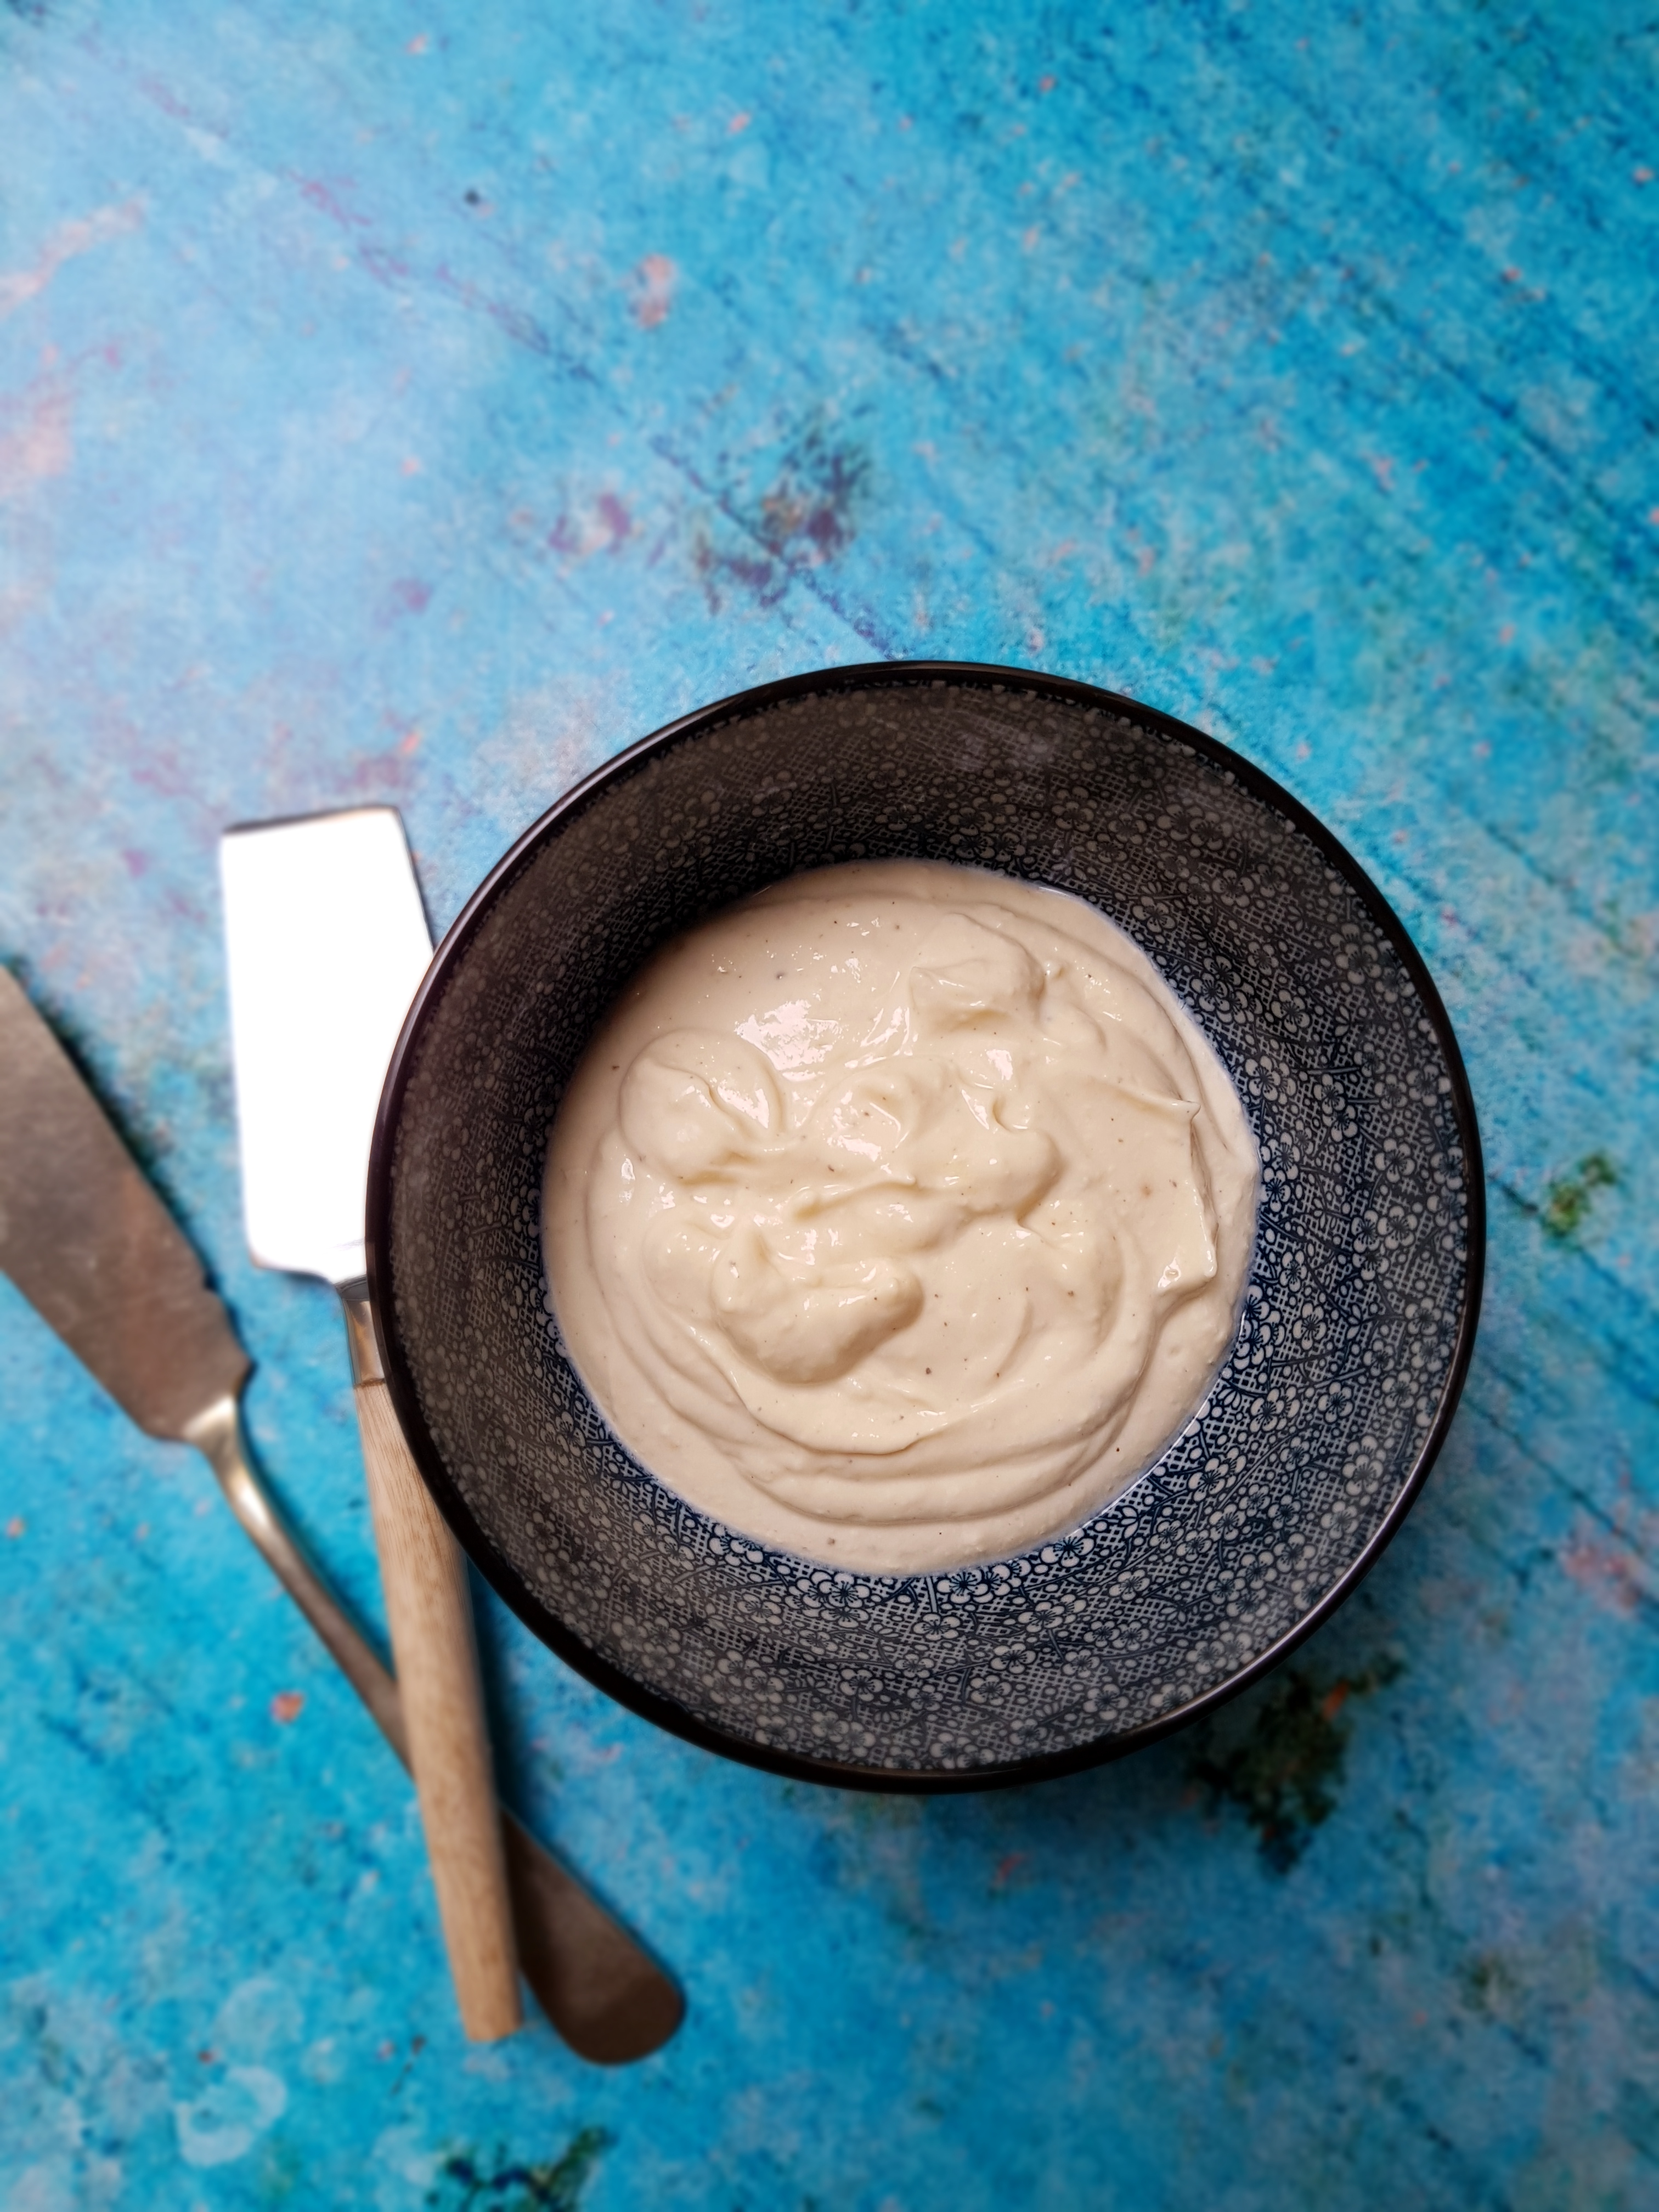
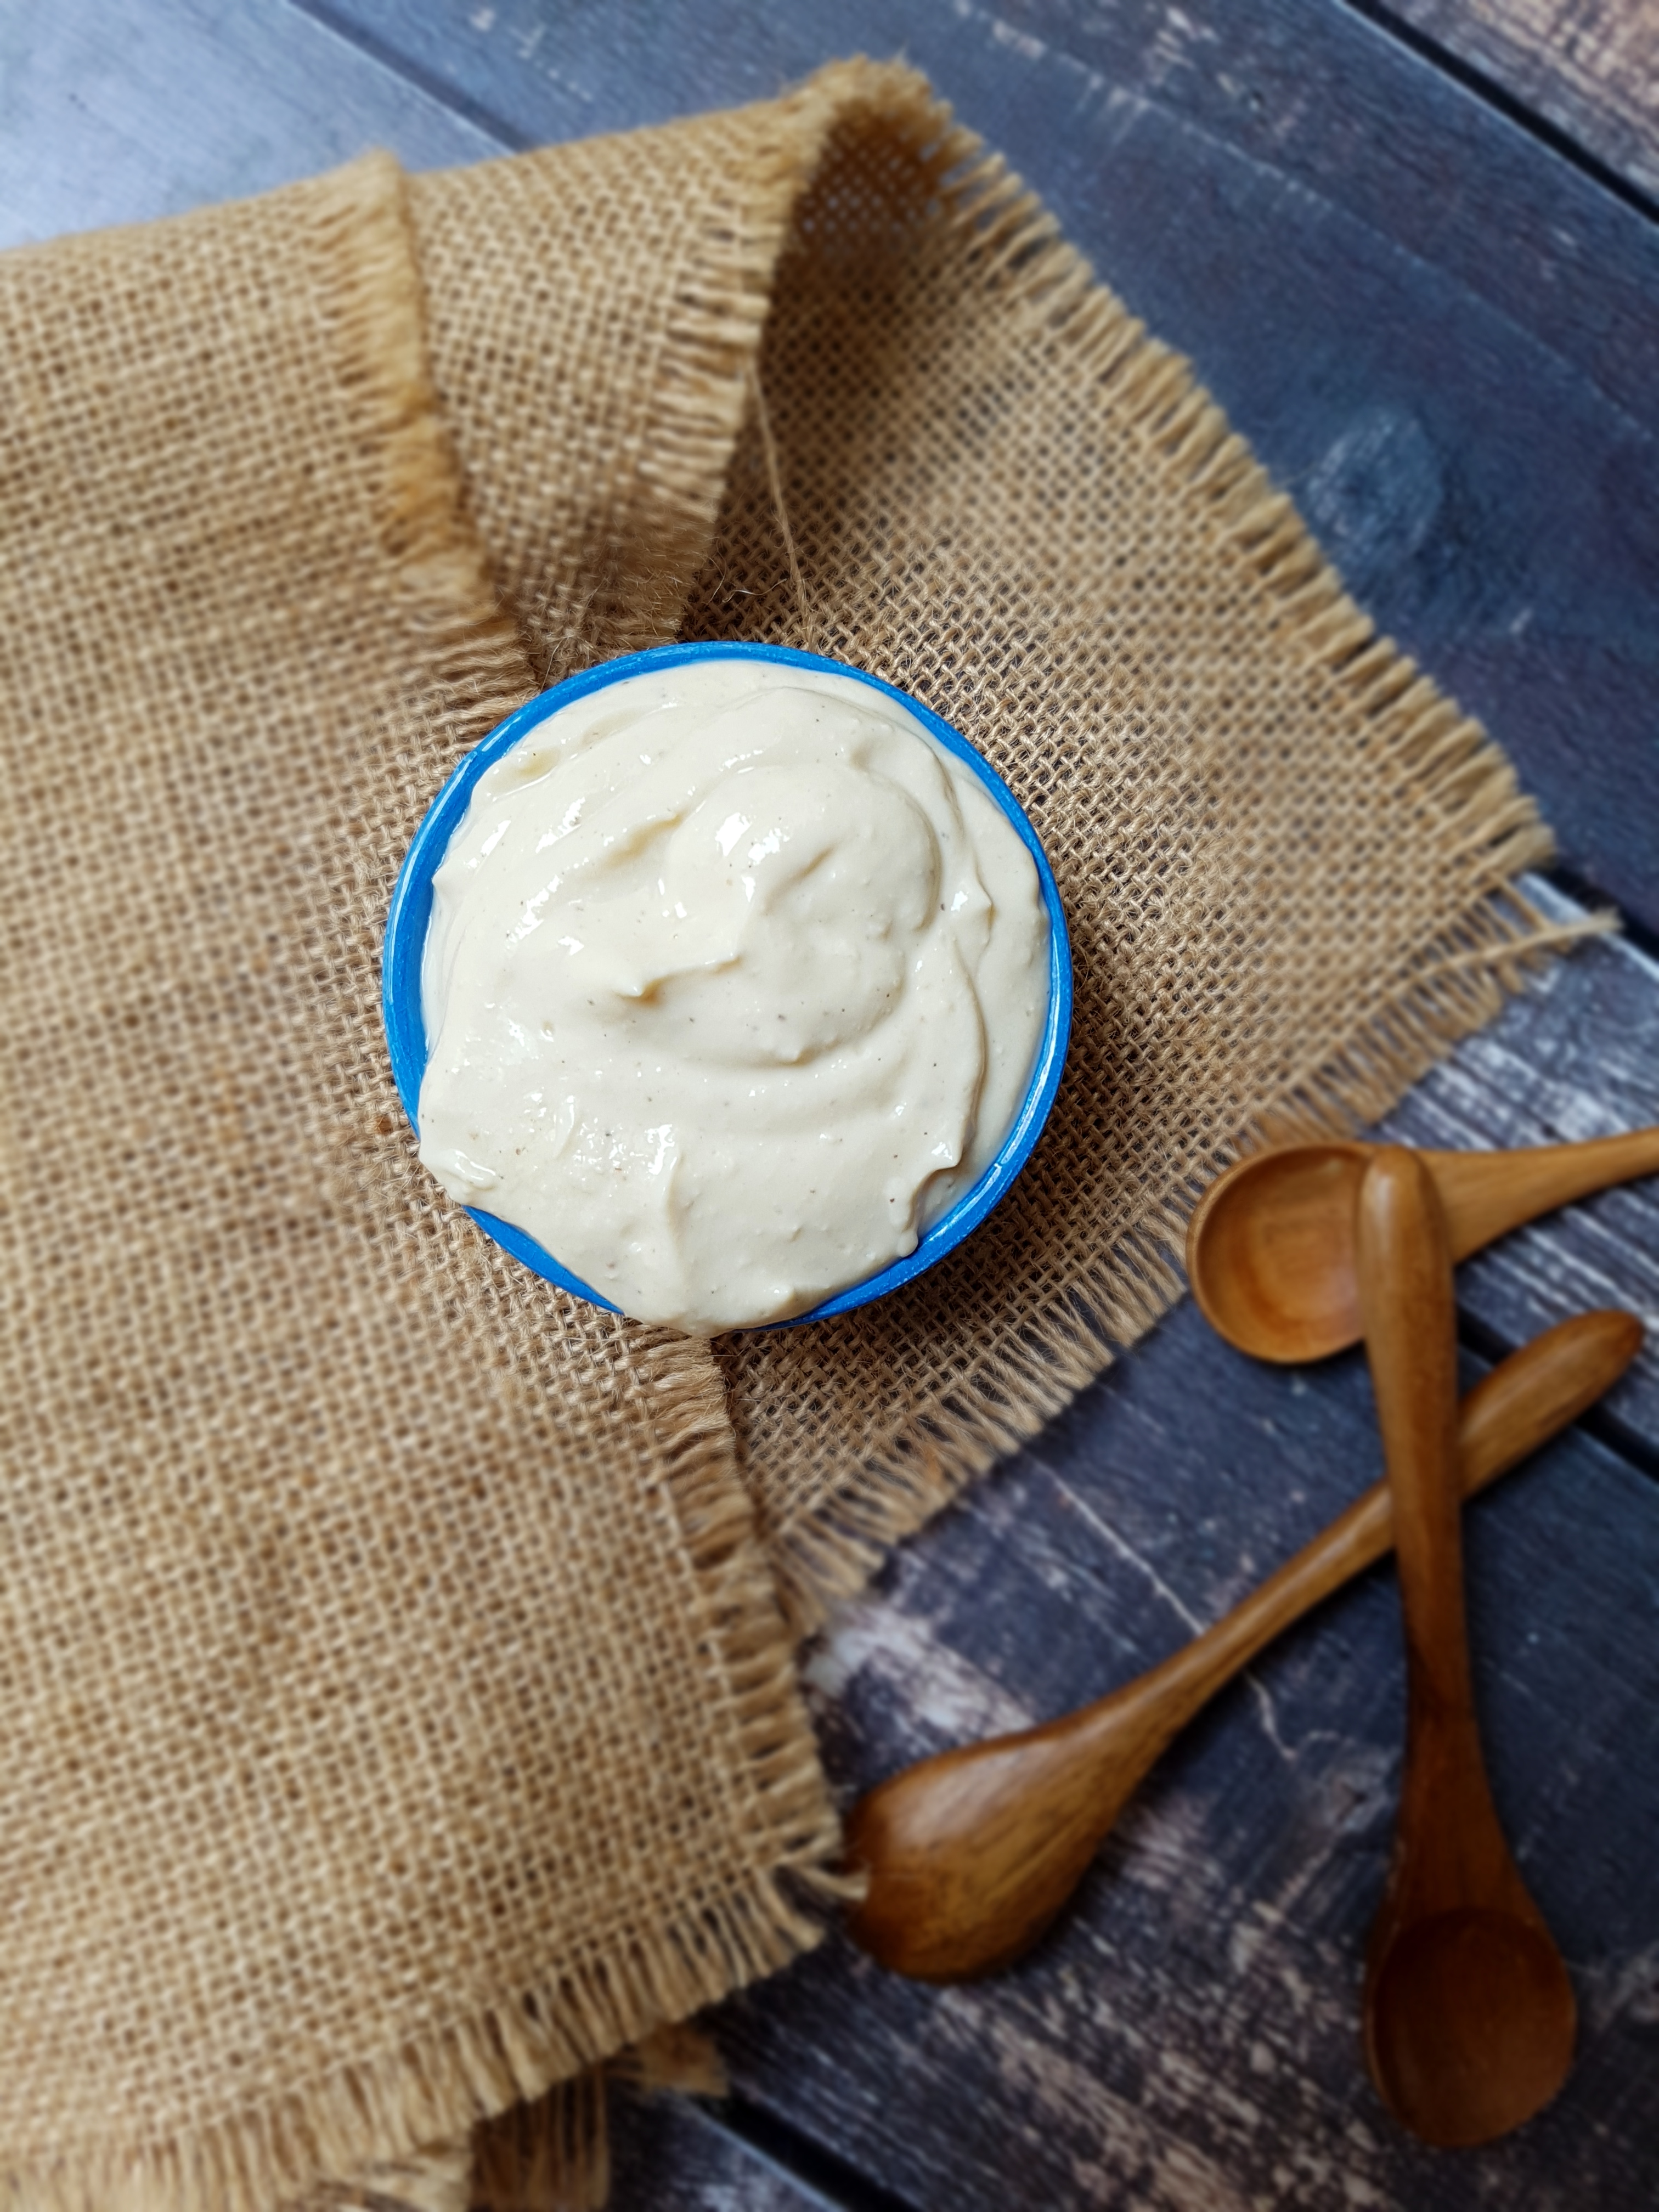
Ready for a game-changer, peeps? Who doesn’t love mayonnaise? And I bet, after trying this recipe, you’ll love my instant lowfat vegan mayonnaise!
Instant Lowfat Vegan Mayonnaise
There were two problems with mayonnaise until now: a) it is full of fat, and b) it is incredibly tedious, time-consuming and tricky to make yourself. Obviously, traditional mayonnaise being made from eggs is off-limits if you are vegan or intolerant/allergic to eggs (not to mention the risk of contracting salmonella). If you have ever attempted to make your own mayonnaise, or even tried to “healthify” it, you are in good company. According to internet searches, it is one of the most coveted items to make vegan, oil-free or egg-free. But the plethora of recipes for vegan mayonnaise you can find online were not what I was looking for, either. They generally still use a lot of oil, making a very high-fat vegan substitute or they use cashews as base which are also high in fat, expensive and not suitable if you have nut allergies.
So my browsing of vegan mayonnaise recipes left me thinking of the U2 song: “I still haven’t found what I was looking for…”. Needless to say, I had to create my own version. I wanted it to be very quick, very yummy and very healthy. And I am quite positively surprised that it turned out great on the first try. In fact, this was probably the quickest recipe creation I have ever done.
Thick and creamy vegan mayonnaise
I knew I wanted to use tofu as a base but without any added oils. I figured that there needed to be some zing and because I could not decide between apple cider vinegar and lemon juice, I simply used both. And because I love mustard (a remnant of my European heritage), I added that as well. I also added just a tiny pinch of toasted sesame oil which is my favourite oil and gives this mayonnaise a mysterious depth of flavour.
The result was a thick, creamy, luscious mayonnaise that – both in terms of flavour as well as texture – can take on any conventional mayonnaise heads-on. I find it so addictive, I can hardly restrain myself from not gobbling up the whole thing when I make this. And why not? Using naturally low-fat silken tofu as base and with only half a teaspoon of sesame oil, this is a light and lower fat alternative that still provides a very rich, authentic taste. Not a bad effort considering this beauty is gluten free, dairy free, egg free, cholesterol free, vegan, nut free, refined sugar free and almost oil-free!
Tip: If you tolerate garlic, add some garlic to make aioli!
Are your fries/coleslaw/potato salad ready for the healthiest, quickest and most delicious mayonnaise of your life?
Vegan Mayonnaise that tastes like the real thing!
Instant Lowfat Vegan Mayonnaise
300g nigiri tofu 1 tbsp apple cider vinegar 3 tsp lemon juice 1 tsp Dijon mustard 1 tsp sea salt (use herb sea salt for extra flavour) 1/2 tsp black pepper 1/2 tsp toasted sesame oil
Blitz all ingredients in a high-powered blender and serve straight away. Alternatively, store in the fridge for up to 5 days.
While Melbourne is enjoying a glorious late summer these last days, it is only a little more than a week until the official beginning of autumn. The evidence is mounting that the cooler season is approaching with big steps. The leaves are changing colour, chestnuts and acorns are adorning the pathways, and the days are getting shorter. Time for warming and earthy dishes such as this lentil buckwheat & beetroot salad with oranges.
It is no secret that lentils and buckwheat are a match made in heaven with their hearty textures and grounding flavours. Together, they also form a complete protein which is why this salad is so valuable for vegans. Beetroot with its sweet earthiness complements the qualities of lentils and buckwheat perfectly, while fresh oranges not only provide a hefty dose of vitamin C to rev up your immune system for the colder season, but with their juicy and tangy flavour lift this dish while chopped walnuts add heart-healthy fats and another textural element to this salad. A generous dose of parsley and spices provides for some bite while a mild dressing made of orange juice, balsamico and maple syrup achieves a perfect balance of flavours.
This is a very simple yet satisfying and wholesome starter or even main meal. I don’t cook the buckwheat as it would get all mushy, but rather roast raw buckwheat groats which makes for some wonderful crunch and nutty aromas. I used brown lentils from the tin although you can cook dry lentils and use them here. As for the beetroot, you can use freshly cooked, packaged or tinned beetroot.
Lentil Buckwheat & Beetroot Salad
Lentil Buckwheat & Beetroot Salad
Serves 4
1 cup raw buckwheat grouts 1 tin brown lentils, drained and rinsed 2 large oranges, chopped 3 cooked beetroot bulbs, chopped 2 handfulls of fresh parsley salt, pepper, paprika, chilli and cardamon to taste 4 tbsp fresh orange juice (from the oranges) 3 tbsp balsamic vinegar 3 tbsp maple syrup 2 tbsp chopped walnuts
First, prepare the dressing by cutting your oranges open and squeezing out roughly 4 tbsp of fresh orange juice into a small bowl. Mix with equal amounts balsamic vinegar and maple syrup and adjust the ratios to taste. You may want to add some salt and pepper or other spices or add them to the finished salad. Dry roast the buckwheat in a large non-stick frying pan until golden and aromatic. This should only take a few minutes. Add to a large mixing bowl, then add the lentils, oranges, spices and dressing and mix well. Do not add the beetroots at this stage to avoid colouring of the remaining ingredients. Divide the lentil buckwheat orange mix to four salad plates and top with chopped beetroot, fresh parsley and walnuts.
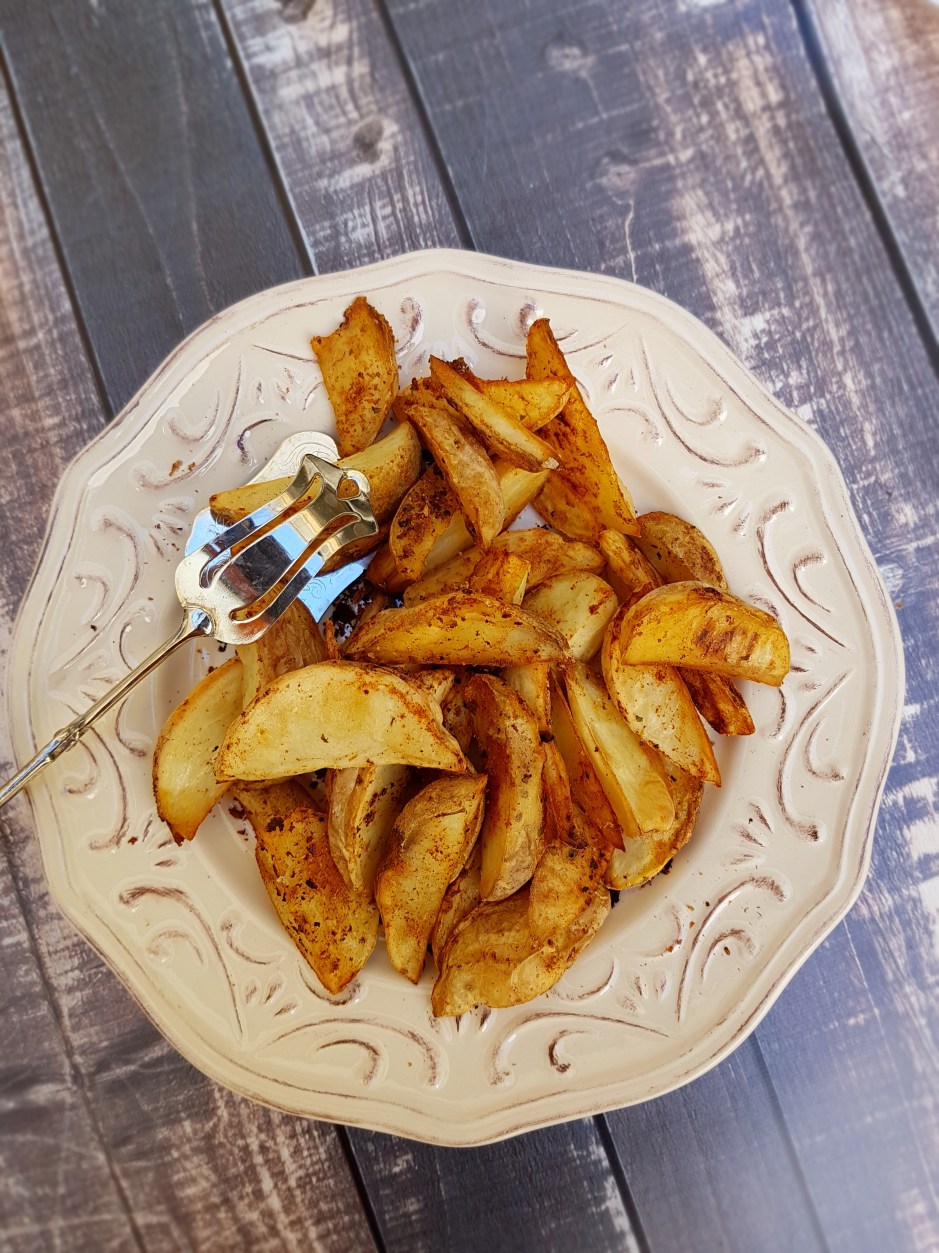
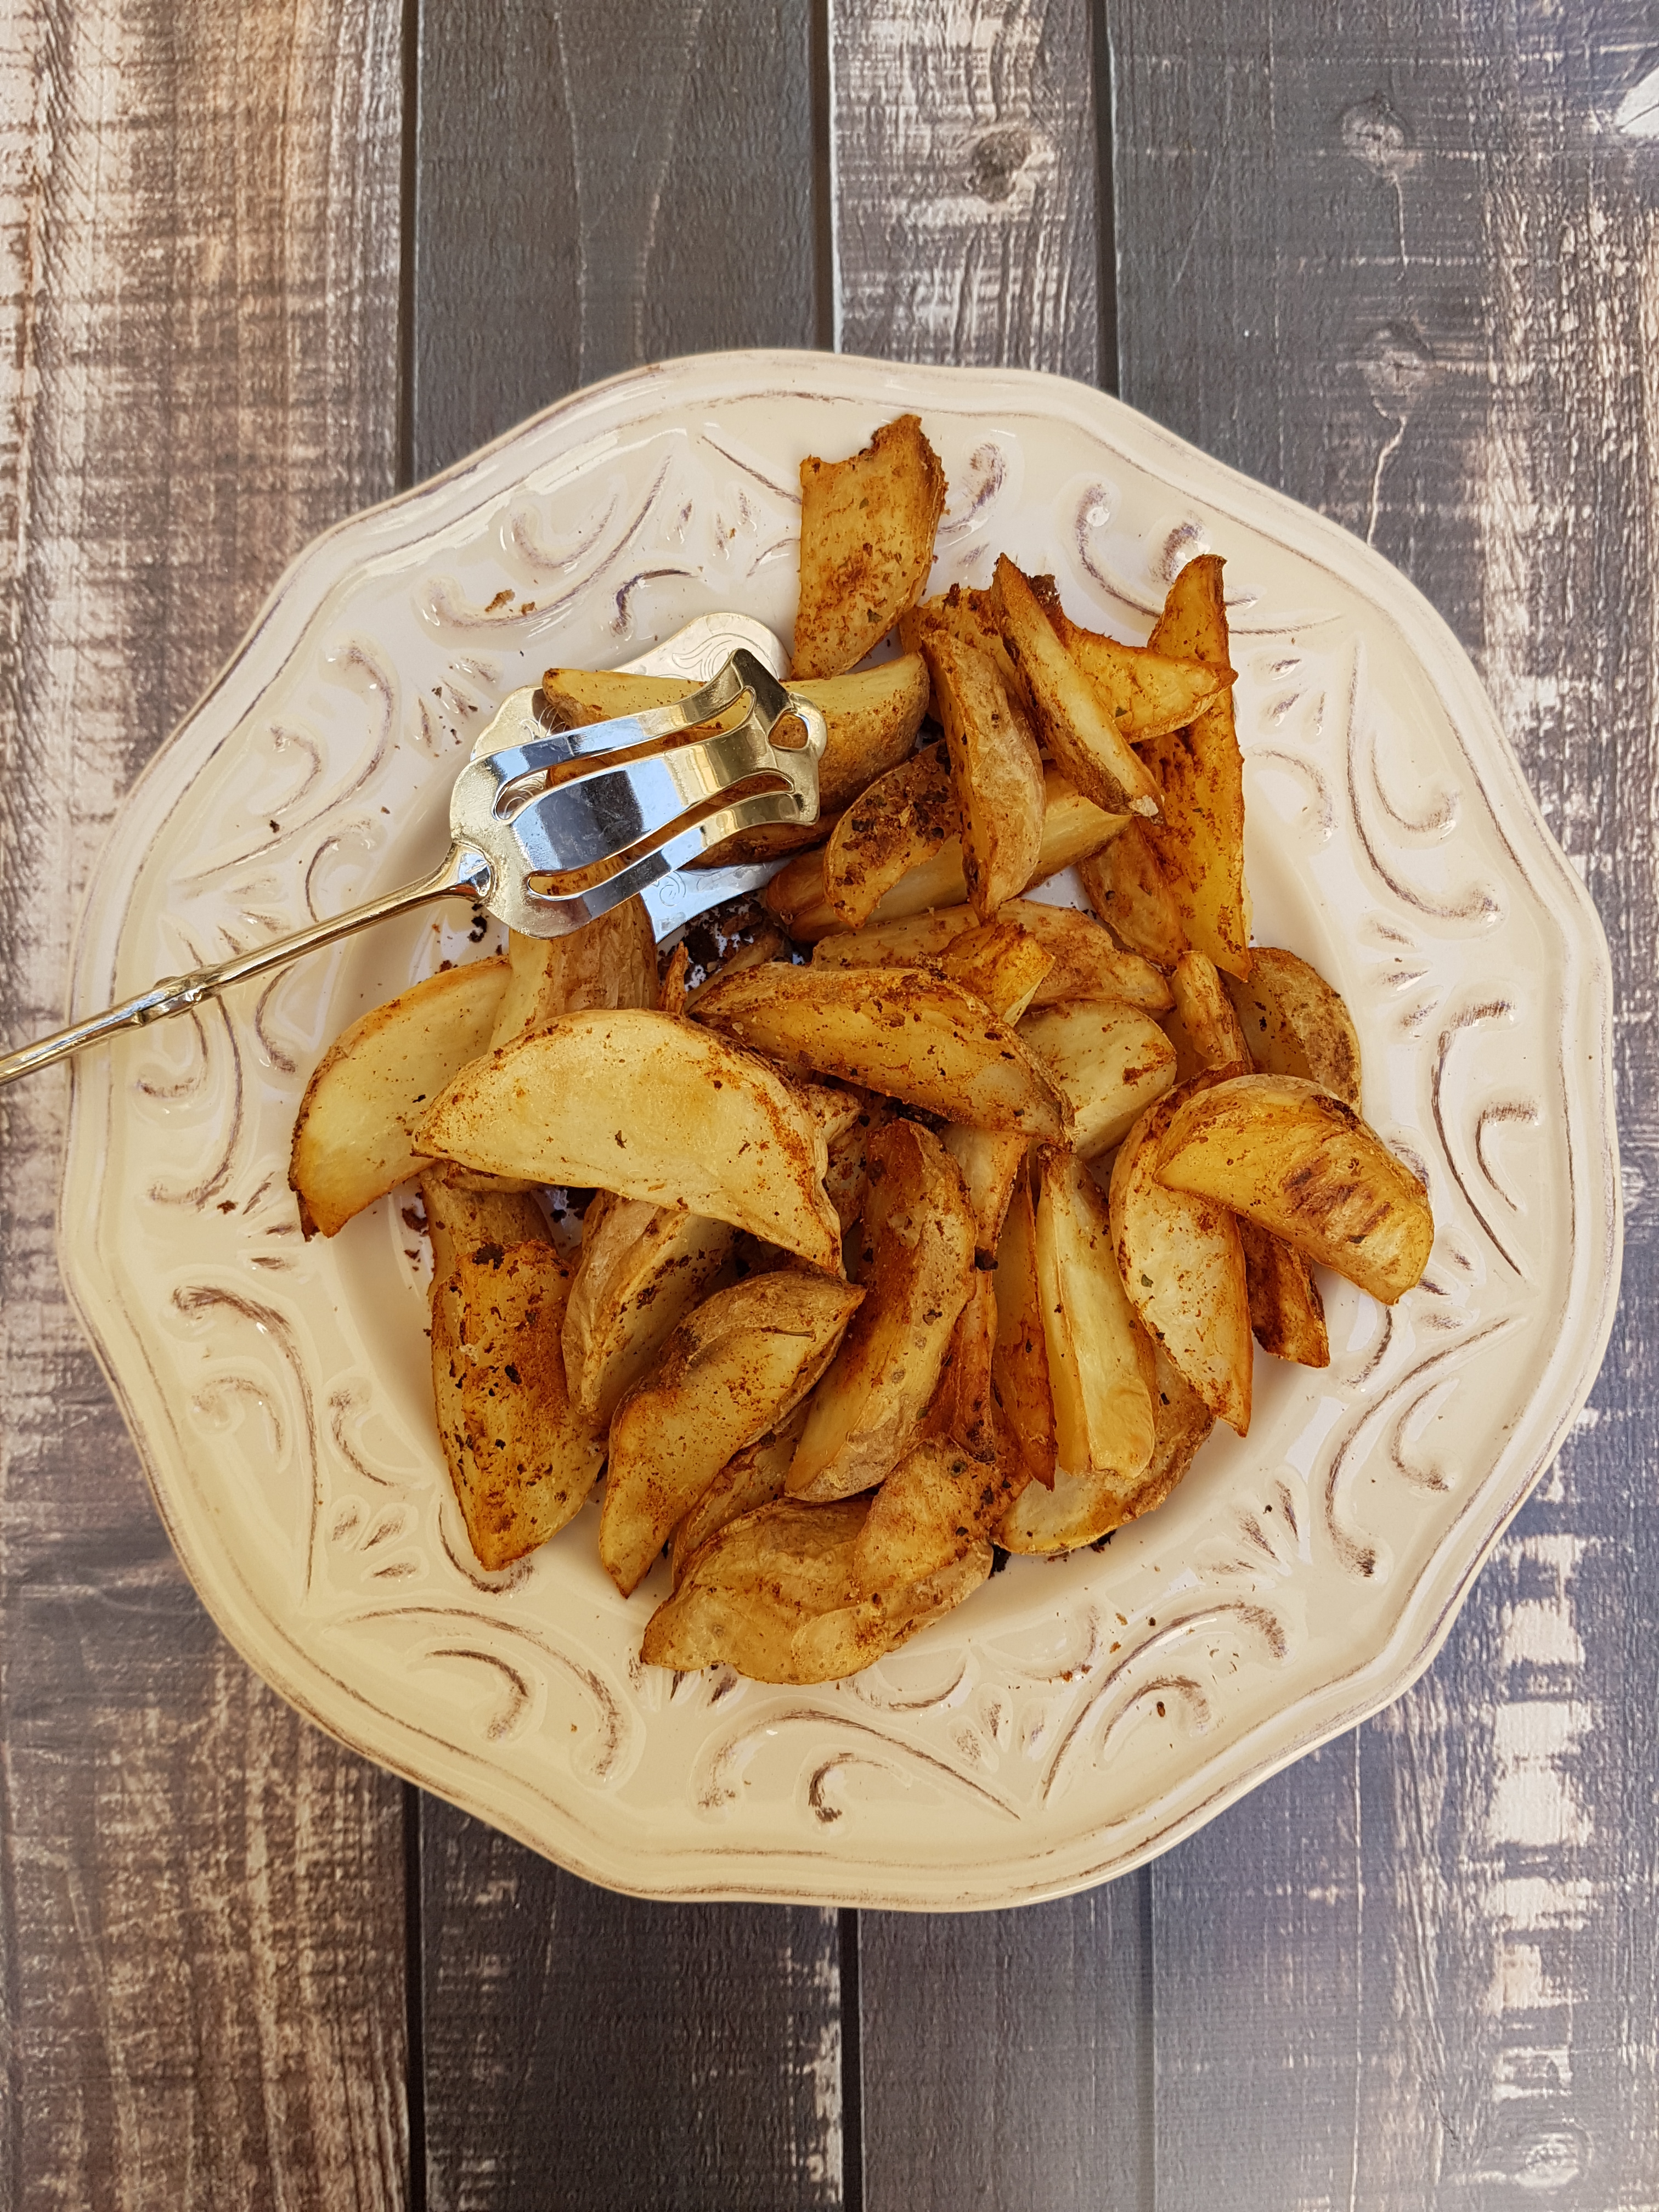
I loooove potatoes. Seriously. They are so much more than a side dish. Not only do they taste delicious, they are so filling and satisfying that they make for a complete meal. I love them in any state – boiled, baked, roasted, mashed, fried…but they are at their best in the form of chips or wedges. Now, if this sounds greasy and unhealthy to you, dripping with trans fats and all sorts of nasties, hear me out. It is possible to achieve the perfect crispy oil-free potato wedges. No oil and no deep-frying required!
These are not the result of an air-fryer (if you are remotely familiar with instagram you would have come across the latest craze that is air-fryers). No fancy or expensive equipment required, just a good ol’ oven, a baking tray and 40 minutes of your time. That’s all!
While rice, noodles, pasta and (gluten-free) bread all have their merits, nothing will keep you full for as long as a good plate of spuds. Being much lower in carbohydrates and calories than other “side dishes” and with their favourable nutritional profile, potatoes are closer to vegetables than starchy sides. They are fat and cholesterol free and bursting with iron and vitamin C. Vitamin C actually improves the absorption of iron which is why potatoes are extremely valuable for vegans and vegetarians. They contain more potassium than a banana, are a good source of vitamin B6, fiber, magnesium and antioxidants as well as the so-called “resistant starch”. Resistant starch works like soluble fiber which contributes to improved insulin sensitivity, lower blood sugar levels, reduced appetite and improved digestion.
Enough said about the benefits of spuds, I bet you just want to know how to achieve the perfect crispy oil-free potato wedges! Crispy wedges without any oil? What’s the secret ingredient? Yes, there is actually a secret ingredient. And that is…water! I knew that in gluten-free bread baking, putting a tray of water into the oven helps the bread to form a proper crispy crust. I thought that this must also be possible with potatoes! While I have achieved good results dry-roasting potatoes before, adding some water to the tray definitely put these babies onto a new level. Unlike with bread where a separate water tray is put into the oven, the water is added directly to the tray with the potatoes on it.
Crispy Oil-Free Potato Wedges
Crispy oil-free potato wedges
Serves 4
1kg potatoes, washed and cut into wedges 1-2 tbsp coarse sea salt 1 tsp paprika halt a cup plain water
Preheat the oven to 230 °C. Spread the prepared wedges onto a non-stick (or lined) baking tray. Mix the salt and paprika in a small bowl. Sprinkle the spice mix over the potatoes and rub into the wedges. Add the water to the tray. Bake for approx. 40 minutes, turning halfway.
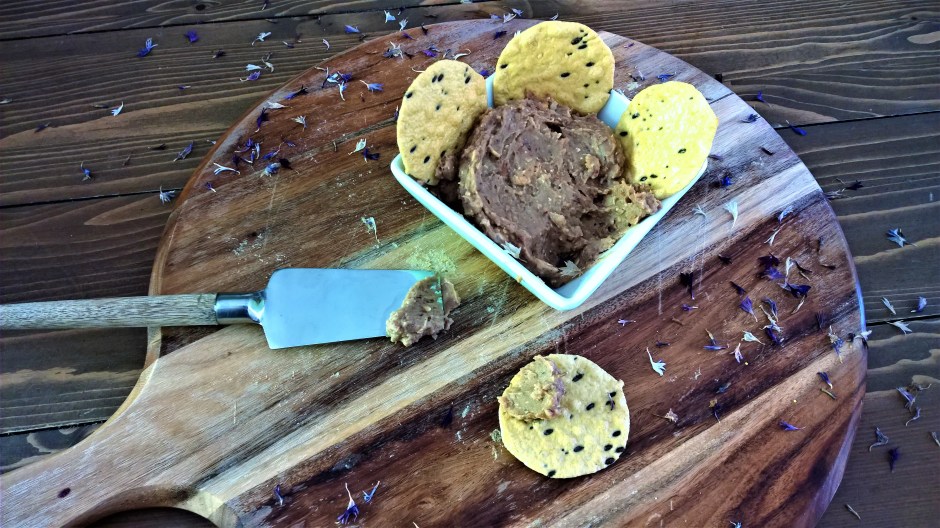
Lowfat Vegan Pâté sounds a bit like a plumber (or any other tradesman for that matter) who is quick, good and cheap. It’s pretty much impossible to tick all three boxes. In fact you’d be very lucky if you can tick two of them. A pâté, this French appetiser made of butter, cream (sorry!), raw liver (more sorry!) and cognac (sorry not sorry), is generally neither low in fat nor vegan. While there are recipes for vegetarian and vegan versions of pâté, I am yet to find one that is not full of nuts and oil. I believe an appetiser should not contain all your calories for the day so I created one that is much lighter and healthier than all its colleagues, be they vegan or not, yet still filling and satisfying.
With Christmas done and dusted for another year, chances are you are in need for a bit of a reset. I always believe that tomorrow starts today and that you should not postpone your commitment to a healthier life. Whether you want to go down the vegan route or not, having a repertoire of easy and delicious plant-based recipes can help you on the way to a cleaner and greener life. The good news is, there is absolutely no need to sacrifice your old favourites in favour of a healthy and ethical lifestyle. Hello, creamy Alfredo pasta, decadent chocolate mud cake and hearty Bolognese! Yup, all vegan, gluten free and low fat. And now you are in for another treat: lowfat vegan pâté!
This one came about coincidentally. I was feeling peckish and craved some gluten free crackers with a delicious spread. Having had pretty much all hummus varieties under the sun (here, here and here), I was looking for something a little different and just threw some random things into my blender. The result looked and tasted like a French liver pâté. Eureka! I had created a lowfat vegan pâté! Consisting of pumpkin, beans, olives and oats this savoury little beauty comes with a bucket full of fibre, beta carotene, protein and a little healthy monounsaturated fat from the olives. No nasties, no processed crap, no cruelty, no worries. Just pure goodness in a cute serving bowl (one of the main reasons I love making dips is that I can make use of all my serving bowls).
That’s not where the awesomeness stops, however. This spread – provided you have the pumpkin mash ready to go, but you could also use babyfood – comes together in less than five minutes. You read that one right. You likely have all ingredients at hand and if not, it’s going to be a very short trip to the supermarket. Best thing is, both my husband and daughter cannot get enough of it, and since neither of them is into healthy eating, I take this as a big compliment! Healthy stuff that doesn’t taste healthy. How good is that?
So here is to lowfat vegan pâté – it looks and tastes like a “real” pâté, but without the fat and the cruelty!
Lowfat Vegan Pâté
Lowfat Vegan Pate
One tin mixed beans (can use lentils or any brownish beans although the texture will be slightly different) 1/2 cup pumpkin puree or savoury vegan babyfood such as mashed (sweet) potato 1/2 cup oats
1/4 cup nutritional yeast a handfull of kalamata olives salt and pepper to taste
Just blend all ingredients in a high-powered blender and store in an airthight container in the fridge. Can be enjoyed straight away but the texture will improve after chilling for 30 minutes.
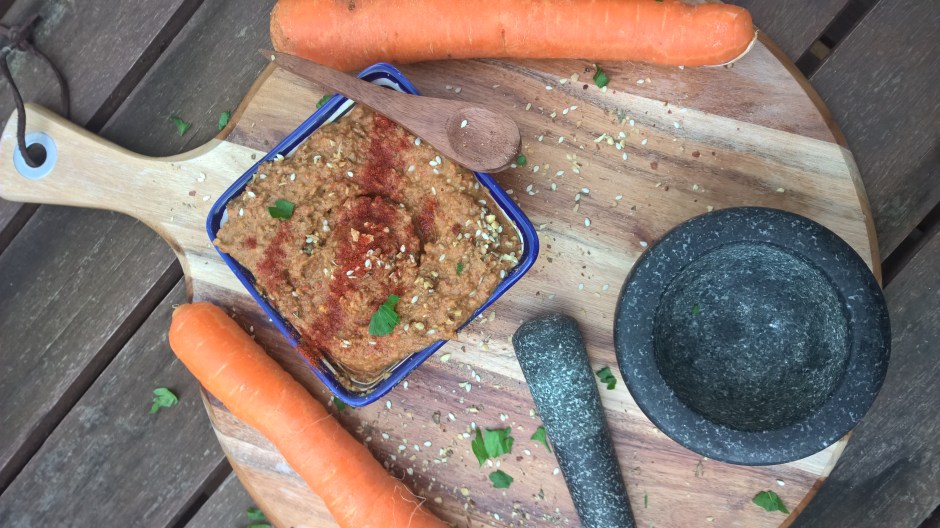
Have you ever considered making hummus with lentils? If you haven’t noticed already, I love all things legumes with their only downside being a little hard on the ol’ stomach at times. Which is why lentils are great. i have mentioned before that lentils might be easier to digest for some and with their hearty, meaty flavour are a nice alternative to chick peas and other beans. With lots of garlic, carrots and red peppers and only very little fat coming from healthy tahini paste, this hummus is infinitely better for you and tastes – in my humble opinion – better than any store-bought hummus! It is also incredibly quick to make with ingredients you likely have in your pantry. I’d consider this an allround win.
This lowfat lentil carrot hummus has been tried and tested by friends and family. It never fails to hit the spot, so give it a go! Tasty with just the right amount of spice, much lower in fat than store-bought hummus and very filling. I doubt you’ll be in a hurry to buy hummus from the shop again! It is also vegan, gluten free, soy free, refined sugar free, and nut free – a great recipe to have in your repertoire for entertaining as you’ll tick most dietary requirements! Tip: Try it with my 5-minute vegan gluten free naan bread!
Lowfat Lentil Carrot Hummus
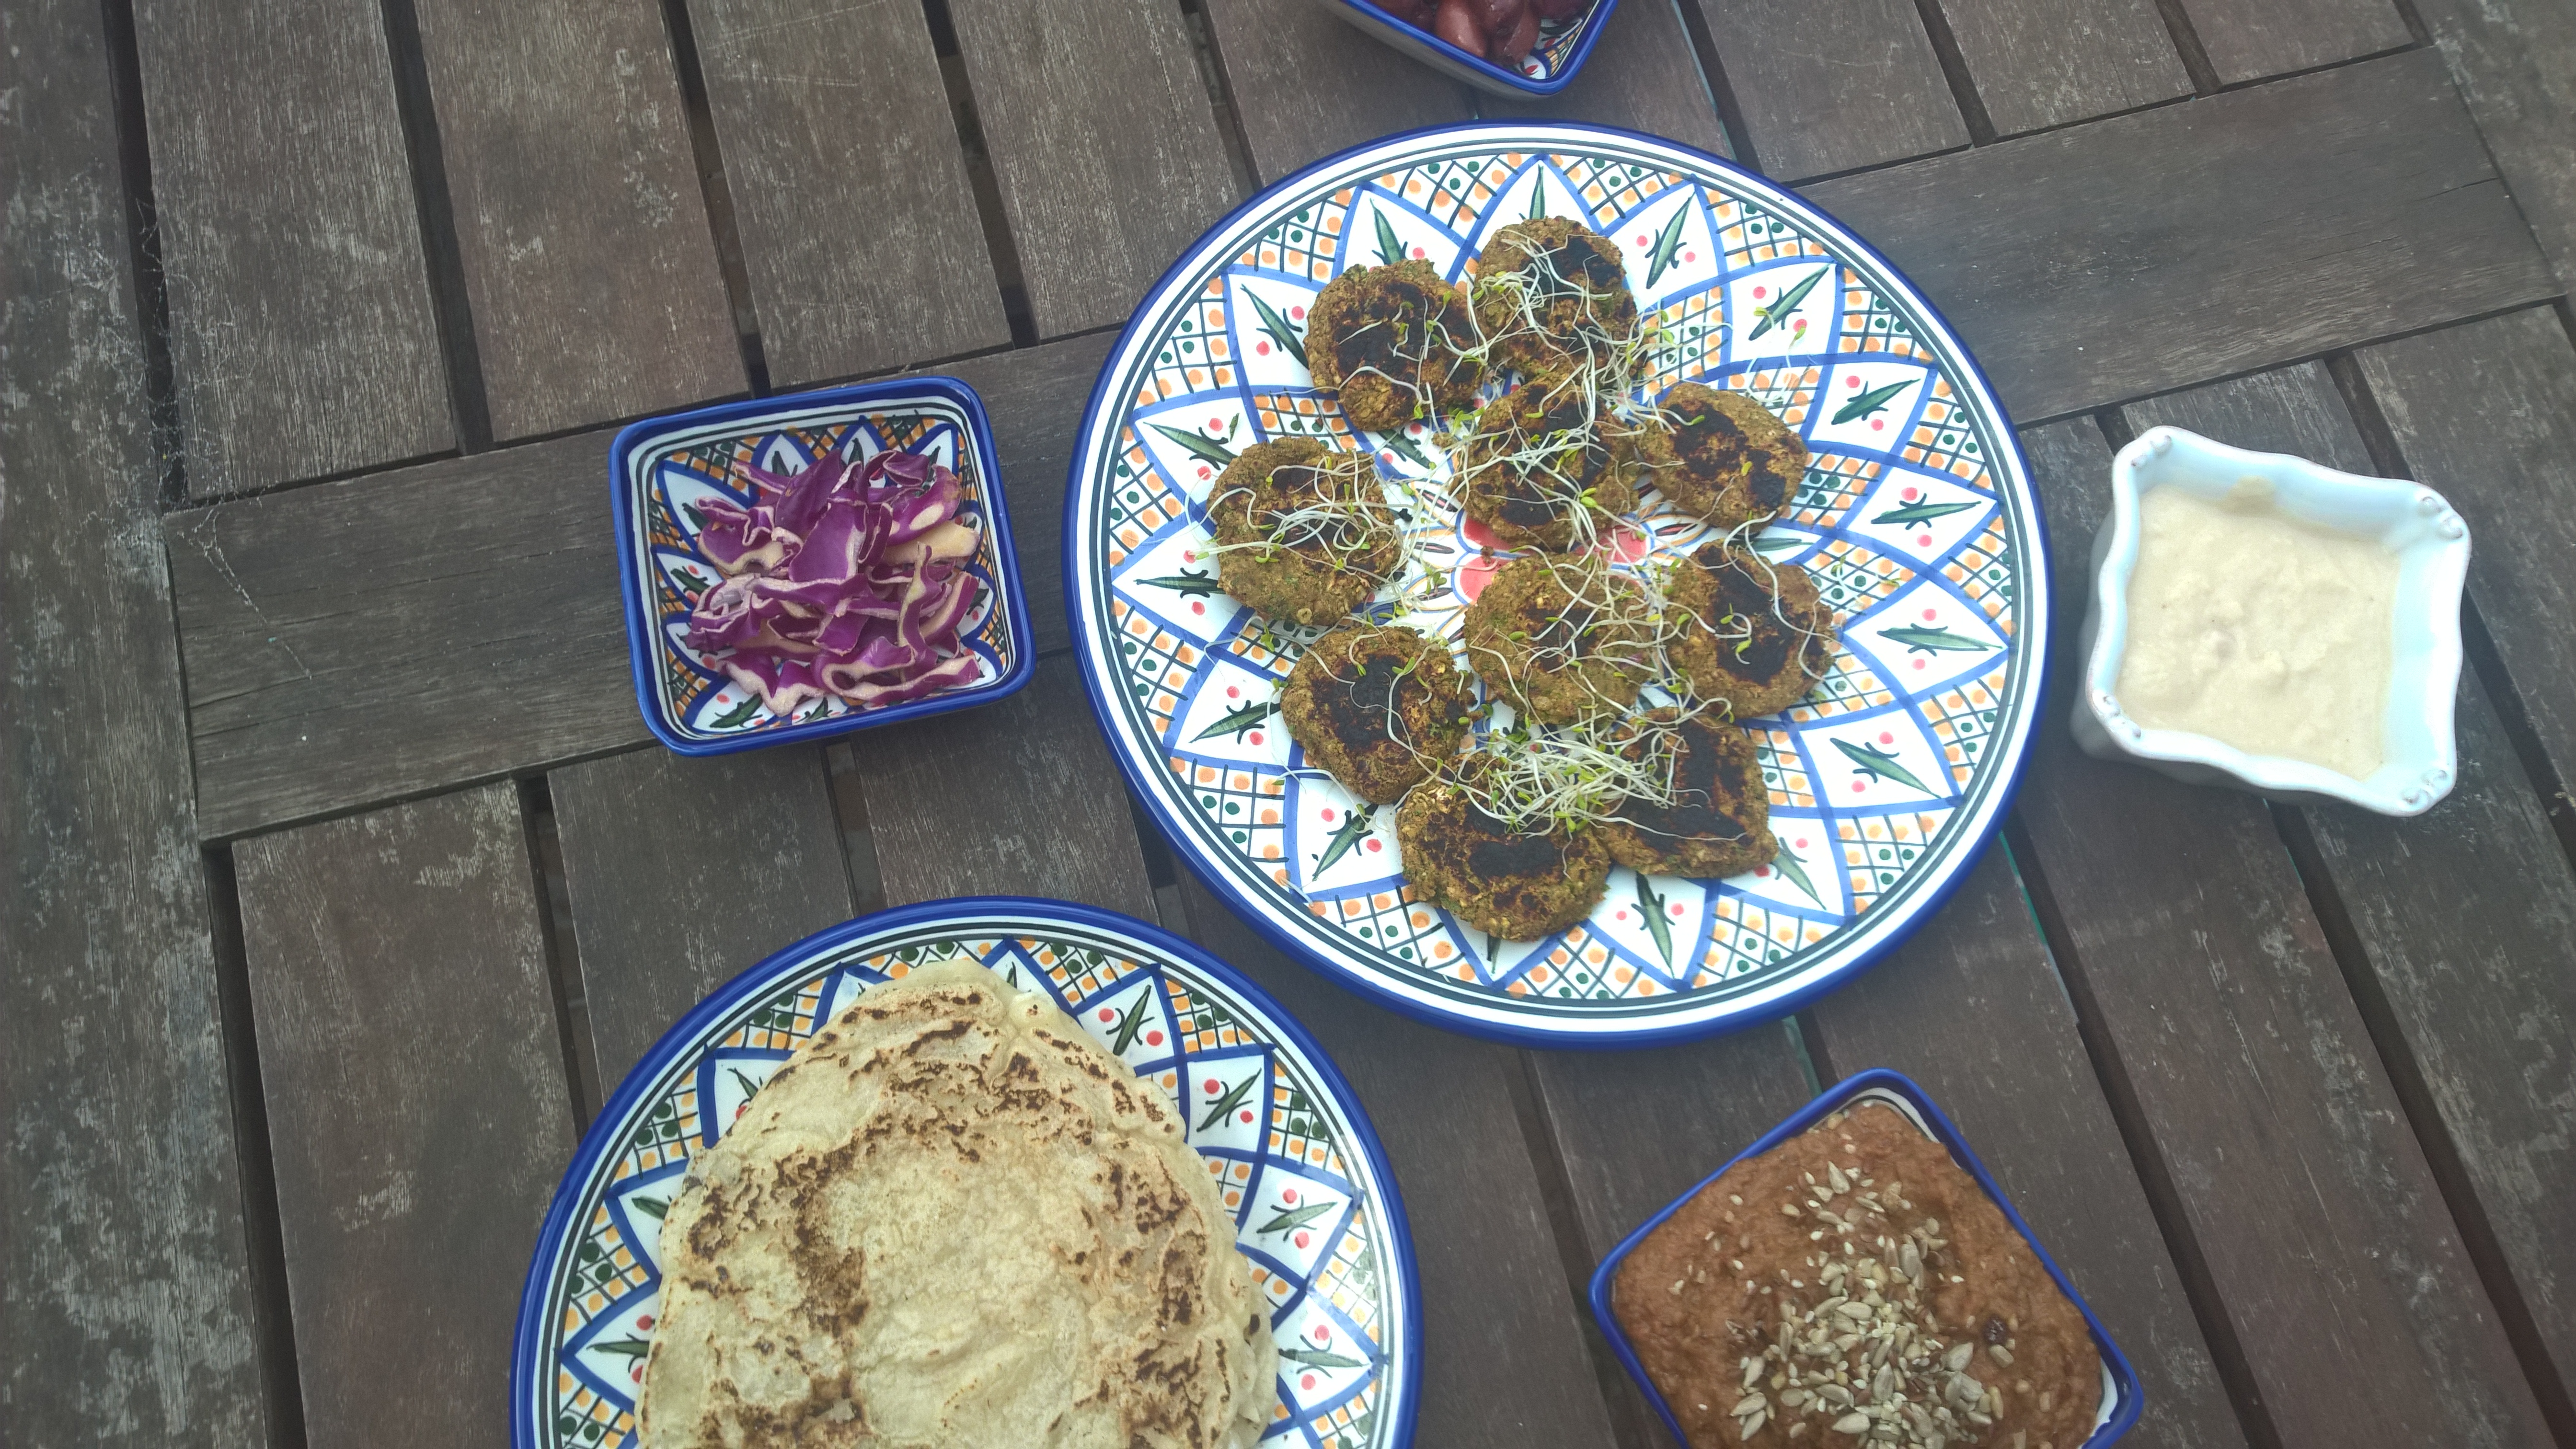
Lowfat Lentil and Carrot Hummus (pictured with falafel, naan bread and garlic sauce)
1 tin lentils, drained and rinsed ½ cup grated carrots ½ cup roasted red peppers (can be from the jar) 2 garlic cloves, minced 1 tbsp dukkah (optional) 3 tsp souk spice mix or blend your own with a pinch each of black pepper, allspice, cumin, coriander, turmeric, cinnamon, paprika, cardamom, cayenne, and nutmeg 2 tsp lemon juice 2 tsp tahin (omit if you want to make it fat free) pinch of salt
Just blitz everything in a high-powered blender and –
No, this is not a raspberry mousse, much as I’d like one! It’s beetroot hummus – and an oil-free, vegan, gluten free and soy free one no less! The colour, you ask? Tinned beetroot for the win! If you can boost the nutrition of your snack with a multitude of vitamins, minerals and antioxidants all while turning it the most stunning colour ever, why wouldn’t you? And with eight simple ingredients you possible have sitting in your pantry right now (or can easily enough pick up from the store), there is just no reason not to make this hummus and impress your guests and your family (and yourself) with this beauty. This is pretty much an instant affair, so a good candidate if you have friends dropping in unexpectedly.
I am not exaggerating if I say that it tastes absolutely a-maaazing. I love any version of hummus, but the sweetness of the beetroot just works perfectly to offset the earthiness of the chickpeas and the pungent garlic. My toddler is in love with this hummus which is the biggest compliment ever as at the moment she seems to be the pickiest eater ever! So I’m happy that I’ve got something for her that’s pink and still good for her. 🙂
One word of warning – this hummus may be “oil-free”, but due to the lovely tahini it is not “fat-free”, so moderation – if you can! – is key.
Oil-free Beetroot Hummus
Healthy oil-free beetroot hummus
1 tin chickpeas, drained and rinsed 1/3 tin tinned beetroot, drained (not rinsed) 2 tbsp tahini (sesame paste) 1-2 tbsp plant milk (depending on how you like the consistency) 1-2 cloves garlic, minced (depending on your taste) dash of lemon juice 1 tsp smooth mustard 1 healthy pinch of Maldon Sea Salt
Simply blitz all the ingredients in a high-powered blender until completely smooth, then transfer to a bowl and chill until using. Lasts about one week in the fridge.
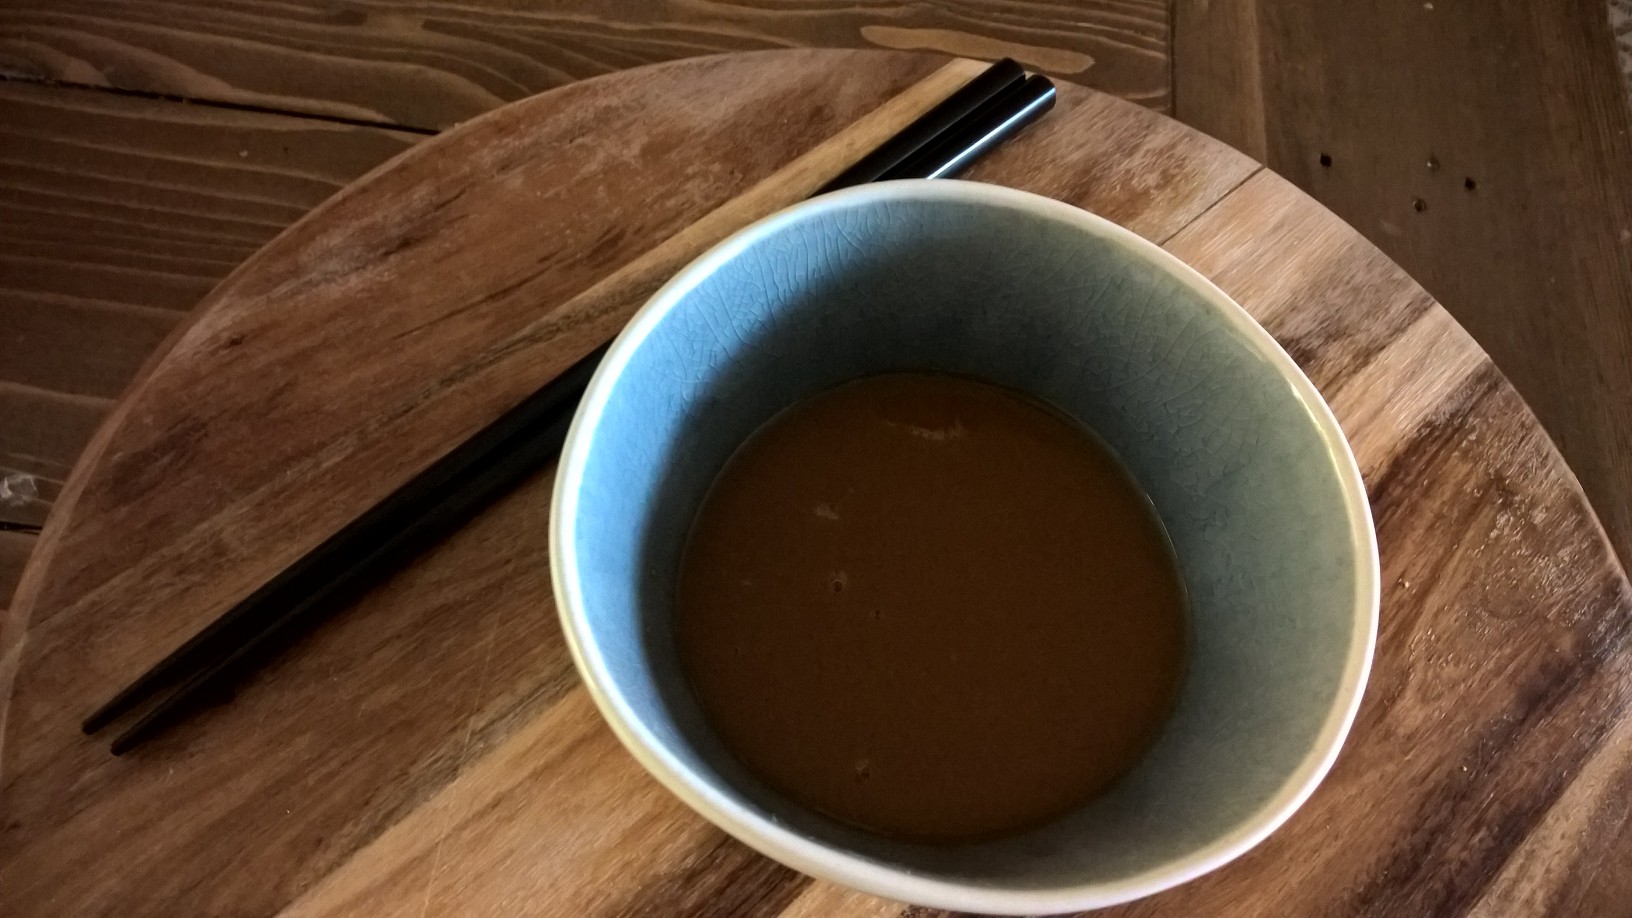
I got a sample for Japanese roasted sesame dressing at the recent Melbourne show. I love Japanese food, so this was right up my alley – until I discovered the ingredient list! This dressing consisted mainly of soybean oil, canola oil and “vegetable” oil – the worst types of oil you can consume – and barely had any real sesame in it. Plus, with soy sauce and egg yolks it was not exactly gluten free or vegan friendly, and don’t even get me started on the MSG! I knew I had to come up with a rock-solid alternative and figured there must be a way to create a healthy, gluten free and vegan alternative that in terms of taste, doesn’t need to hide behind the store-bought version – my healthy Asian sesame dressing.
What I came up with is an absolutely kick-ace dressing with just six ingredients. I doesn’t even take five minutes of your time to throw together. Due to the fragrant toasted sesame oil, a little goes a long way, so you don’t need to blow your calorie budget. Gluten-free tamari replaces soy sauce. Natural maple syrup stands in for of sugar. Organic almond milk works to achieve a creamy texture. Apple cider vinegar for added digestive benefits and last not least just a tiny amount of mustard – there goes your roasted sesame dressing! This dressing works with any Asian-inspired dish but also as a dipping sauce for crudités or ricepaper rolls!
Healthy Asian Sesame Dressing {gf, vg}
Healthy Toasted Sesame Dressing with just six ingredients and no nasties
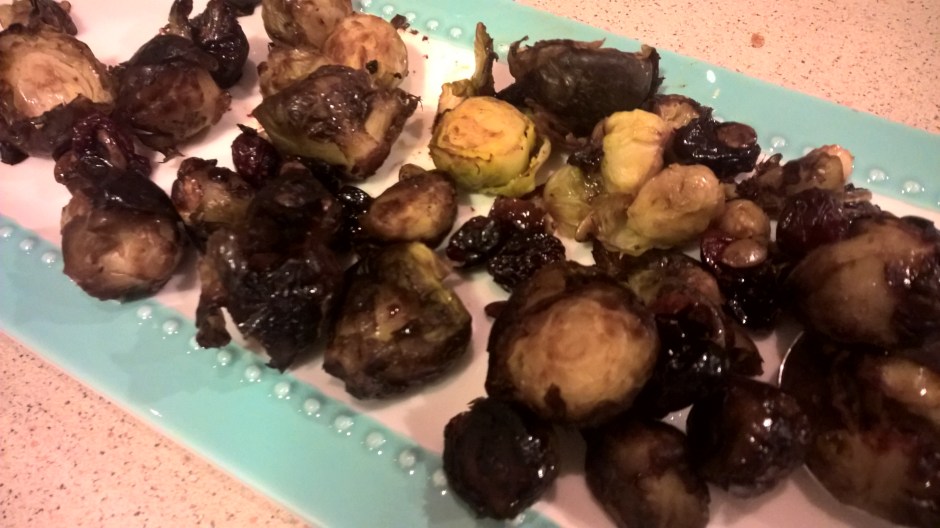
Think you hate Brussels sprouts? You are hardly alone. To be honest, it never really occurred to me to prepare Brussels sprouts. Even my love for broccoli and cauliflower is fairly recent, but Brussels sprouts hadn’t been on my agenda until I tried them at my grandparents-in-law’s house. I was so blown away by how tasty they were that I decided to pick up a bag on my next shopping round – and apparently I’m right on trend as Brussels sprouts were featured in the recent food issue of our local newspaper as retro vegetables having a come-back (along with beetroot and silverbeet).
While my hubby’s nonna uses oodles of garlic and oil to make vegetables tasty, I came up with a different approach, namely a balsamic maple glaze with cranberries and pepitas. The sweet and sour combination of the maple syrup and the balsamic together with tart cranberries and crunchy pepitas offset the cabbage-y flavour of the sprouts which become a scrumptious caramelised melt-in-your-mouth side dish or snack. The fact alone that half a cup of sprouts accounts for one fifth of your daily folate requirements should be reason enough to give these guys a chance – but this recipe will win over even the most ardent sprouts hater.
Serves 4
250 g Brussels sprouts, halved 125 g fresh or frozen cranberries 125 ml balsamic vinegar, divided 2 tsp maple syrup, divided 50 g pepitas (pumpkin seeds)
Preheat oven to 200 °C and line a braking tray with baking paper. Combine half the vinegar and half the syrup in a bowl and toss sprouts and berries to coat. Spread evenly on to the baking tray and roast until the Brussels sprouts start to brown, about ten to 15 minutes. Meanwhile, mix the remaining vinegar and syrup. Carefully take the tray out of the oven, turn the sprouts and berries and sprinkle with the vinegar mixture. Return to the oven and rost for another ten to 15 minutes until sprouts are just tender.
The free bread basket you get in restaurants to quench your hunger – I know, sometimes it isn’t even free – is usually just that – a hunger quencher. In my gluten-eating days, I have rarely come across a restaurant that serves a bread basket with bread that actually deserves its name. Since going gluten free, I naturally have to pass on the bread basket – but unlike saying good-bye to thin-crust pizza on Saturday nights and freshly baked croissants in bed on Sunday morning, I happily live without these buckets of stale bread thrown at you that spoil your appetite for the “real” meal.
The only exception is delicious naan bread in Indian restaurants, fresh from the clay oven, only waiting to soak up tangy relishes and condiments. While Indian food has never grown on me as much as, say, Mediterranean or middle eastern cuisine, I’d happily walk miles for a good naan bread – gluten free of course.
The best things in life happen by chance, and my latest creation in the realm of gluten free carby things was born while experimenting with different pancake recipes. (After all, it was Pancake Day on Tuesday.) While I’m still trying to rival the crêpe stand in Melbourne CBD, I might not have come up with a pancake recipe I would be happy to post, but – yup – a recipe for naan bread! How good is that? I mean, you try to create something that roughly looks, tastes and smells like a pancake, a crêpe, a poffertje,a flapjack, or a blintz (any reference to a certain Austin Powers movie is mere coincidence), and what you get is naan! I won’t complain. I guess it’s just life. Do you have that too where when you are looking for something you always find something else? Or is it just me?
I won’t go as far as calling these babies “healthy” because – shame on me- I used plain old commercial gluten free flour which is about as carby as you get. I’ve been a bit slack these days. So the fact that these beauties take less than five minutes to make (and contain just four ingredients (five if you count the fat for frying)) got me sold. Yes, this means you could devour a stack of delicious gluten free naan bread in under five minutes from now.
So while I work heavily at creating a more healthy version of this revelation (I think sorghum and buckwheat are likely candidates), why don’t you go forth and bake. The time starts now.
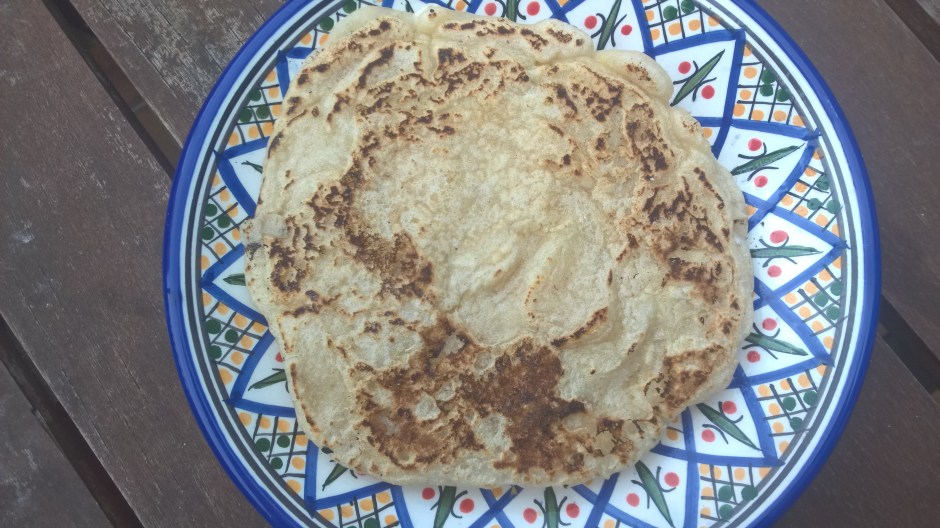
5-minute Vegan Gluten Free Naan Bread
Makes 4 naan breads
250ml filtered water 150g gluten free self-raising flour 1 tbsp psyllium husk pinch of sea salt a little bit of refined coconut oil for frying
Mix flour, psyllium and salt, then gradually add water while constantly whisking until you have a smooth dough. Lightly grease a large non-stick frying pan. The pan should be really hot. Make sure you use a good non-stick brand. Ladle a quarter of the batter inside the pan, fry until bubbling on top, then flip. Let cool before serving (the texture will become more naan-y as it cools down).