Nothing beats the creamy, melt-in-the-mouth, buttery consistency of fudge – and no trip to Scotland would be complete without a taste of this heavenly delicacy. Even though store-bought fudges are generally gluten free, they are, unfortunately, far from healthy. Vegetable oils, sugar, pasteurised dairy, and in unfortunate cases even soy make for a nibbly that should be enjoyed only occasionally, if at all. So how about a healthified version of chocolate fudge that you can create in just three minutes? Okay, there is the refrigerating time, so you won’t be able to dig in in three minutes, but three minutes is all you need to spend to enjoy healthy and yummy fudge (and you are welcome to try before chilling!).
125 ml melted coconut oil (raw virgin, organic) 60 g raw cocoa (organic) 75 g honey knob of grass fed butter (optional) good dash of finely ground Himalayan sea salt dash of vanilla
Mix all ingredients until well combined, spoon into a lined 20×20 cm container and chill for an hour or until solid. Lift out the fudge and cut into squares. If you enjoyed this fudge, why not try the following variations: Add mint essence for a classic after dinner treat, chilli powder or ginger for a bit of heat, orange peel, cinnamon and cardamom for a yummy wintery treat, peanut butter for extra indulgence or rose water for a mysterious Middle Eastern touch à la Turkish Delight.
Paleo and Vegan Protein Shake – the best of both worlds!
With a primal or paleo-oriented diet, getting enough protein in shouldn’t be an issue at all – if you are, however, not the biggest fan of meat or fish, meeting your daily protein requirements can be a bit more of a challenge! It is no coincidence that “protein” dereives from the Greek word “protos”, meaning “first” or “most important”. Besides fats and moderate amounts of carbohydrates – mainly from fruit, vegetables, and potatoes -, protein should account for 20-30% of your daily calorie intake – and this does not only apply to you if you are an athlete! Protein is the main building block of every cell in our bodies and is required to make hormones and enzymes. Besides, our body has no capacity of storing protein, which means you have to constantly supply your body with protein from your diet.”Vegan” and “Paleo” is not necessarily mutually exclusive, as I have shown in countless recipes. But even if you don’t follow a vegan diet – and I would advise against a vegan diet for a variety of reasons -, you might struggle to get your share of protein as pretty much all protein supplements use either soy (stay away from that by all means!), dairy, or egg albumen, which can cause adverse reactions in many people. In fact, finding a good, tasty, and healthy protein supplement, whether to fill you up after a strenuous workout or to achieve your protein intake goals, is next to impossible. Although I have seen “paleo” beef protein powders, they are expensive and hard to get your hands on.
An easy way out are rice protein shakes, which should be tolerated by pretty much anyone and impresses with an excellent amino acid profile. Admittedly, it doesn’t boast the best taste, but with a few paleo-friendly accessories, this problem can easily be solved. I created this shake as a convenient, tasty, and healthy source of protein. There is hardly any fructose in it, just glucose from banana (nature’s powerhouse!). Raw organic cocoa means plenty of minerals and antioxidants while at the same time staving off even the most violent chocolate cravings, almond meal provides for texture and an extra dose of vitamin E, and coconut water and coconut milk mean you get in the best of one of the planet’s healthiest foods – now I am sure the shakes they serve you at your local gym can’t even get close to this! Of course, you have plenty of options to “customise” this shake. Not vegan? Add some raw egg (you won’t taste it!)! Not strictly paleo? Consider a dollop of natural peanut butter! Feel like a cherry ripe bar? Get the frozen cherries out for a delicious treat and some added vitamins. Or go all decadent and add a few drops of mint essence for a delicious “dinner mint” treat.
Makes 1 shake
dash of vanilla 1 medium banana 1 tablespoon raw organic cocoa 2 heaped tablespoons almond meal 1 tablespoon stevia 5 ice cubes 2 tablespoons rice protein powder 200 ml coconut water 50 ml coconut milk 1 tsp flax pinch of salt
Add all ingredients in a high-powered blender and mix away!
It´s time to eliminate your prejudices – you don’t have prejudices, you say? I bet you have some – two of which I will eliminate in this blog post. First, I am sure you think that “vegan” and “paleo” is mutually exclusive. Well, yes and no. If you are talking lifestyle, then probably yes. If you are talking indulgent desserts, not necessarily. Oh, you say that “paleo” and “indulgent” is mutually exclusive? And that “vegan” and “indulgent” is mutually exclusive? That actually takes us to four prejudices I will get rid of with this post. What is the fourth one, you ask? Well – have you heard of panna cotta? With the possible exception of Italian chefs, the word “panna cotta” is commonly associated with the words “difficult” or “complicated”. But, actually, this could be the easiest dessert you’ll ever make. And yes, you can finally invite your paleo cousin and vegan sister in law to the same dinner party!
The educated among you will know that “panna cotta” is Italian and means as much as cooked or boiled cream. Which already presents the first challenge as dairy cream is neither paleo or vegan. What to do? Coconut to the rescue! If you have followed this blog, you will know that I am a big fan of coconut – coconut oil, coconut flour, coconut cream – you name it. Not only does this versatile gem taste divine, it is also exceptionally healthy. I have mentioned the various health benefits of coconut numerous times, so I suggest you do your research on this.
The second challenge is the gelatin required in traditional panna cotta recipes – though popular among the paleo community – and rightly so – it is a no-go for a vegan or even vegetarian diet. but nature wouldn´t be nature if it hadn´t bestowed us with a worthy alternative – agar, which you can almost use completely interchangeably with gelatin. Voilà! There you have a dessert which boasts healthy fats and is loaded with antioxidants. Win!
Serves 4
1 tin (420 ml) coconut cream, full fat 1 tablespoon vanilla essence 100 g honey 1 tablespoon agar 200 ml boiling water For the sauce 100 g honey 2 tablespoons raw organic cocoa 1 tablespoon potato starch 1 tin (420 ml) coconut milk 2 tablespoons ground coffee
Heat the cream, vanilla and honey in a saucepan over medium heat until the honey is completely dissolved and everything is well combined. Take off the heat. Boil the agar in the water for five minutes until completely dissolved. Stir into the coconut mass until completely dissolved. Pour the mass into four heat-proof moulds and refrigerate for three hours or until set.
For the sauce, combine all ingredients bar the coffee in a small saucepan over small heat until thickened. Turn off the heat and stir in the coffee until completely dissolved. Refrigerate until ready to use.
Happy 2015! What are your resolutions for the new year? If living healthier is on your bucket list for this year (and there is a fair chance it is) then you will probably have banned nutella and banana sandwiches for dinner – at least for the first few days. But if you think that a chocolate hazelnut spread is inherently bad, hear me! Of course, the store bought stuff – no offence to the almighty Ferrero – is loaded with cheap vegetable oils and refined sugar – two ingredients that you should avoid at all costs or only enjoy occasionally. But both hazelnuts and cocoa possess powerful health properties and because they taste divine as well – especially in combination with each other – a chocolate hazelnut spread is just made for my blog!
In fact, although it’s advisable not to overdo it on the nuts (due to their phytic acid content on the one hand and their high level of omega 6 on the other), hazelnuts, with their relatively low omega 6 content, are among the more preferable types of nuts, and come with a healthy does of manganese for strong bones, copper for the utilisation of iron, and vitamin E for cardiovascular benefits on top. You might want to read up on nuts in the context of a paleo diet here.
I based my nutella on this recipe by the detoxinista, but instead of coconut sugar I opted for stevia. Why? Well, while I’m a big fan of the taste and texture of coconut sugar and believe it to be a high-quality type of sugar, it is still a carbohydrate. And, given that spreads are commonly used on bread which is – gluten free or not – a notorious carbohydrate bomb, I believe a spread should be as low in carbs as possible to balance this out – see my recipe for a low-carb jam here. Everyone knows that managing your carbohydrate intake is the key for long-term health and maintaining a normal weight, and that is why I like to replace all sugars, even the “healthy” ones with low-carb alternatives such as stevia, xylitol, or erythritol (no artificial sweeteners though!), especially as I don’t mind the taste of stevia. If you, however, despise it (and I know there are people that do), feel free to use coconut sugar, palm sugar, or raw sugar here (don’t think white sugar would work). Now, for a die-hard paleoist, including stevia in any recipe boasting the word “paleo” is for sure a sacrilege, but living a balanced lifestyle also means to try not to be holier than the pope. Of course, no sweet treat is strictly paleo, but I think that low-calorie, natural sweeteners such as stevia and erythritol are a godsend to enable us to enjoy the occasional sweet treat without deviating from our healthy lifestyle.
Does this nutella taste like the real thing? Well, I think it is pretty close, only better! Think of the inside of a Ferrero Rocher (am I the only one who used to scrape out the insides of a Ferrero Rocher?). Can’t argue with that one!
So without further ado, let’s take three steps to heaven!
225 g hazelnuts 10 g stevia (or 100 g sugar of choice) 15 g cocoa powder 15 g melted coconut oil 50 ml filtered water
1. Preheat oven to 150 °C and roast the hazelnuts on a flat baking sheet for 10-15 minutes or until the skins start to come off. Let cool slightly and then gently rub the nuts in a clean tea towel to remove the skins. Don’t worry about small bits remaining.
2. Pulse nuts approx. 10 minutes in a high powered food processor until you achieve the consistency of a coarse nut butter. I am lazy like my nut butters with a bit of crunch, so I don’t bother processing them to a smooth consistency.
3. Add remaining ingredients and quickly blend until well combined.
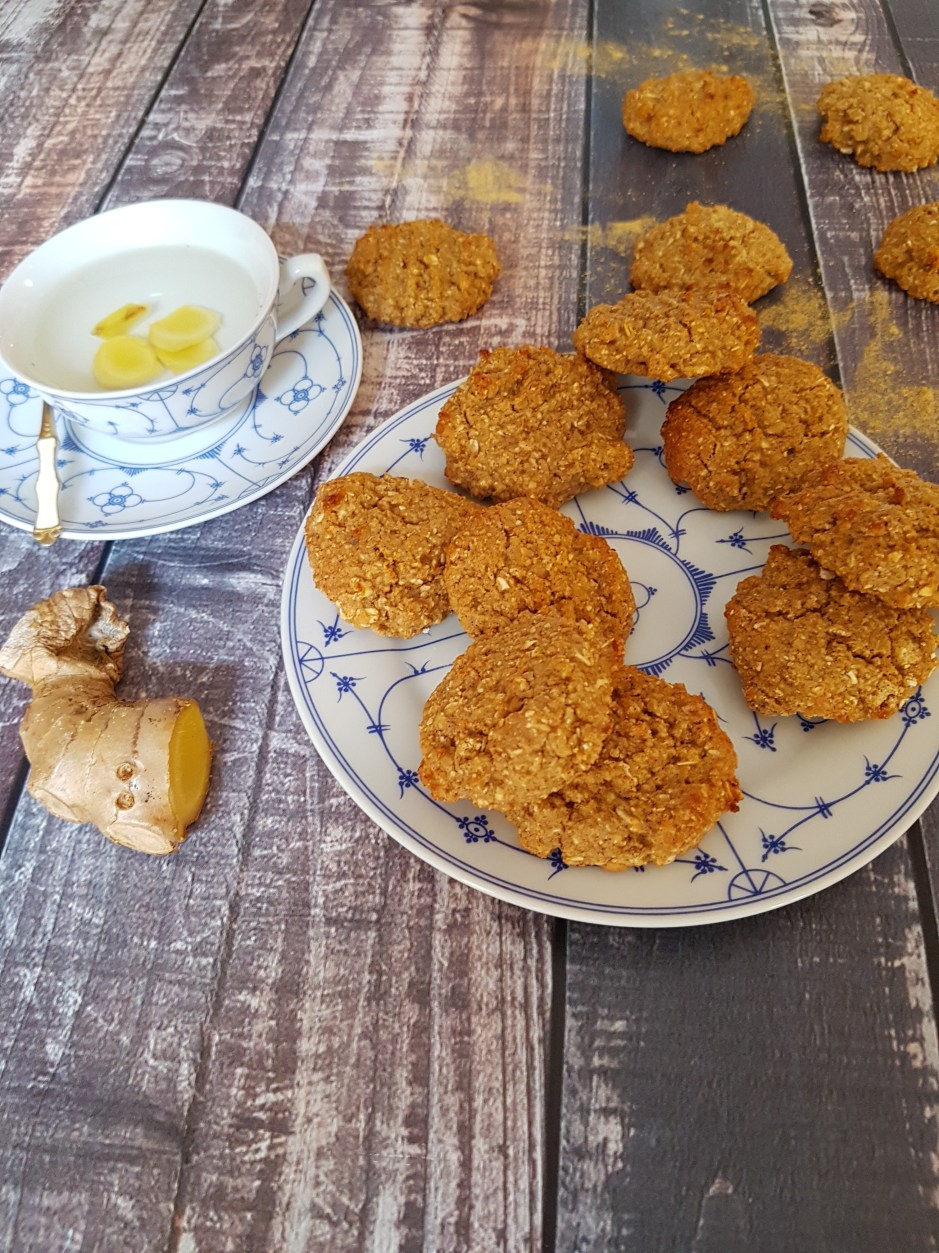
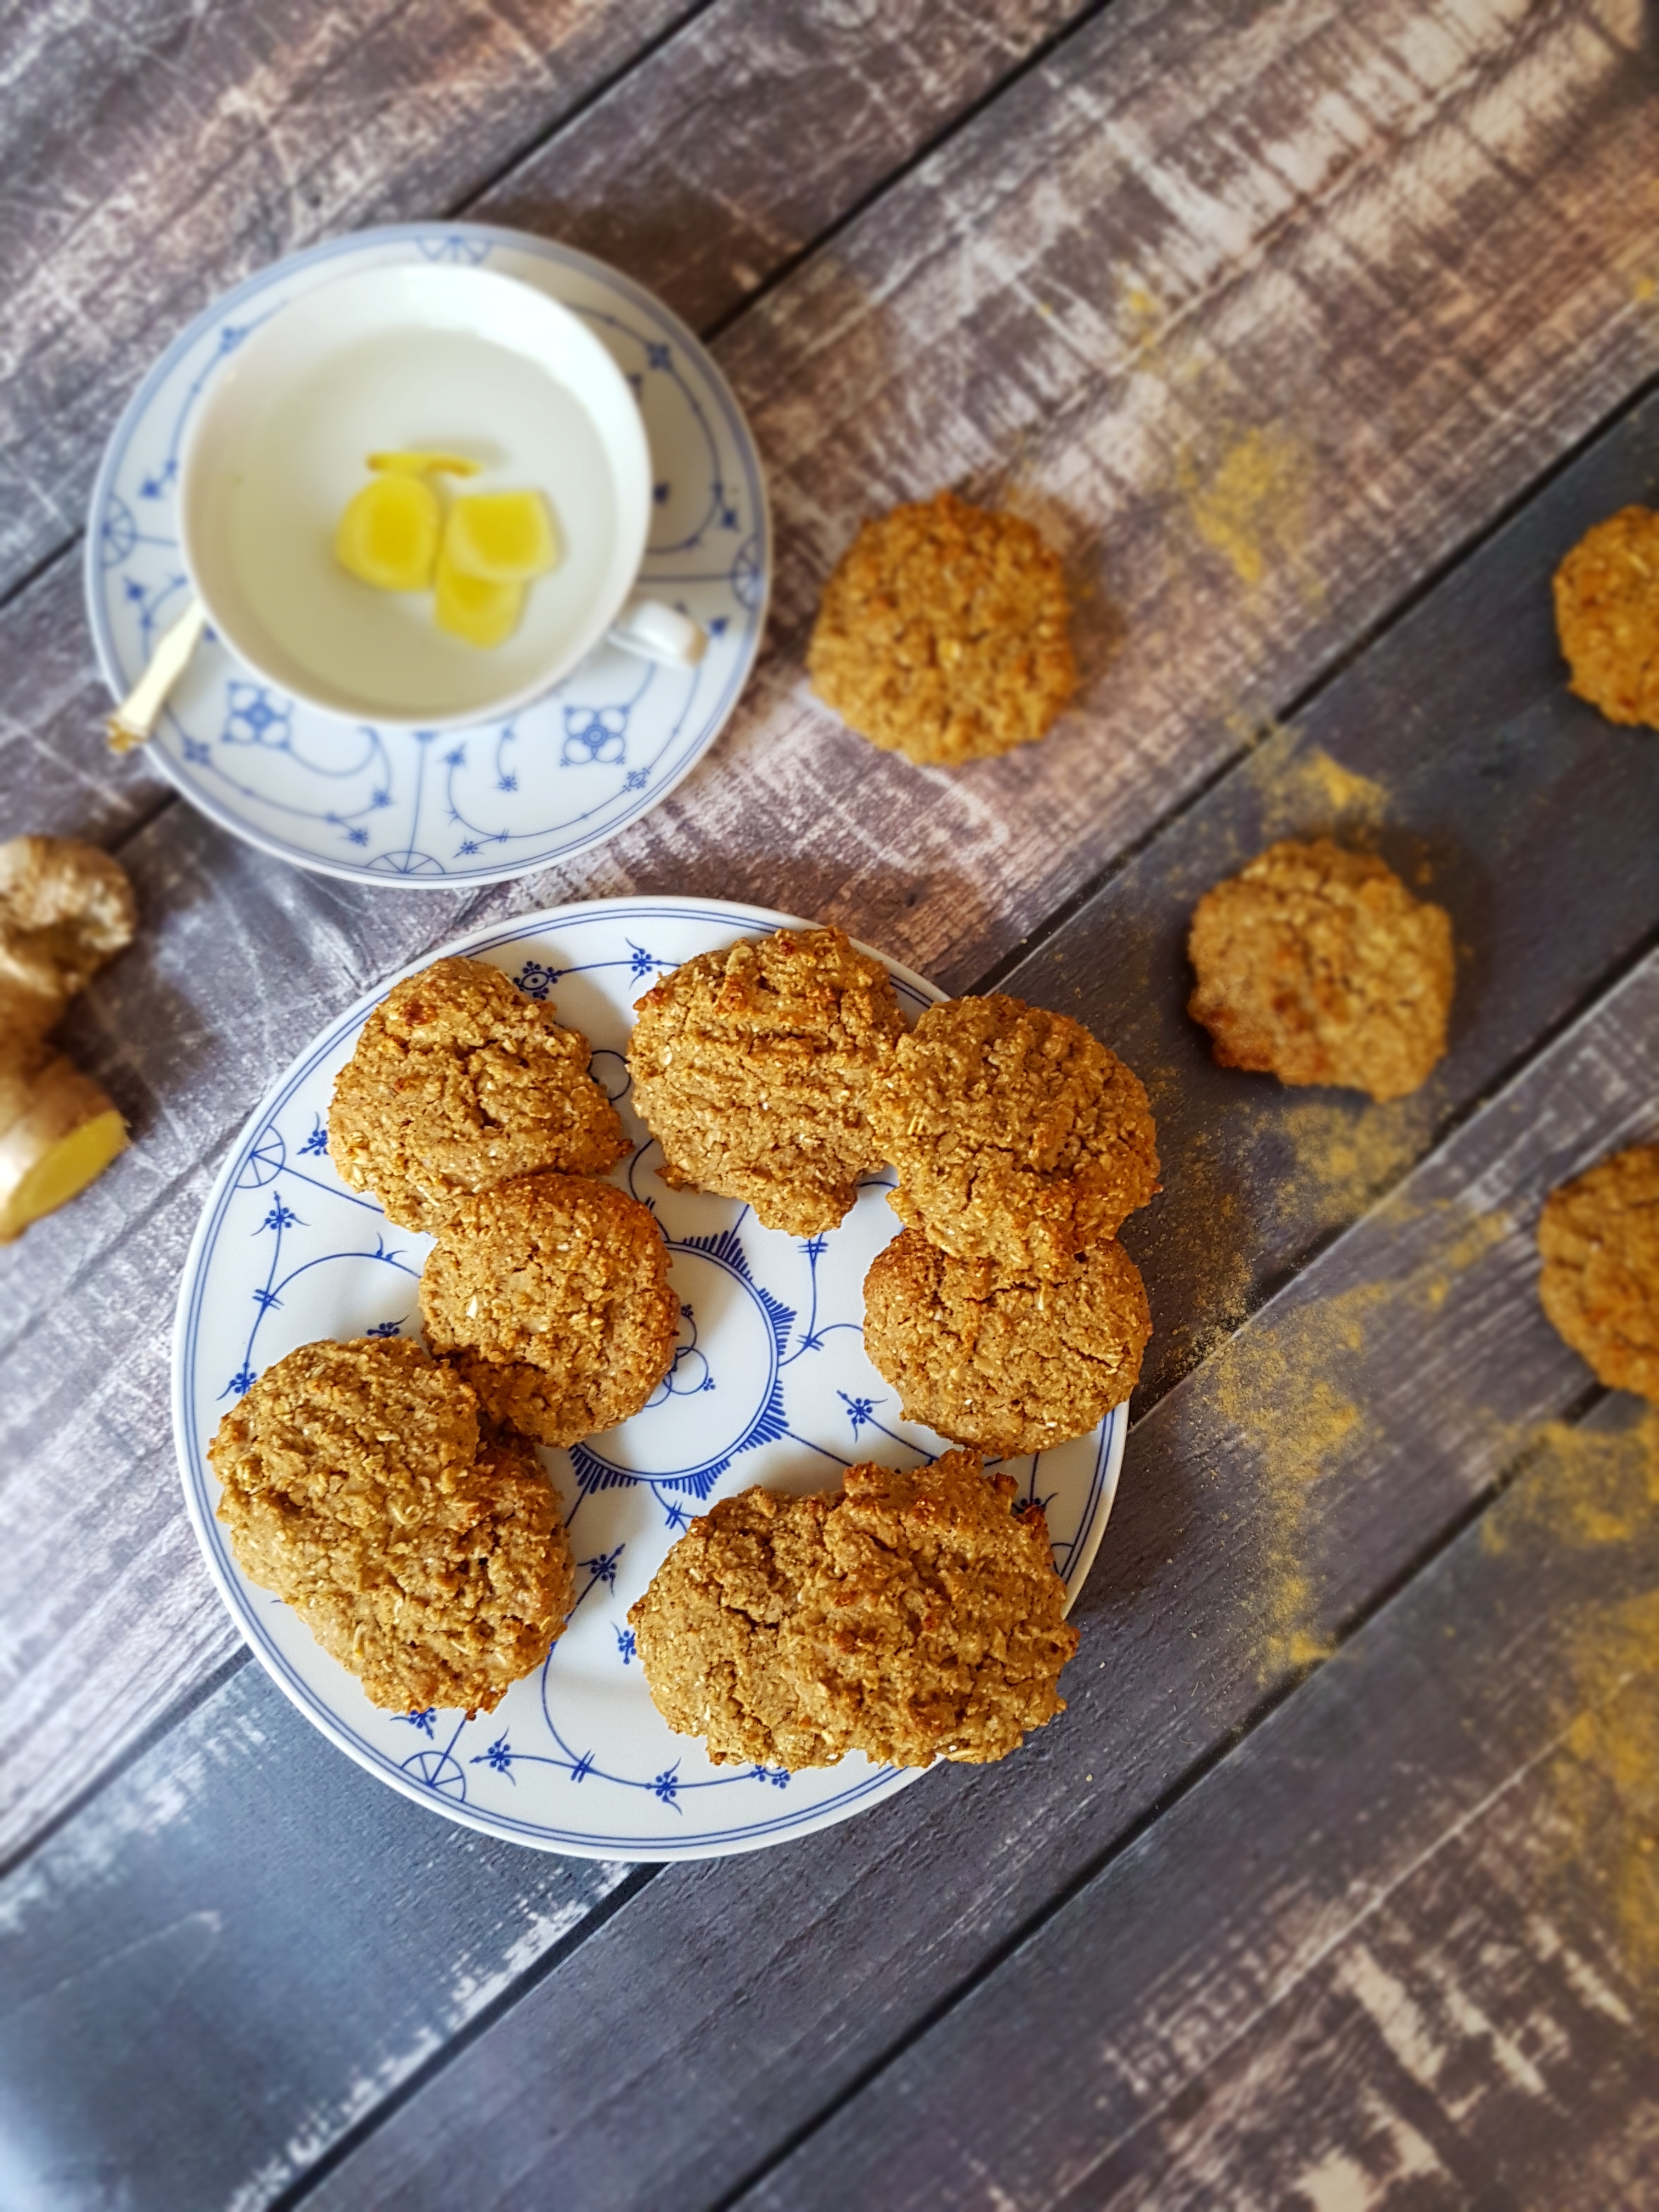
As you might know, I am a big fan of legumes. From falafel to hummus to stews, it would be easier to list my recipes without lentils, beans, chickpeas and co. than the one with them as there are so many! And the reason for that is simple – they are delicious, filling, cheap, and prepared in a jiffy. They are full of fiber and a very good plant-based source of protein. Together with grains, any legumes form a complete protein. Take that, omnivore! But if you think, grains and legumes are only for soups and salads, you haven’t tried my vegan ginger snap biscuits yet!
Vegan Ginger Snap Biscuits
You are probably wondering what on earth is going on here. A post about vegan ginger snap biscuits and then all the carry-on about legumes? Makes no sense? Not so fast! With recipes floating around for cookies and biscuits containing beans (yes, you read that right), the idea to give your afternoon snack a protein and fiber boost while lowering the fat content isn’t exactly new, but I thought I’d update my old ginger snap biscuit recipe and bring you a sparkling new, vegan, gluten free and lowfat version!
These babies are not only a cinch to make, they are also a guilt-free treat, and a very satisfying at that. Even my hubby was excited and he usually doesn’t like healthified snacks at all, so take that as one more reason to get the cannellini bean tins out!
Vegan Ginger Snap Biscuits {vg, gf, lf}
Makes 25
1.5 cups rolled oats 1.5 cups besan (chickpea) flour
1/2 tbsp glutenfree baking powder 1 tsp ground cinnamon 1 tsp (or more) ground ginger 1/2 tsp ground cloves 1/2 tsp freshly ground sea salt pinch of cayenne pepper 1 tin cannellini beans (reserve 6 tbsp of the liquid from the can, see next row!)
6 tbsp aquafaba (cannellini bean “brine”, i.e. the liquid from the can)
3/4 cup brown sugar
Combine dry ingredients (oats, besan, baking powder, spices and sugar) in a medium-sized mixing bowl. Process the beans with the aquafaba in a high-powered blender and add the resulting mush to the dry ingredients. Heap a teaspoonfull each on a prepared baking sheet and bake in a preheated oven at 180 °C for 15 minutes until lightly golden at the edges. Taste best on the same day but can be kept in an airtight container for up to a week.
You probably thought you would never have a donut again. Well, I hate to tell you, but you were wrong, this time. You really can have it all, and these donuts are not only ready in a jiffy, but they taste truly delicious and seriously chocolatey. With only 7 g of carbs per mini donut, they won’t leave you feeling slumpy, either. no go forth and bake.
Makes 12 mini donuts
100 g red sorghum flour 50 g potato starch 30 g cocoa powder, Dutch processed 100 g erythritol 1/2 tsp baking soda pinch of salt 1 flax egg (1 flax egg = 1 tbsp milled flaxseed dissolved in 4 tbsp filtered water) 100 g plant milk dash of vanilla 25 g melted coconut oil
for the glaze: 150 g extra dark vegan chocolate 50 g coconut oil dash of vanilla
sprinkle (optional)
Preheat oven to 230 °C. For the batter, mix the dry ingredients first, then mix the wet ingredients in a separate bowl and add to dry ingredients until well blended. Place into donut pan and bake for 8 minutes. Let cool completely. For the glaze, melt chocolate and butter in a double boiler over very low heat until completely melted and well combined. Add vanilla. Glaze the donuts and ornate with sprinkles, if you like.
Delicious cookies that are vegan paleo and ready in minutes – it’s just not fair…
So let’s take one chocoholic baker with two magic hands, three utensils, four minutes of time, five senses, and six to seven ingredients (depending on whether you like vanilla or not, but I think it’s lovely). Then it takes eight minutes of baking, and you’ll be on cloud nine in vegan heaven – or paleo heaven, gluten-free heaven, or dairy-free heaven, or low-carb heaven, or whatever your heaven might be. Actually, I’d prefer to say “chocoholic heaven” ’cause that’s what these cookies are – heaven for chocoholics.
I made 16 of these cookies 24 hours ago, and now we are down to four. FOUR! I mean, it’s just hubs and me for the moment, and we gobbled up 12 chocolate cookies in one day between the two of us! Honestly, these cookies are soooo good, they’ll be gone before you know it – but your friends/family/neighbours/colleagues/better half/kids will never know they are gluten free, grain free, and sugar free! Not that anyone would care anyway, as they are just sooo delicious! But it’s good to know that they are allergy-friendly (provided the eater isn’t allergic to nuts!)
In fact (and luckily for us), there is not a single unhealthy ingredient in them. There is no flour and no grain whatsoever, no dairy, no trans-fats, and they are sweetened exclusively with dates – no refined sugar here. Almond butter instead of artificial, trans-fatty margarine boasts a healthy dose of heart-healthy monounsaturated fats which keep you happy and satisfied, egg is a well-known treasure of amino acids, vitamins and minerals, dates instead of refined sugar deliver magnesium for better sleep, and unsweetened cocoa comes with antioxidants which offer numerous health benefits. They are great as a pick-me-up between meals and a great dessert for when you have those chocolate cravings after dinner.
What are you waiting for? Make these cookies!
Makes 16 cookies
250g natural almond butter 1 flax egg (1 flax egg = 1 tbsp milled flaxseed dissolved in 4 tbsp filtered water) 1/4 tsp sea salt 1/2 baking soda 80g dates 20g cocoa dash of vanilla
Preheat oven to 180 °C. Mix all ingredients in a good food processor. Roll into a ball, scoop approx. 1,5 tbsp of dough onto a prepared baking sheet and bake for eight minutes. The cookies will still be a bit soft, but that’s ok.
If granola has been one of the few things you have never tried to make yourself even though you try to make as much as possible from scratch, let me tell you: It is really easy. In fact, it is so ridiculously easy that you will be vexed when you find out just HOW easy it is – and you won’t tell the difference to store-bought granola, other than that your tummy will be thankful for being spared the bucketloads of sugars, chemicals and cheap industrial oils in commercial granolas. In fact, I dare to say that this granola tastes far superior than any granola you will find in your supermarket or health food shop.
Speaking of “health food” – just because something is labelled healthy, it is not necessarily good for you. I have always been disappointed by the options in health food shops. Even the supposed “healthy” cereals from the organic shop come with loads of dodgy ingredients – and that at a premium price! Making your own granola is not only far better for you and far tastier, it is fun, quick, and cheap! Keep in mind that this way you can also make this granola “your own”, adding any ingredients you fancy! Have you not often thought: I wish they had pecan & walnut / cashew & cranberry / mango & coconut / hazelnut & chocolate chip / white chocolate & raspberry granola?
Now you can make your very own granola! As it lasts a long time, it’s worth making a big batch and storing it in a mason jar in the fridge. The main ingredient, rolled oats, you can get very cheaply, so you can spend as little or as much as you want on your granola.
200 g rolled oats (certified gluten free) 80 dates, roughly chopped 1 tb honey 2 tb coconut oil, melted dash of vanilla good pinch of sea salt Any optional ingredients (nuts, seeds, dried fruit, chocolate chips…)
Preheat oven to 150 °C. Mix all ingredients in a mixing bowl until well combined. Spread thinly on a lined baking sheet and bake for up to 10 minutes until lightly toasted. When cooled, transfer to a mason jar and store in the fridge. Serve with Greek yogurt or milk of choice and fresh fruit.
If my flourless low-carb brownie cookies were still a bit too dry and crumbly for your liking, you are in for a treat! And a fudgy, squidgy, decadent one at that! These brownies are again flourless and paleo, but thanks to yummy avocados, they are super moist, smooth, rich, dense and, yup, fudgy!
You read that right, there is avocados in there! As you might know, I am a demon for avocados, and they occupy a regular place in my diet, whether as dip for crudités, in chicken salad, or as a nutritious addition to my breakfast smoothies. And as a passionate baker, it’s only natural that I incorporate them in my baking and dessert-making, too! The thing is, chocolate and avocado is just a match made in heaven – the Mexicans got that quite right! If you don’t believe me, whip up some avo with cocoa powder and taste it – see what I mean? It’s wizardry. But you don’t need to be Harry Potter to make the world’s best brownies! Brownies that even taste like there was icing on top, even though there isn’t! Now, ain’t that magic?
I don’t need to mention that these brownies are super healthy coz that’s what this blog is all about – but these are truly nutritious. Lots of healthy fats from avocado, eggs, butter/coconut oil and almond meal, antioxidants from pure cocoa, and only a little bit of carbohydrate from natural honey. No starches, no refined sugar, no processed oils, and absolutely no grains involved. It’s magical. And let me say it again: These are the moistest, fudgiest, most decadent and flavoursome brownies you’ll ever taste.
These brownies are as hard to resist as they are satisfying. A couple of them should be enough to indulge even your most violent cravings, and with 7 (yes, seven) net carbs per two pieces there is absolutely nothing to feel guilty about. It’s also easy as pie to “veganise” them (indeed, paleo and vegan are NOT mutually exclusive!!!) – just use coconut oil instead of butter, maple syrup or your favourite sweetener instead of honey, flax eggs instead of eggs, and Bob’s your uncle! Magic again?
As I haven’t mentioned it yet and can anticipate your questioning look – no, these brownies do NOT taste like avocado, not one bit! Like Harry Potter under his invisibility cloak the avos are there, emphasising the rich cocoa flavour and providing a heavenly consistency of the brownies, but you cannot see, i.e. taste, them.
I am pretty sure that this could become your all-time favourite morning, afternoon and/or bedtime snack, and one your body will thank you for, too! I must warn you though – the raw dough is so, so delicious that there is a certain risk you might devour a considerable portion of it before you slather it into the baking tray. But try to resist the magical charm of the dough as texture, taste and look of the baked brownies are just too good (in fact, magical) to make do with any less amount of dough.
Ready for some magic?
Makes 36 mini brownies
130 g butter or coconut oil 100 g unprocessed cocoa powder 140 g honey 1 tsp vanilla 70 g almond meal good pinch of sea salt pinch of baking soda 2 large eggs or flax eggs 2 large, ripe Hass avocados
Preheat the oven to 170 °C. Prepare a 20 x 20 cm baking pan by greasing and/or lining with parchment paper. Melt the butter/CO together with the cocoa powder in the microwave in 30 second instalments until completely smooth. Stir in the honey, vanilla, almond meal, sea salt, and soda.
Add the avocados to a blender or food processor. Add chocolate mixture as well as eggs and blend until smooth.
Spoon into baking pan and flatten out. Bake on the middle rack for approx. 25 minutes. Let cool and cut into 6×6 pieces (or bigger pieces if you like them bigger, but beware – they really are dense!). Store in the fridge in an airtight container (they will last very long – if you let them last. :-)). Always serve chilled.
So you thought you would never look at a Snickers bar again, didn’t you? Snickers is all about refined sugar, processed oils and dodgy additives. And you were determined not to ruin your health with these anymore. But, heck…you still fancy a good ol’ Snickers every now and then…you start feeling itchy at the sight of your colleague munching down a Snickers in front of the computer. And while you wait for your train home, exhausted from a long day in the office, you are eying the vending machine at the station, one hand on the lookout for small change – only to be relieved/annoyed if it turns out you don’t have enough spare change to afford that little sin. Or you are at the service station, and, oh my, those blue letters on a brown background is just what you need right now. That Snickers bar, so sweet and innocent, nestled between its comrades Mars, Twix, M&Ms…that cure little thing can’t be that bad, can it?
Either you are disciplined, feel deprived and probably pig out on that bag of Doritos in your pantry as soon as you are through the door. Or you give in and feel guilty. So guilty.
Well, you don’t have to feel deprived anymore. And you don’t have to feel guilty anymore. Never – at least not about food, anyway. Promise.
What we are talking about here are Snickers bars….HEALTHY Snickers bars.
No, I’m not selling you some wonder tool here. I don’t promise you to become rich overnight or anything like that. What you will find here is a naughty treat that just happens to be good for you.
Yes, you can have the full Snickers experience, knowing that what you munch on is good, simple, honest food. No sugar. No wheat. No transfats. No additives. These Snickers bars are a dream, a revelation, a delight, luscious, scrumptious, indulgent, with the right balance of sweet and salty that we all love and miss about Snickers…well, you know what a Snickers tastes like, right? So I don’t need to explain anything further. These just taste like the real thing. Only better!
And here is where I stop because if you haven’t already scrolled down to the recipe you have to do that now!
Makes 10 bars
200 g dates, any type will work, chopped into small pieces (sticky, doughy consistency) 70 ghoney 70 g crunchy natural peanut butter (no added oils) 150 g unsalted peanuts 135 g rolled oats 100 g dark chocolate chips, chopped into small pieces 75 gcaramel (note that I used Elana’s recipe for the caramel in this bar, but replaced the palm shortening with butter) pinch of salt
Toast the oats and peanuts at about 180 °C for 10-15 minutes until slightly golden. Put them into a bowl, together with the dates, chocolate, prepared caramel, and salt. Warm the honey and peanut butter over very low heat until smooth. Add to the other ingredients and stir through until all ingredients are evenly combined.
Line a 20×20 cm baking dish with parchment, and fill with the prepared “snickers bar mixture”. Make sure to press the mass firmly into the pan to avoid it crumbling later. Best to cover with a sheet of parchment and use a hammer or your hands to press it down. Freeze for 30 minutes.
After 30 minutes in the freezer, take the dish out, lift the parchment, and carefully cut into 10 bars.