Who doesn’t love bliss balls? They are a healthy afternoon treat with your cuppa, the perfect pick-me-up for that dreaded afternoon slump, a beloved addition to school lunchboxes or even an energizing breakfast on the run!
Alas, most bliss ball recipes on the nut contain nuts or nut butters, which not only makes them unsuitable for people with allergies, but also unnecessarily high in fat. Here, I present my staple recipe with 5 pantry ingredients!
1 cup (certified gluten free) oats, preferably ground to a coarse flour 1 cup packed (approx. 20) dried dates, pitted, chopped (and soaked in hot water if not using Medjool) 1/4 cup protein powder of choice (vanilla or chocolate works best) 2 tbsp cacao 3 tbsp desiccated coconut (optional) cinnamon to taste pinch of sea salt
First, blend the soaked and drained dates in a high-powered blender until you get a smooth date paste. Add the rest of the ingredient and blend until a smooth doughy ball forms. Shape approx. 24 small bliss balls and refrigerate.
Marzipan used to be my favourite treat as a child! I have now recreated a lower-fat version with dates instead of marzipan paste and almond extract as a stand-in for that delicious marzipan flavour. These little guys are therefore also perfect if you or the little person in your life is allergic to nuts and they are also a great addition to your school lunchbox!
Delicious nut free marzipan bliss balls made from pantry ingredients
Of course, Medjool dates are always best. However, I know they are pricey and not always easy to find so I often just use regular dried dates from the dried fruit section of the supermarket which are very cheap. It is a good idea to always have a bag of dates in your pantry as they keep for a long time and you can make delicious healthy treats in a jiffy! Regular dried dates would need some soaking in hot water beforehand though. I use a vegan vanilla protein powder which enhances both the flavour and nutritional properties of the marzipan balls and also makes these treats more satisfying without getting a sugar spike. Feel free to replace with ground oats if you are not into protein powders.
I do love the chocolate glaze as it offers the true German “Marzipankonfekt” experience. I use a good-quality vegan dark chocolate with 85% cocoa. Dairy-free dark chocolate can easily be melted in the microwave without curdling or burning (as milk and white chocolates tend to do). Feel free to omit the dark chocolate glaze if you want an even lower-fat version. So whether you feel like an extra-indulgent treat with the chocolate glaze or prefer your marzipan balls pure, you will surely enjoy these “marzipan” balls!
1 packed cup (approx. 20) dried, pitted and chopped dates (soak in hot water if you are not using Medjool) One rounded scoop (40 grams) vegan vanilla protein powder Almond extract 1 tbsp cacao or cocoa 50 grams dark chocolate for the glaze (optional)
First, blend the dates in a high-powered blender until a smooth date paste forms. Then add the protein powder, almond extract and cacao and blend some more. The mass should form a doughy ball that does not stick to the sides of your blender. Now roll some small balls of about 2cm diameter – this will yield about 20-24 balls. Now melt some dark chocolate (I use about half a Lindt bar of dark chocolate which is 50 grams) in a small bowl in the microwave for 30 seconds, glaze balls and refrigerate.
Quick, easy, healthy and yummy pumpkin spice bars – a great breakfast or snack!
Looking for a quick easy and healthy recipe to have at hand when the 3pm slump strikes, the kids come home hungry from school or you need a quick breakfast on the run that doesn’t weigh you down? Then look no further than these pumpkin spice bars!
I have made and perfected this recipe countless times over the years and let me just reassure you that these pumpkin spice bars don’t need to be pumpkin spice bars at all. You can replace the pumpkin puree with apple puree and have apple bars (my favourite!) or replace it with banana and have banana bars etc. This recipe is veeery forgiving – you can play around with different grains, different sweeteners (or omit sweetener altogether) and it will always work!
Ingredients: 3 flax eggs (3 tbs ground flaxseed dissolved in 9 tbs water or plant milk and left to thicken) 3 cups rolled oats 3/4 tsp baking powder 1 cup pumpkin puree (or apple sauce or other fruit/veg puree) cinnamon and other spices to taste pinch of salt 1 cup soy milk or other plant milk 1/4 cup coconut sugar or other sweetener (may be omitted) sultanas or other dried fruit and seeds (half a cup)
Method: Preheat fan-forced oven to 180°C. Line or grease a 20×30 cm baking tin. Stir all ingredients together and let rest for 20 minutes – the longer the better! Pour into prepared tin and bake for 20 minutes or until golden on top. Let cool completely before you slice into squares.
Substitutions and adjustments:
As for oats, you can use quick or rolled oats, the rolled oats give a better texture though.
Sweetener: I have made these many times, including with raw sugar, coconut sugar, stevia, honey, and maple syrup and they all work well. As the oats, apple sauce and dried fruit are naturally sweet you can even omit sweetener altogether.
Milk: You can use any plant milk you like. I used soy milk to keep it nut free, but feel free to use nut milks if you don’t need the bars to be nut free.
Add-ins: These bars are very low in fat as they are free of oil, butter and eggs. The fat only derives from the natural fat in the oats and the seeds. If you follow a very low fat diet, omit the seeds and just add dried fruit.
Flax eggs: If you eat eggs, you can use 2 whole eggs instead of the aquafaba.
Pumpkin puree/apple sauce: mashed banana works well if you don’t have apple sauce, or any type of “baby food” purees. I’ve made these with pumpkin purée with great results.
2 brown onions, peeled and finely chopped 4 garlic cloves, minced 2 tsp ginger, grated smidge of coconut oil 2 tbsp garam masala 1 tsp cumin 1 tsp fenugreek 2 tsp mustard seeds 1 tbsp turmeric about 1kg vegetables of choice (potatoes, pumpkin, broccoli, cauliflower, peas, zucchini….) half cup water fresh coriander few leaves of spinach 2 tins of chickpeas, drained and rinsed 1 tin coconut milk brown sugar, chili and lemon juice to finish
Fry onion, garlic and ginger in coconut oil until fragrant and the onion is caramelised. Add garam masala, cumin, fenugreek, mustard, and turmeric until fragrant. Add chopped vegetables of choice and half a cup of water. Simmer until almost tender. Reduce heat, add coriander, spinach, chickpeas, coconut milk until thickened. Finish with brown sugar, chili, lemon juice to taste and serve with steamed basmati rice.
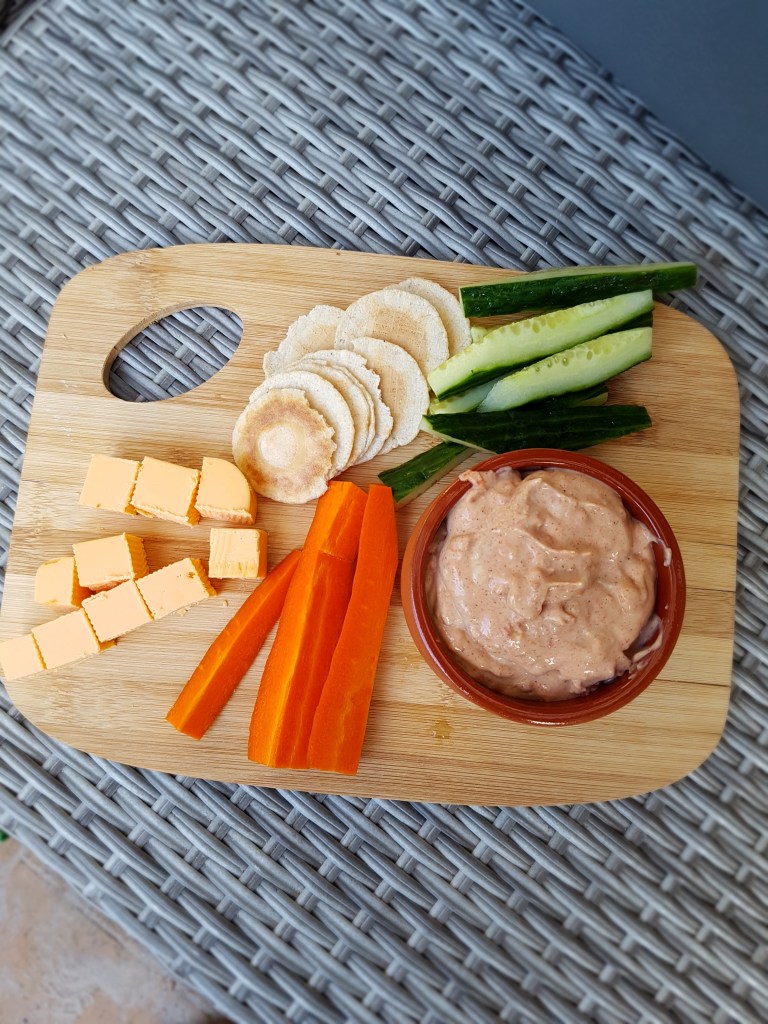
Yogurt, quark and cream cheese are definitely the things I miss most since giving up dairy. While I can tolerate moderate amounts of dairy again, I try to steer clear as I know I will definitely go overboard once I tuck in!
In Australia it is next to impossible to obtain dairy free alternatives such as vegan cream cheese, vegan yogurt and the like. While in my home country Germany, great-tasting, inexpensive and lowfat soy yogurt and soy quark is readily available at all supermarkets, vegan “yogurt” Down Under is limited to coconut yogurt which is sky-high in fat and obviously tastes nothing like yogurt (and don’t even get me started on the price tag)!
So what was I supposed to do with my cream cheese cravings? Thankfully, I discovered a way to recreate a creamy, dreamy, dairy-free dip that tastes heavenly and surprisingly close to cream cheese. My secret ingredient is….silken tofu.
Silken tofu is readily available, low in fat, relatively inexpensive and virtually flavourless which makes it an excellent vehicle for any savoury or sweet creations you might fancy. And since my first try creating a vegan “cream cheese” with silken tofu was so successful, it is definitely not going to be my last!
This dip really is so delicious, even my dairy-loving husband loved it! And best of all, it is ready in a jiffy and super versatile. I made this version with sundried tomatoes in, but anything will taste amazing – use chopped cucumbers and garlic to create a vegan tzatziki, make a nacho dip with mexican spices and capsicum or even try a sweet version with frozen fruit. The sky is the limit here.
This dip is great with crudités, crackers, on bread or even as a creamy pasta sauce.
1 packet (300g) silken tofu
2 tbsp nutritional yeast
2 tsp lemon juice (apple cider vinegar also works)
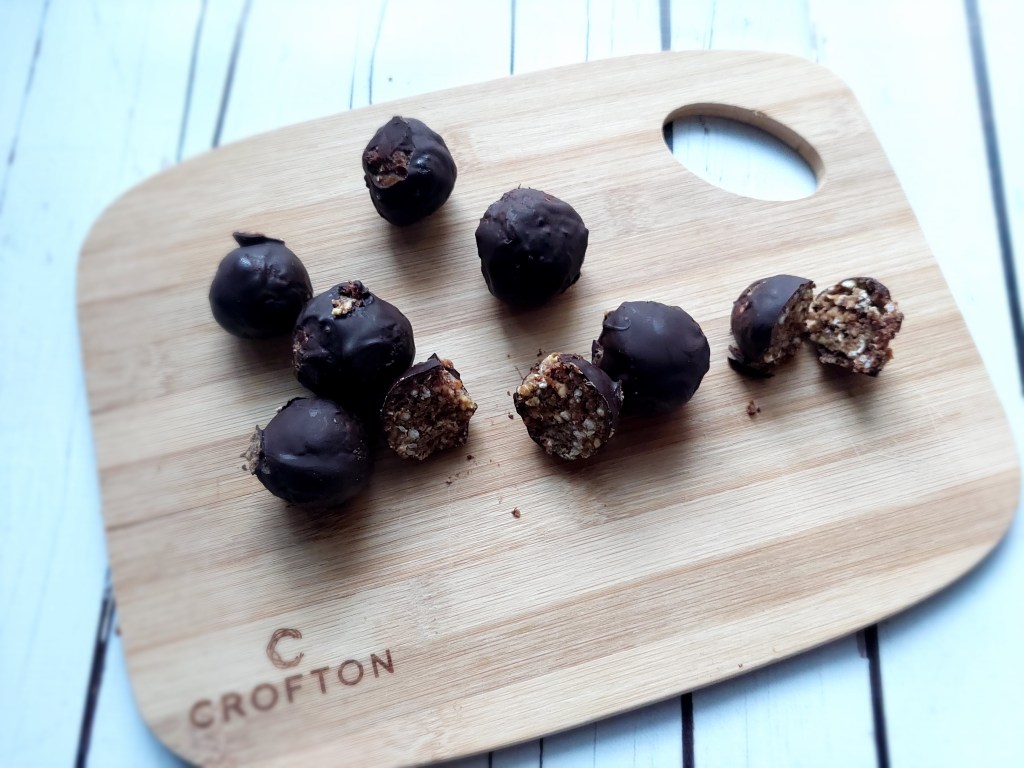
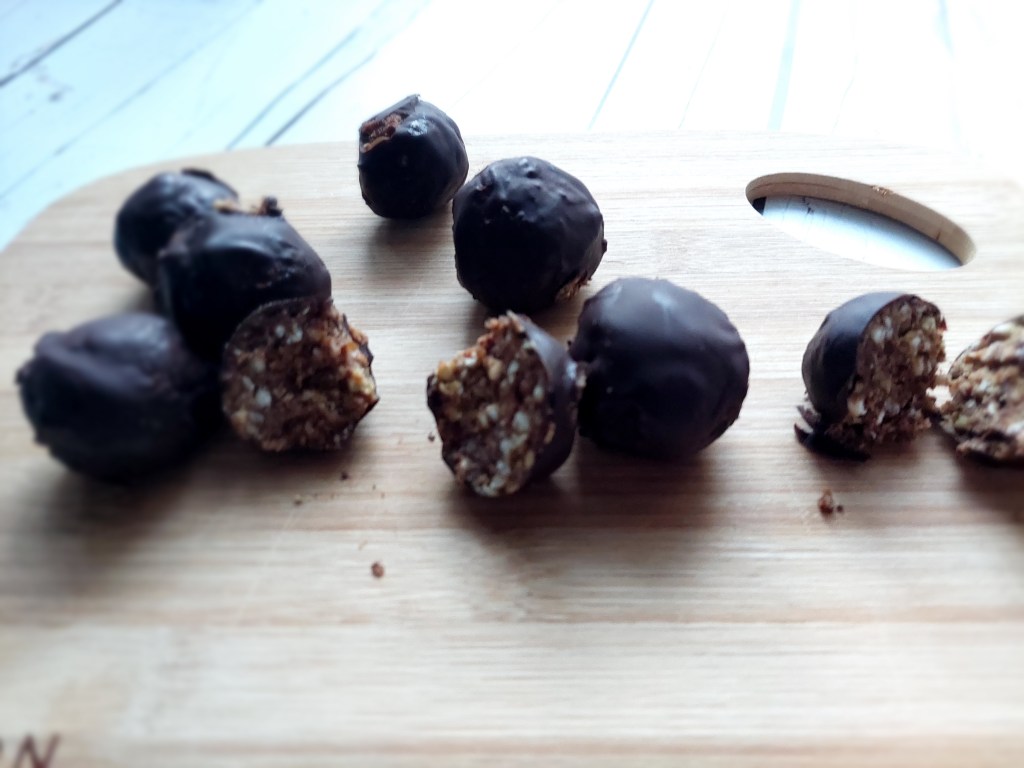
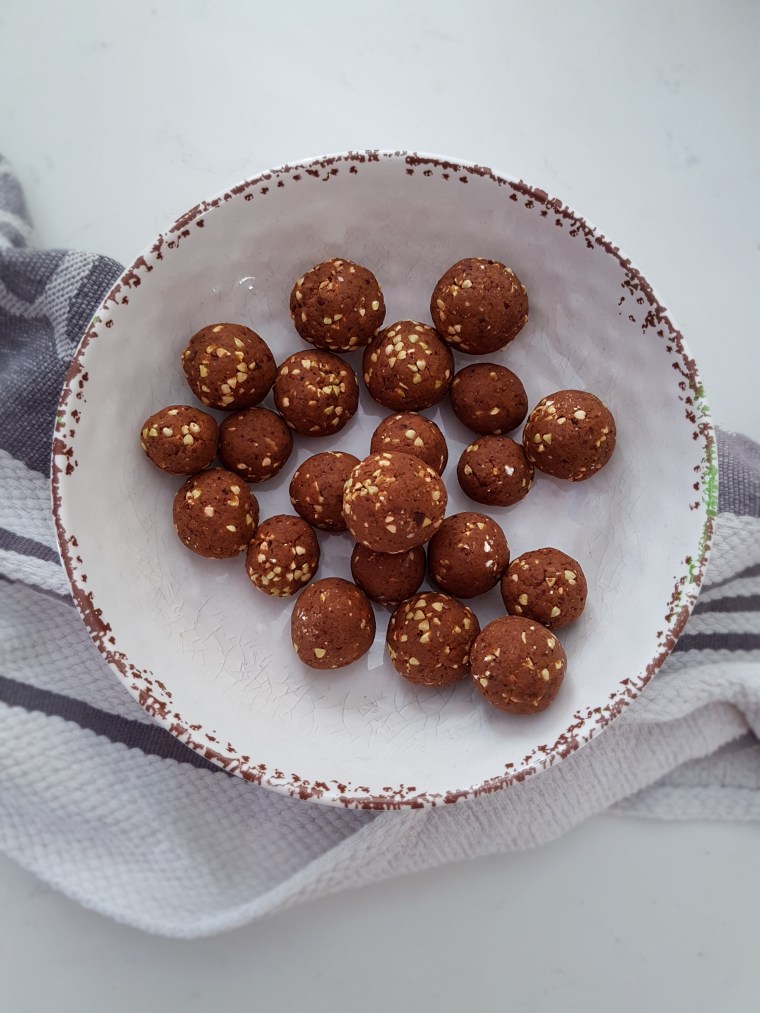
Soooo….it’s been 3 whole years since I last posted. Crazy, I know. And we all know that a few things happened last year. So let me just say I hope you are all staying safe and sane and because I thought we can all use a little bliss and energy in our lives right now, I created these bliss balls (or energy balls) for you.
They are obviously gluten free, dairy free and vegan as all the creations on this page. And they are also high in protein to feed that baby biceps. Being nut-free, they are not only great for kids lunchboxes, they are also considerably lower in fat than nut-based bliss balls.
When I found out, that my two littlies really like dates, I decided to harvest this opportunity and create these super yummy and super healthy treats that only require THREE simple ingredients and are ready in a jiffy! Think juicy dates, your favourite vegan protein powder (obviously, do not use powder that contains stimulants if you are making these for kids), as well as buckwheat groats! If your protein powder is not salted, I also highly recommend adding a good pinch of Himalyan sea salt. And because being flexible is key, feel free to add whatever you fancy – raw cacao powder, maca powder, coffee powder, nuts, seeds…the sky really is the limit!
Are you ready?
Delicious nut free bliss balls
Makes approx. 20-25 bliss balls
250 g juicy dates 100 g vegan protein powder of choice 50 g raw buckwheat groats pinch of Himalayan sea salt (optional, but highly recommended) any other add-ins (optional) (coffee, chocolate chips, nuts…)
Chuck everything into a high powered blender and blitz away! Note, you will probably have to add a little (!) (hot) water to get the mix going, depending on the amount of moisture in your dates.
The mix should come together in a ball after about 20 seconds or so. If not, add a tiny dash more water. Don’t forget to scrape the sides of your blender with a spatula.
Now comes the fun part: Roll into balls! If you can resist, I’d highly recommend putting these in the fridge for a bit before tucking in.
Please let me know in the comments if you made these and what you added. 🙂
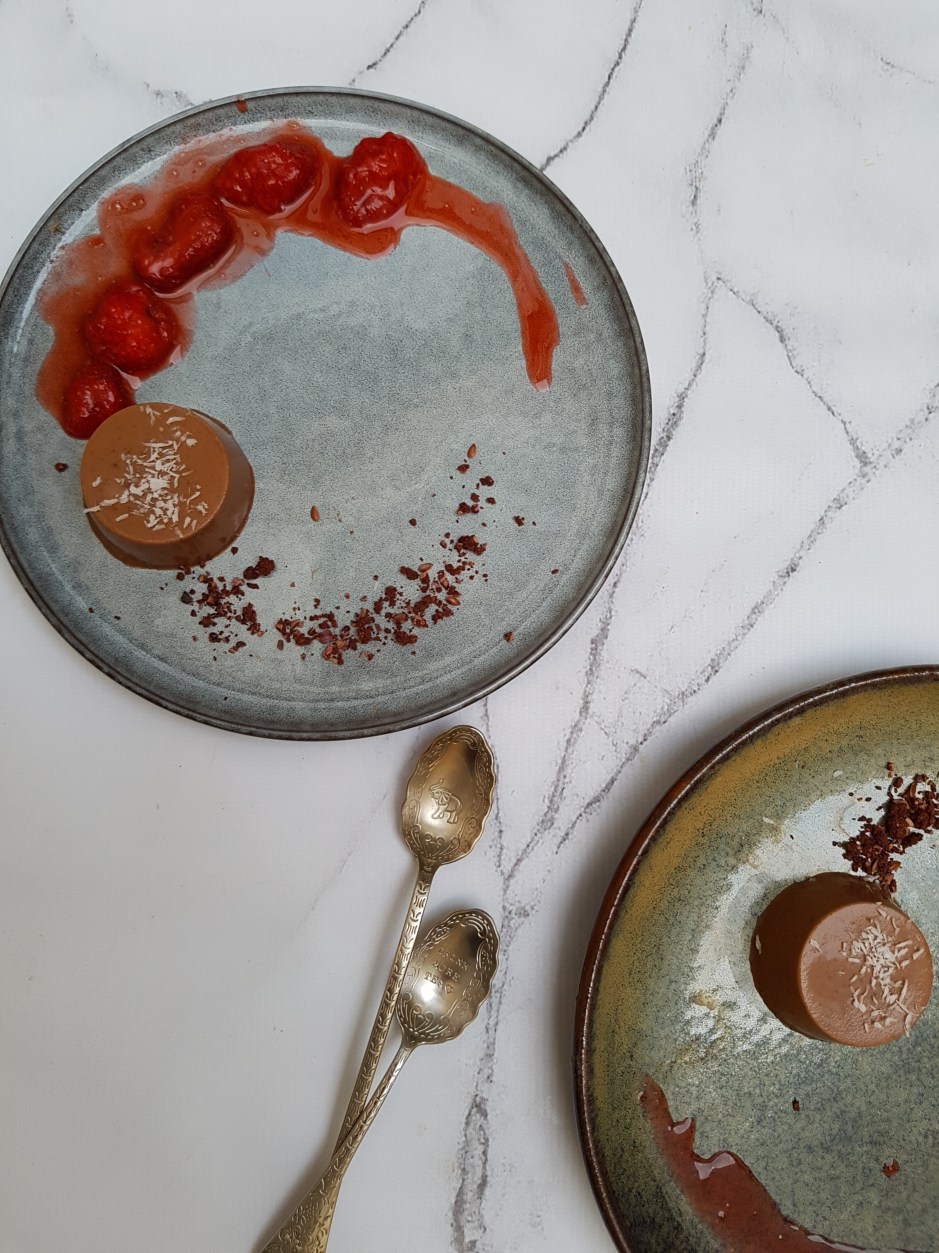
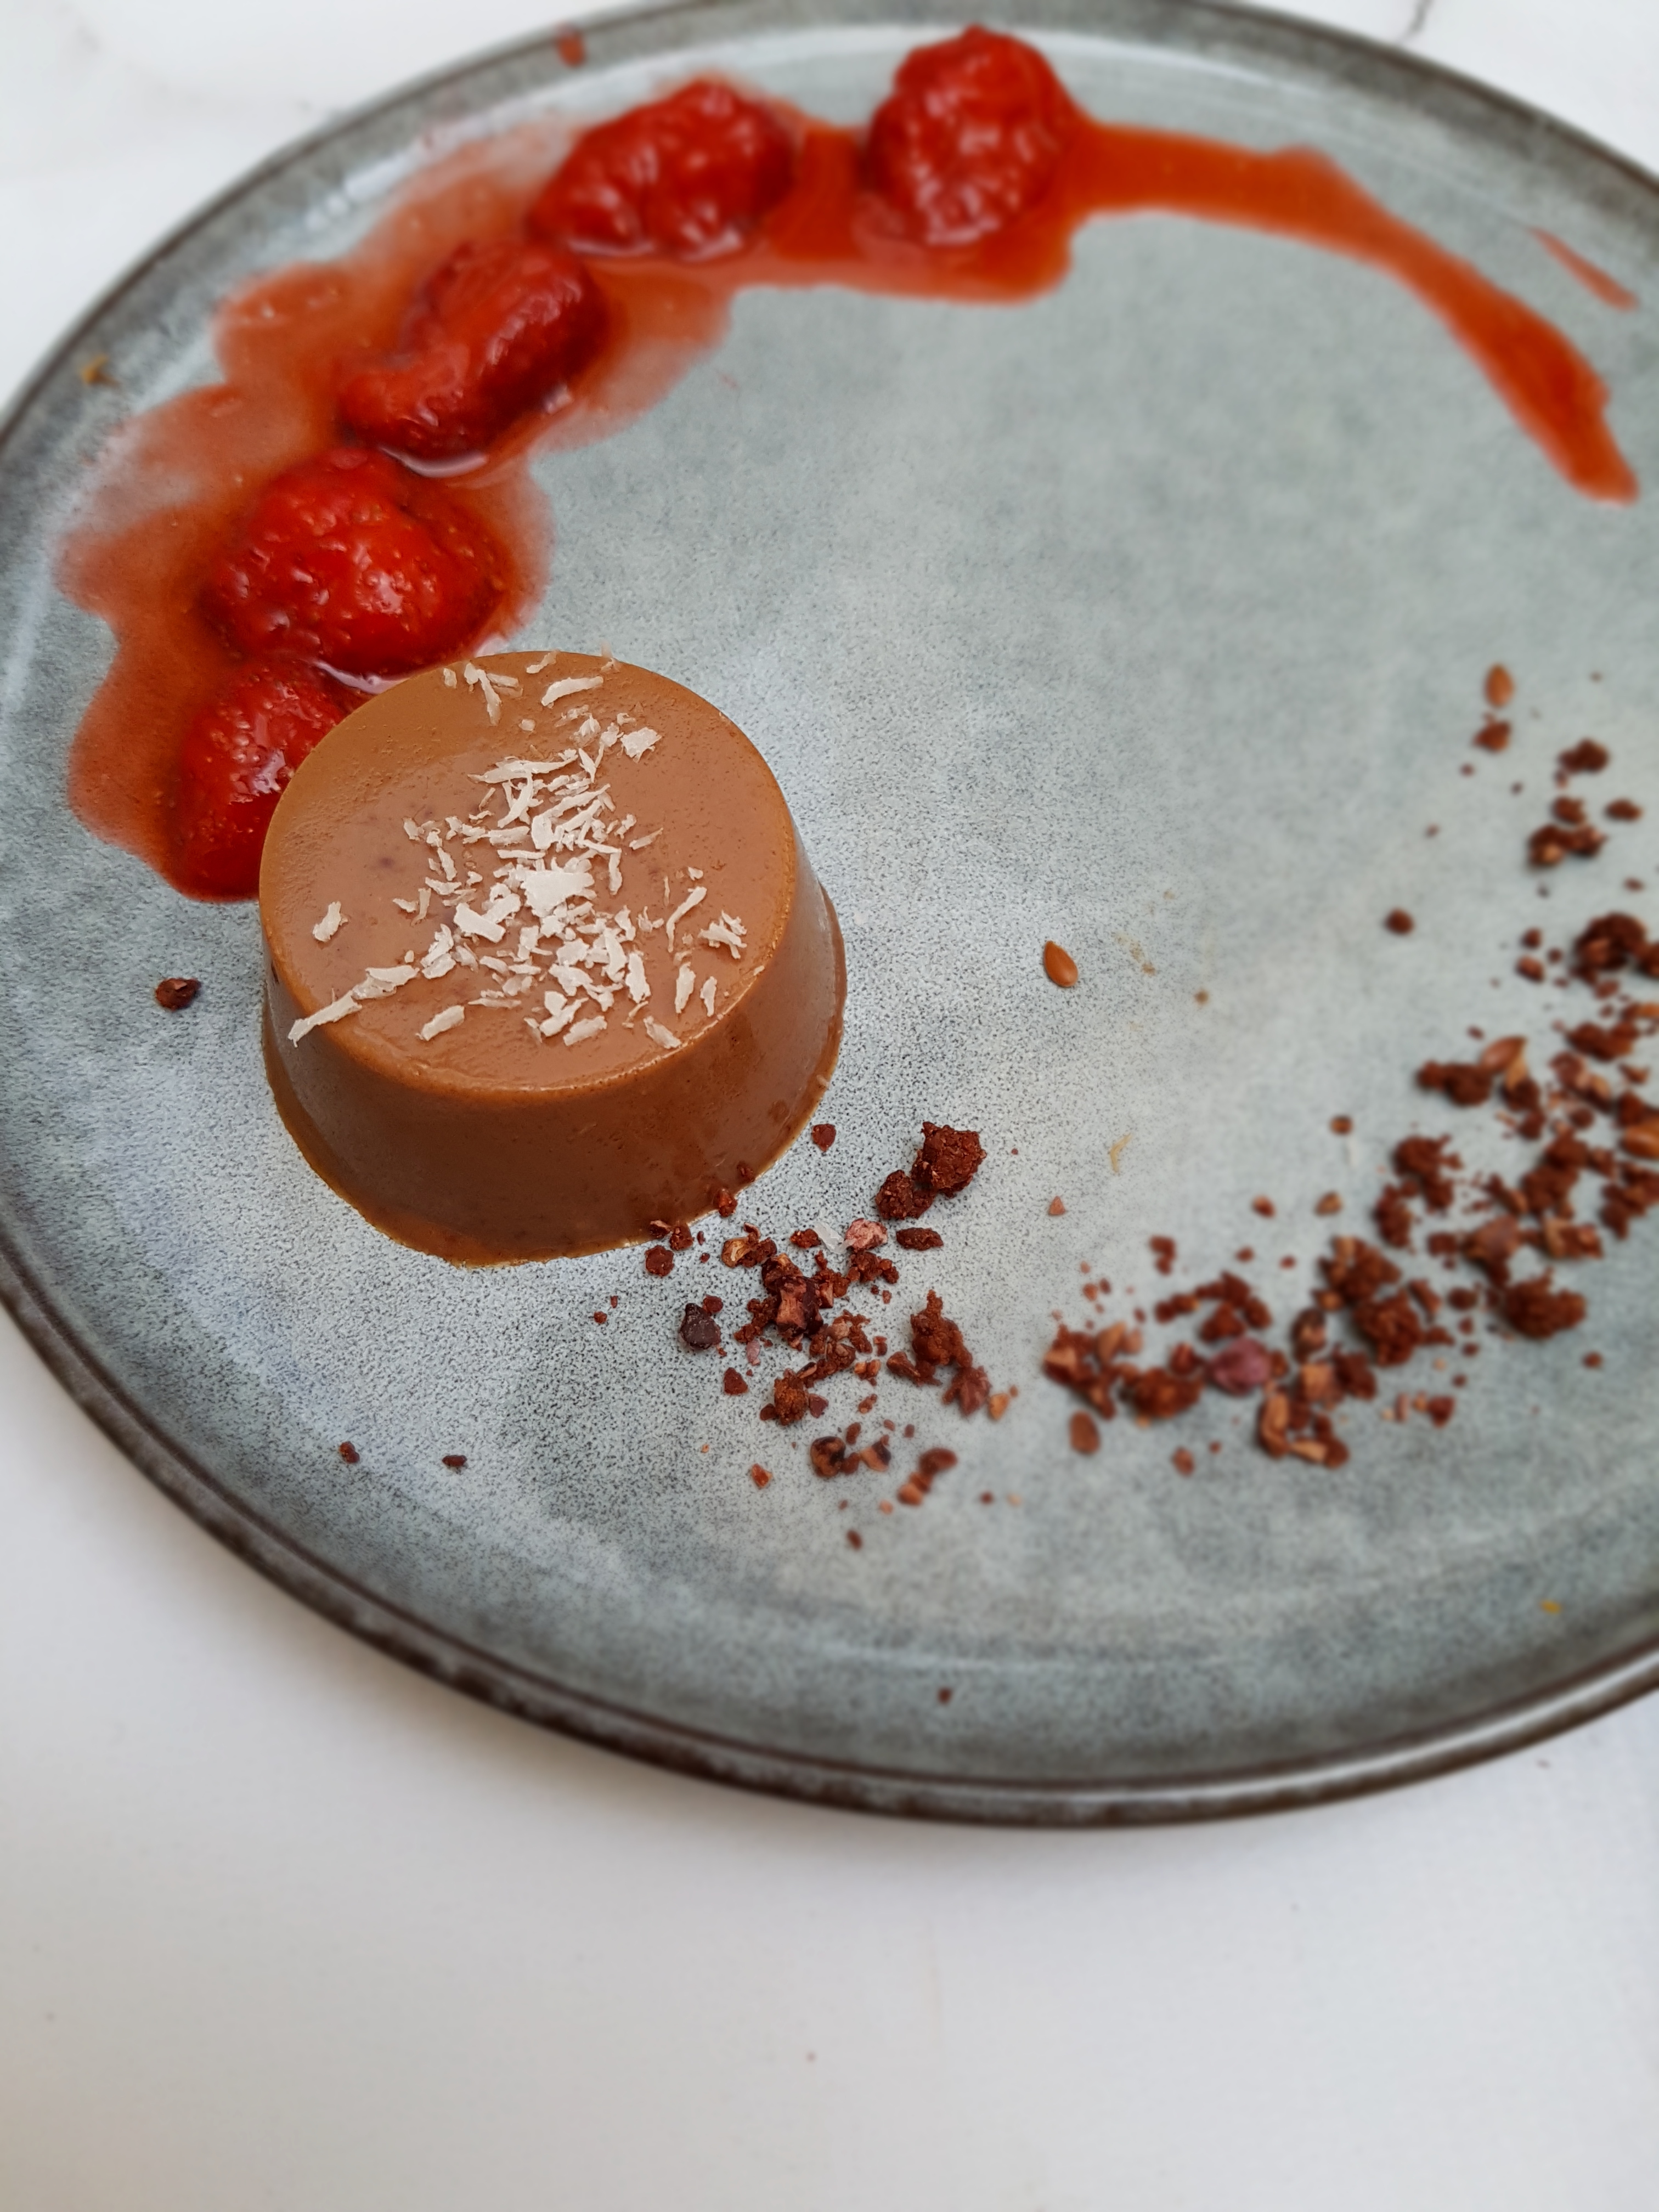
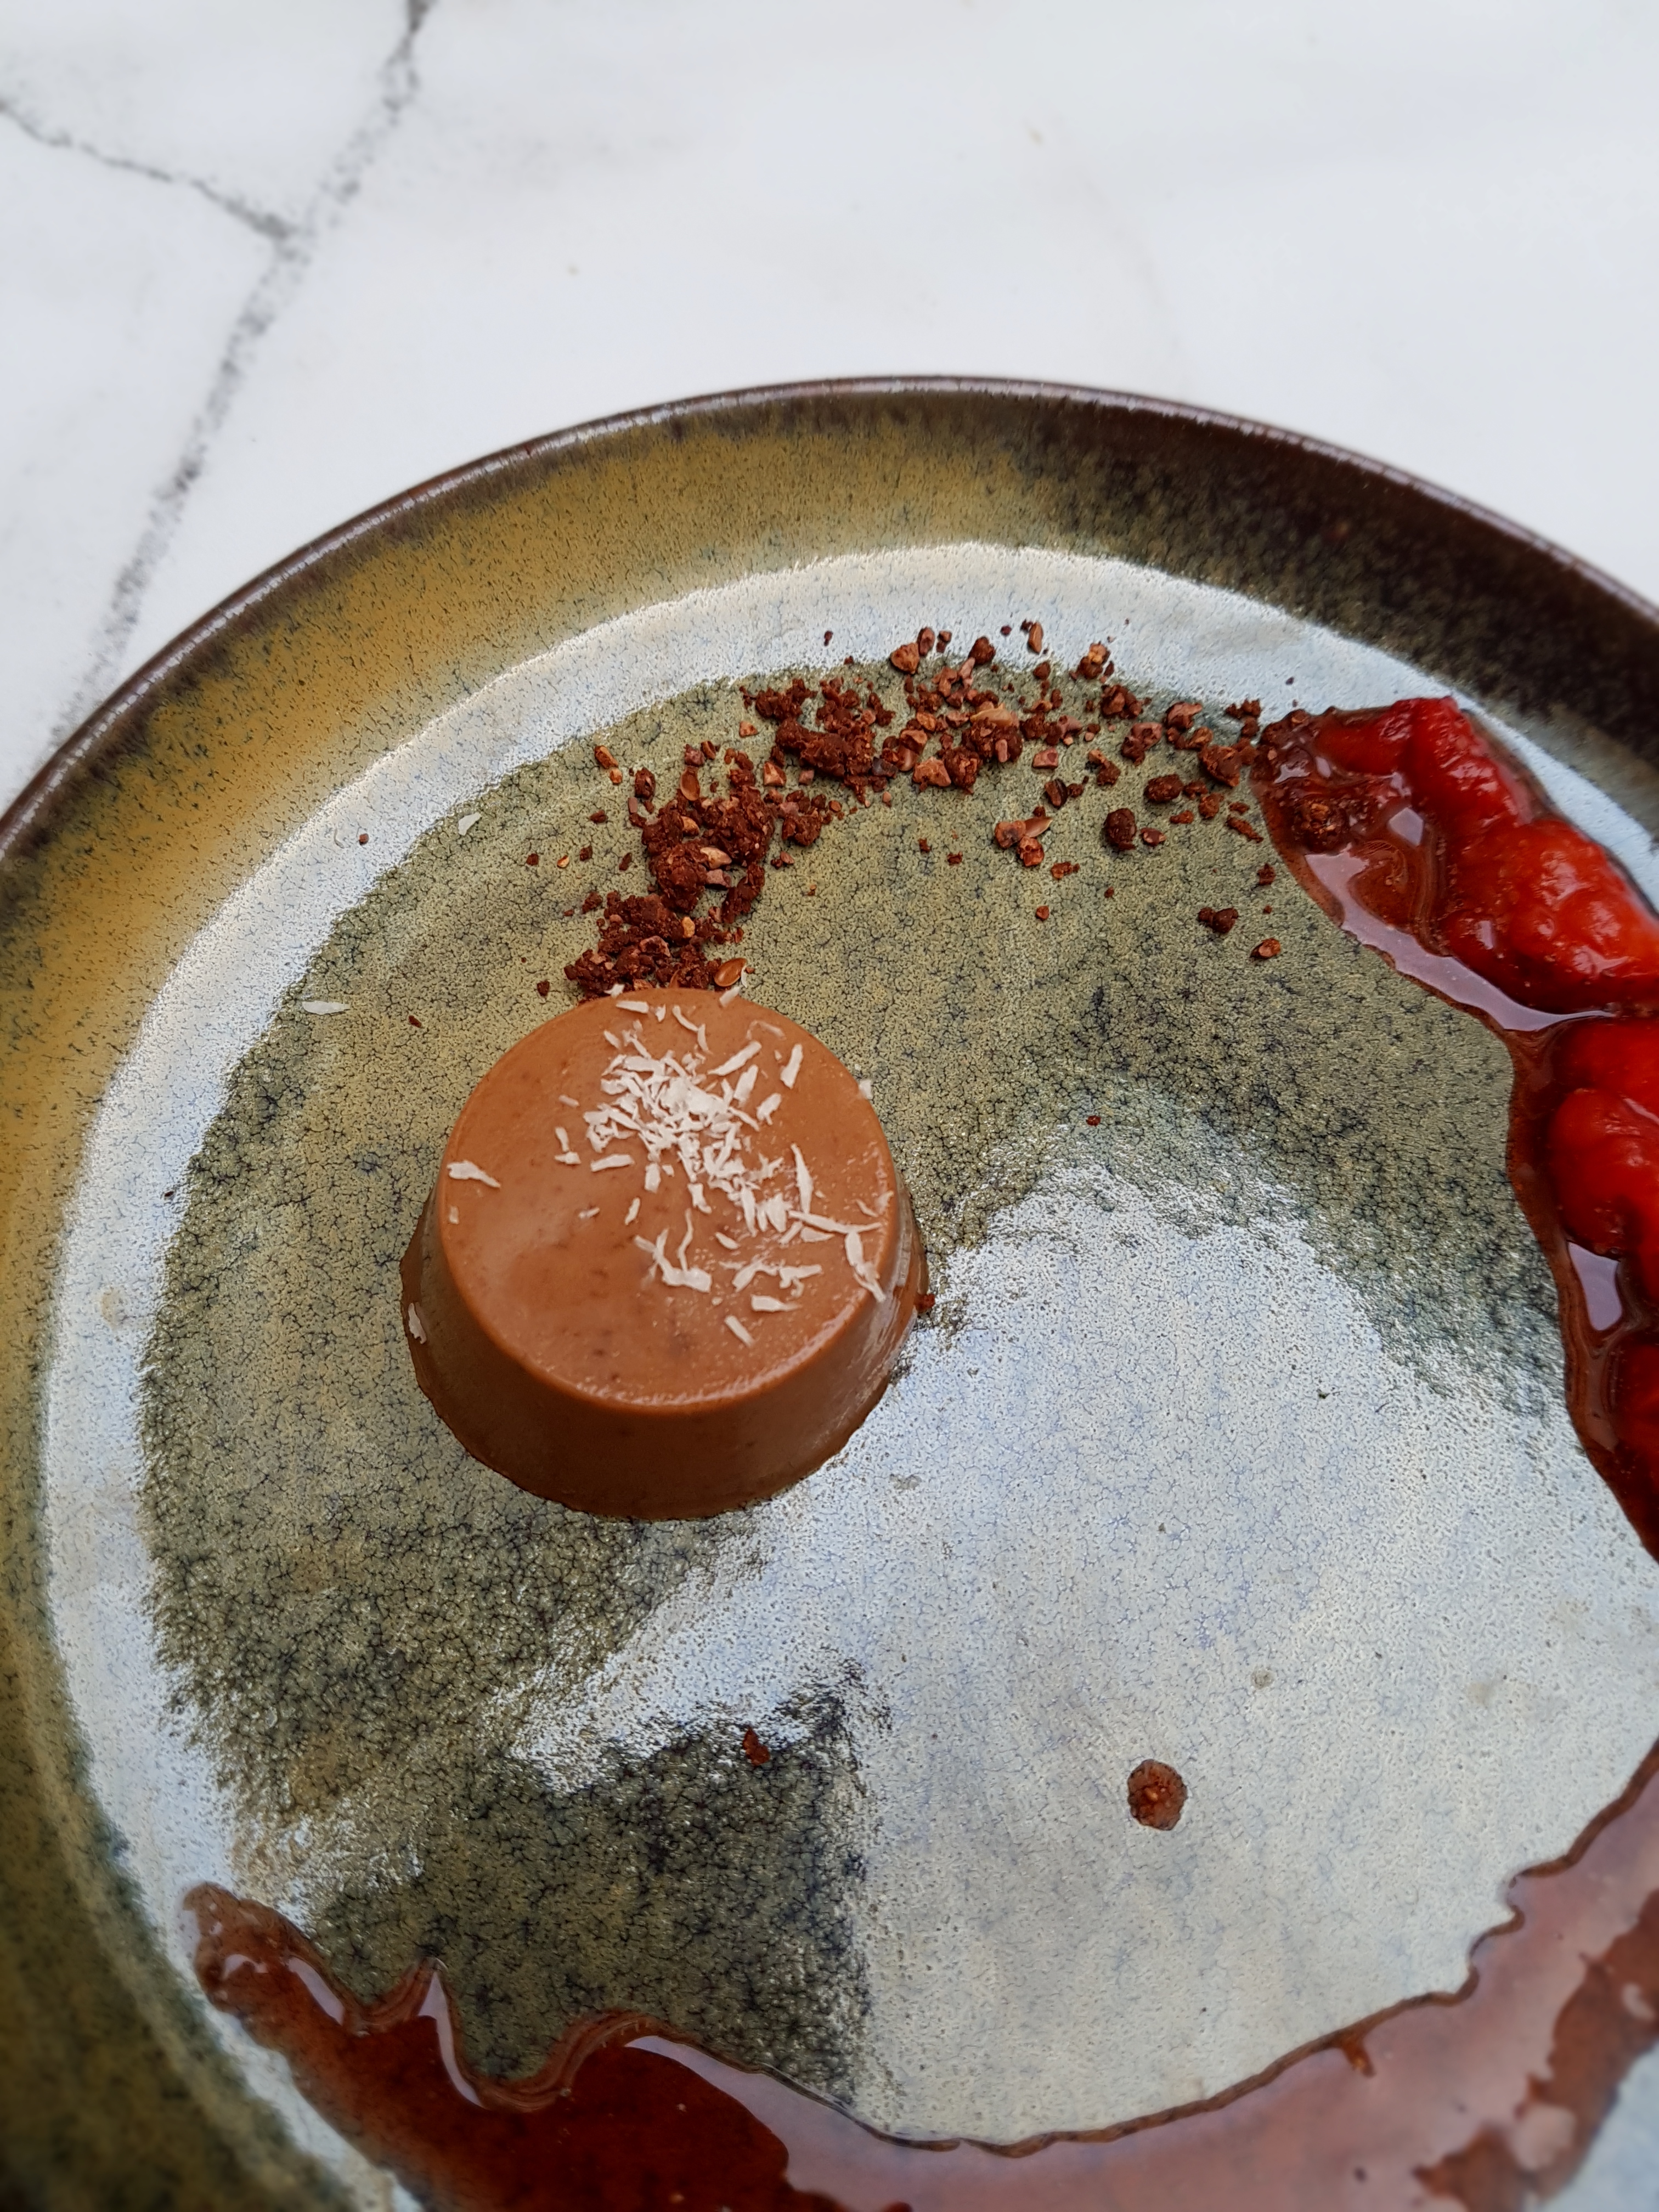
Panna Cotta is the ultimate Italian dessert. It is creamy and indulgent, but light enough to to be served after a rich meal. Because it is a snap to make and can easily be prepared in advance, it is a popular option for dinner parties. Maximum impression with minimum effort – well, not so fast. Panna cotta (literally “cooked cream”) is traditionally made from cream and/or milk, making it unsuitable for folks with dairy intolerance/allergies or those who avoid dairy for health and/or ethical reasons. Moreover, panna cotta’s infamous “jiggle” results from beef gelatin which is obviously not suitable for vegans and vegetarians or for those who avoid gelatin for religious reasons. But fear not! I got you covered with my vegan chocolate coconut panna cotta – less jiggle, more fun to eat!
Vegan Chocolate Coconut Panna Cotta
The concept to use agar agar instead of gelatin is of course not new and I have experimented with it before. However, it is very difficult to get the ratio right. Most of the time, the vegan “panna cotta” ended up brick hard, overset and just unpleasant to eat. Obviously, a panna cotta made from agar will never be 100% like a gelatin one, but this vegan chocolate coconut panna cotta is almost like the real deal without any dairy – and is omnivore-approved as well. I think that’s a fair deal!
This vegan chocolate coconut panna cotta is fairly foolproof to put together and the agar sets a lot quicker than gelatin – another plus in my book. So yes, if your mother in law texts you to let you know they’ll be at your place for dinner in an hour, you can still whip this one up and have it ready for dessert. If that sounds good or you just want to have an excuse to enjoy a healthier, but no less delicious, version of a classic, grab your pot and stirrer now!
I also used xylitol instead of sugar (though you can totally use sugar or any other sweetener of your choice). This makes this dessert practically zero-carb, although that is not necessary. The idea to add cacao is due to the fact that I had run out of vanilla. If you have vanilla, I would still recommend adding it as it just makes everything awesome. I used raw organic cacao – another superfood I consume pretty much daily. Not that I am a health freak. But if you can have deliciousness that’s also good for you, why not?
Another thing I love about this vegan chocolate coconut panna cotta is that it is so customisable. Add some peppermint or orange oil for an interesting twist. Bring the summer on your table by adding some berries or mango!
Vegan Chocolate Coconut Panna Cotta
Serves 6
250ml coconut milk (light is fine) 1.5 teaspoon coconut oil (melted) 0.5 teaspoon agar agar powder 2 tablespoons xylitol or sugar 2 tablespoons raw cacao a dash of vanilla essence (optional but recommended)
Add coconut milk, coconut oil, agar and xylitol/sugar into a saucepan and stir well over medium heat until completely dissolved. Bring to a gentle boil while constantly stirring, then turn down the heat. Add the cacao and vanilla and keep stirring on a gentle simmer for at least five minutes or until viscous.
I used a silicon mini muffin tray to pour the mixture in. If you are using a ceramic or metal mould/ramekin, you will need to slightly oil it to be able to get the panna cotta out. If you intend to serve it in a glass without flipping it over, you won’t need to worry about. Pour the mix into your mould and chill in the fridge for around two hours. Serve with whatever you fancy. Chocolate sauce and fresh berries are great options.
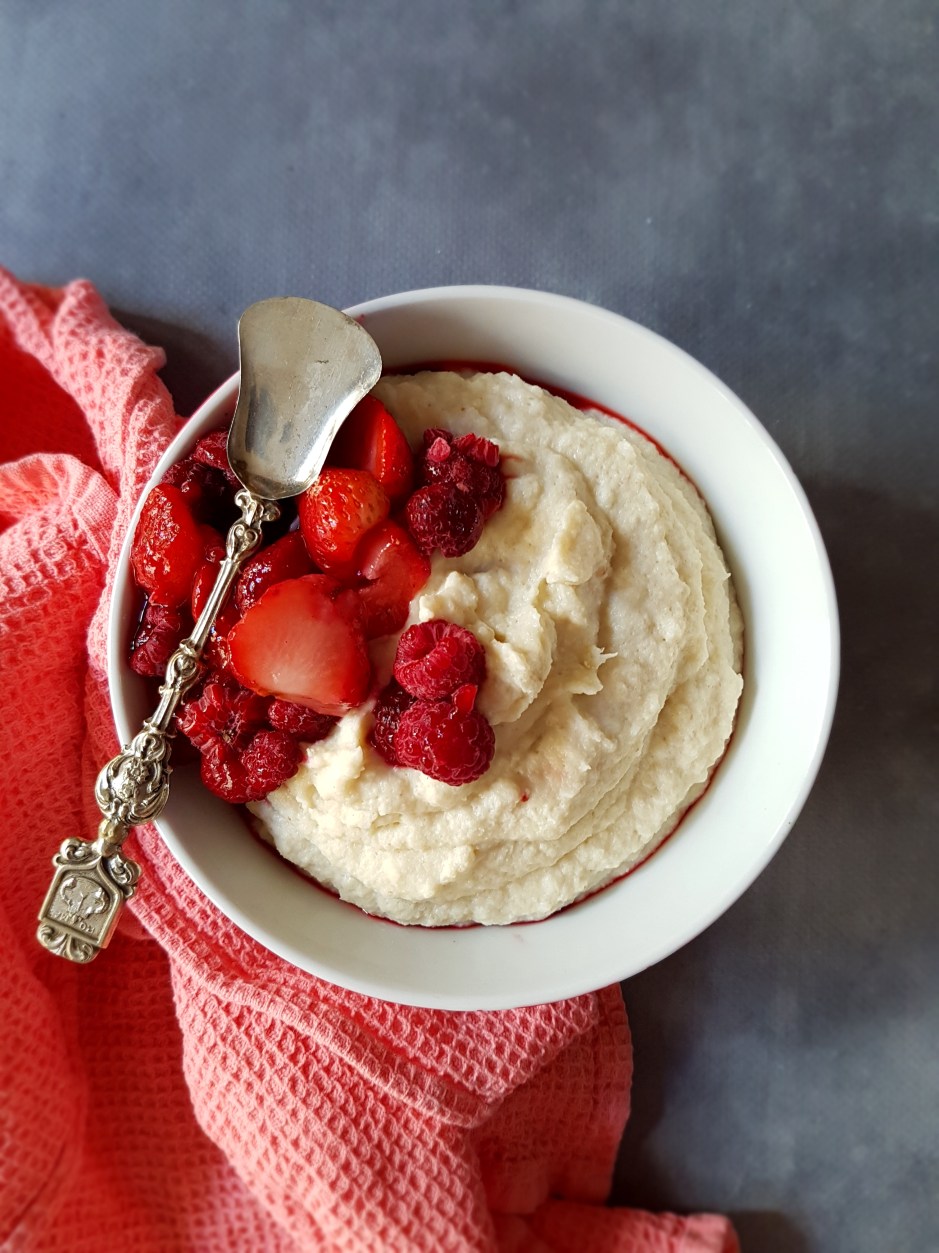
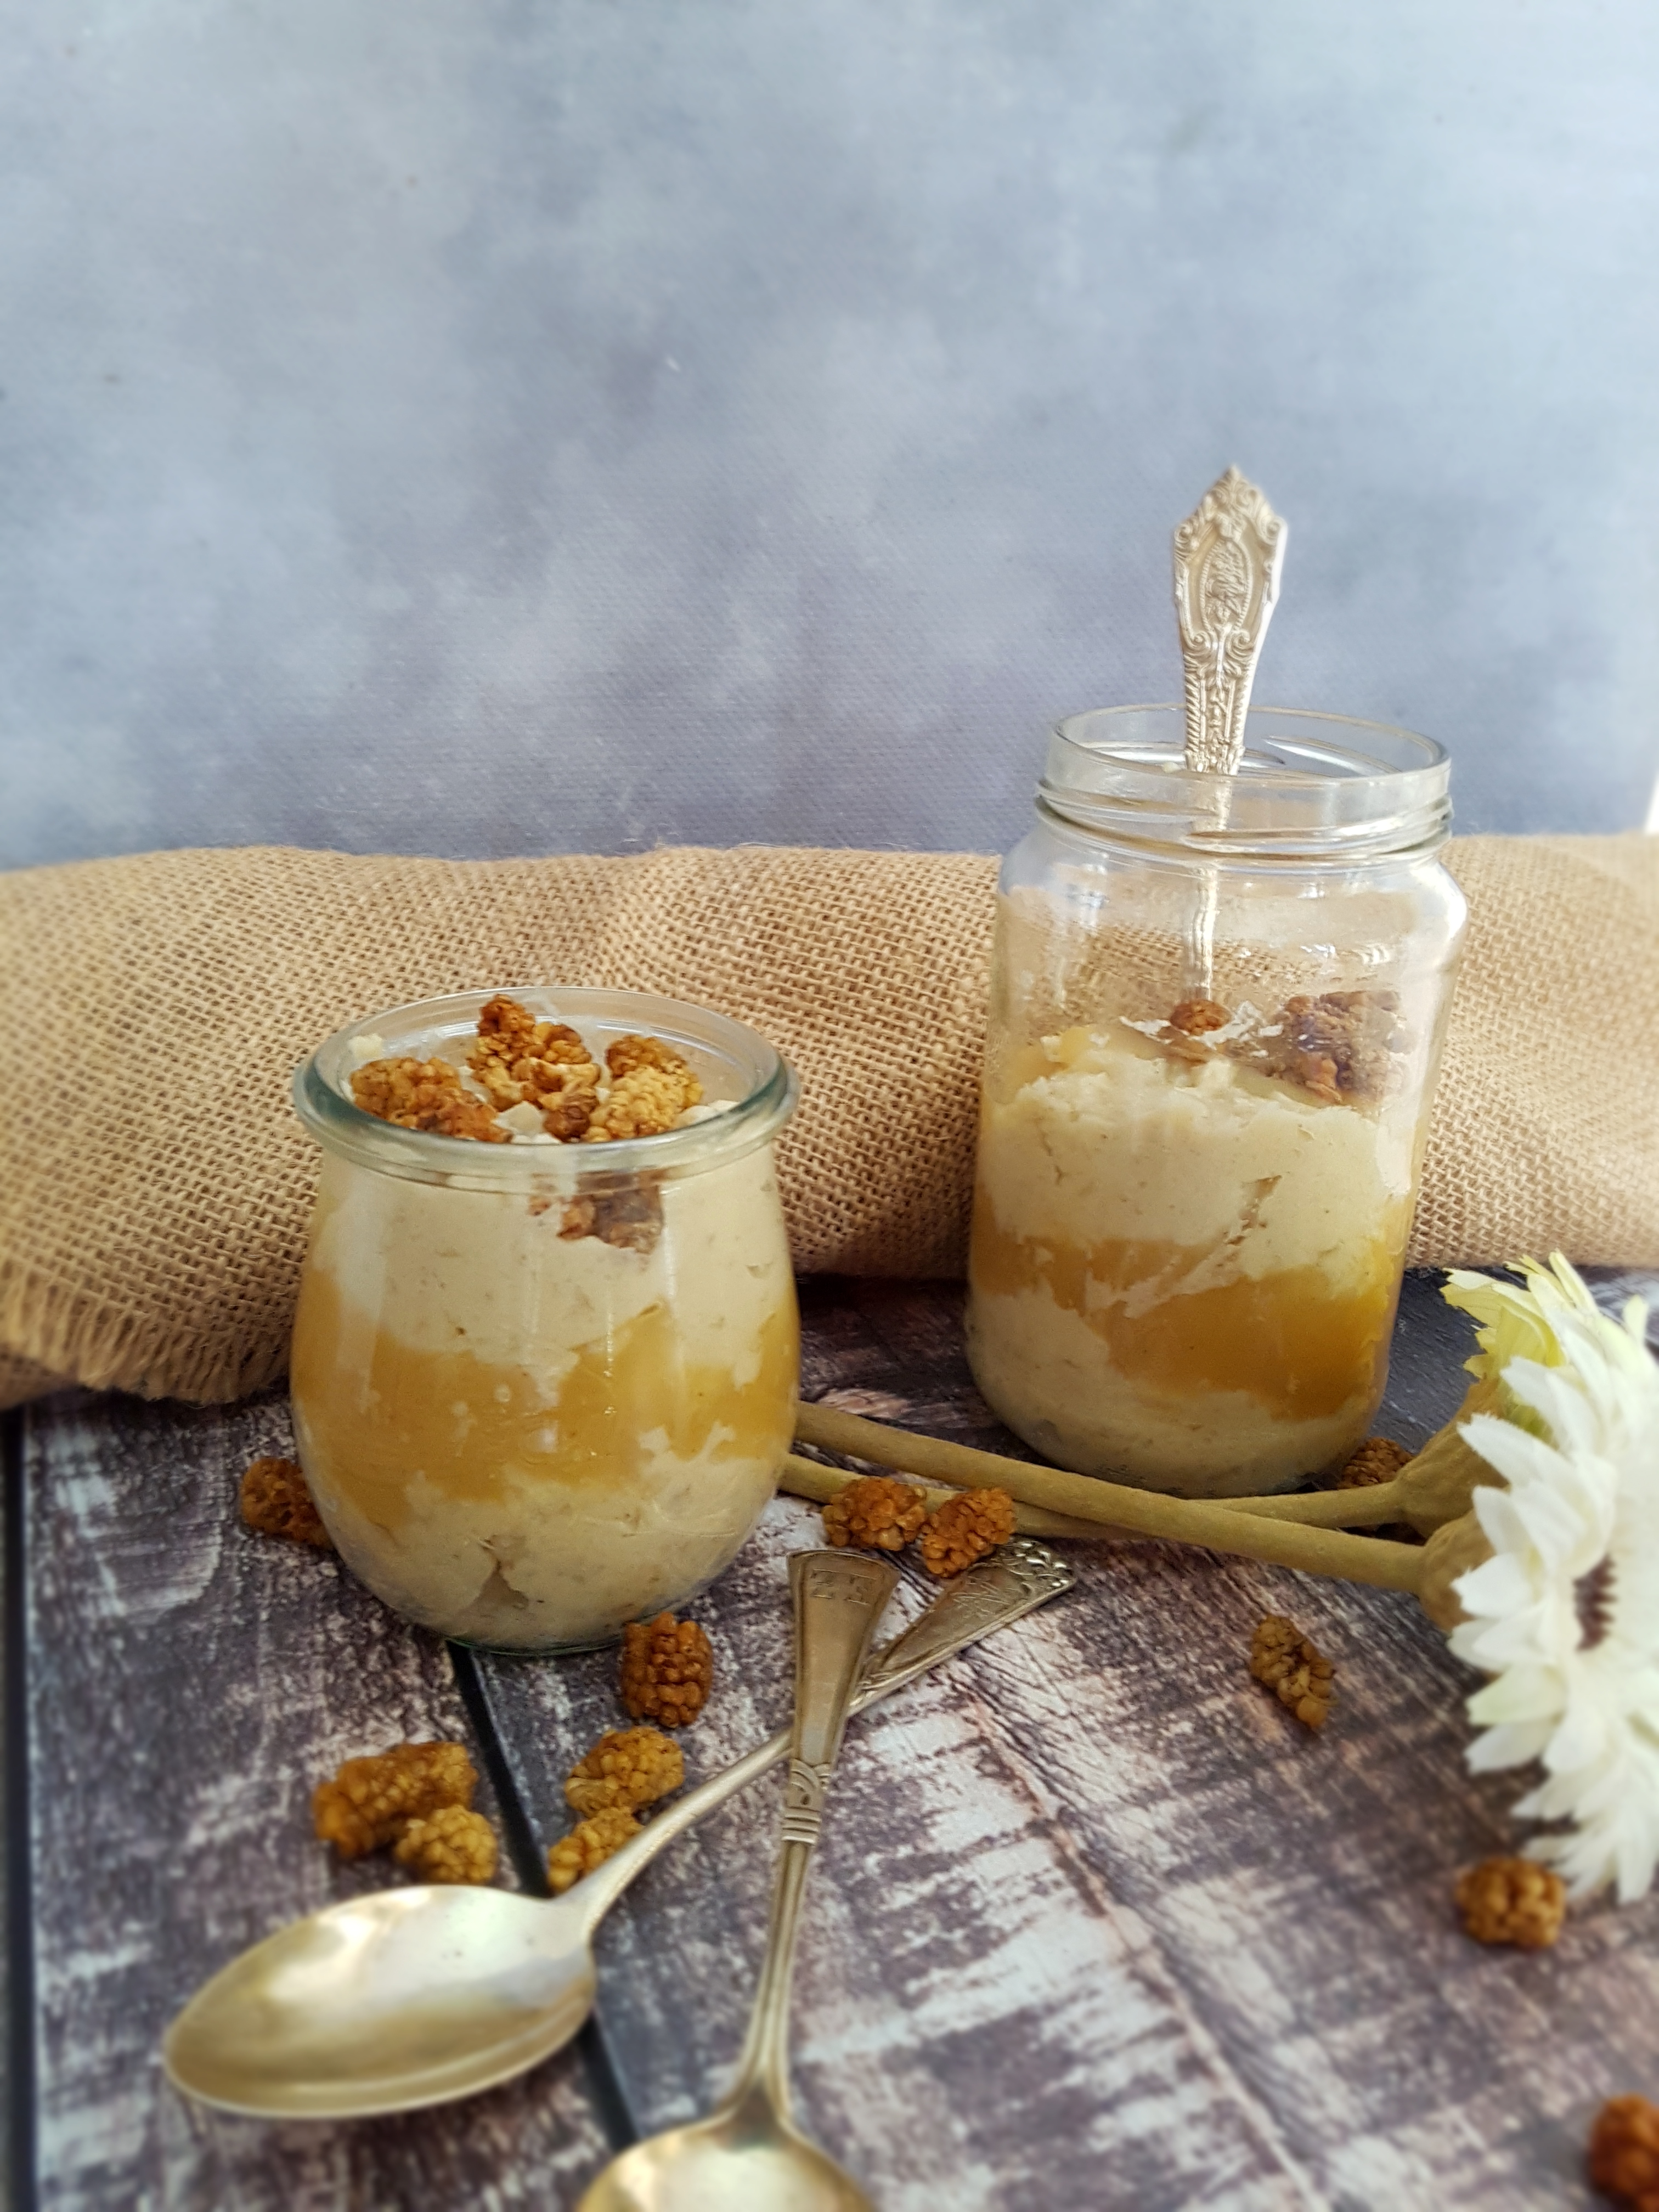
Who else hated cauliflower as a kid? I certainly did – now I love it! And I bet I am not the only one. It’s amazing how your tastebuds change, isn’t it? And there is hardly a vegetable that is more versatile than the humble cauliflower. From cauliflower rice and cauliflower pizza dough to cauliflower buffalo wings and cauliflower steak – what can’t you do with cauliflower? Few people though know that cauliflower is not only great in savoury dishes, but also sweet! What? Yes, you read that right! Here comes….drum roll…my healthy cauliflower pudding!
Healthy Cauliflower Pudding
Before you close this page because you think I went completely crazy, hear me out! This is a game changer. Actually, if you haven’t made cauliflower pudding you haven’t lived, in my view. This cauliflower pudding is seriously addictively delicious. It actually reminds me of my favourite childhood dish – wheat semolina pudding (or “Grießbrei” for my German-speaking readers), which is something like cream of wheat (correct me if I am wrong). Which is obviously not gluten free or low-carb or any of those things that the hipster in me relishes in.
So for all the lovers of cream of wheat and Grießbrei out there, here is a healthy version that will absolutely knock your socks off! Besides, it is ready in only a few minutes and it is vegan, gluten free, paleo, low carb and low fat! How about that!! It is also extremely filling, rich in protein and fibre and the best way to get one of the world’s healthiest vegetables into your child. Even my fussy toddler loves it. You will never walk past cauliflower again!
To add a bit of the nitty gritty of what you take in while you are munching this scrumptious healthy cauliflower pudding. Cauliflower is not only higher in protein and lower in carbs than most other vegetables, it is also loaded with fibre for a happy tummy (yes, I suffer from IBS and a lot of fibre-rich foods are off-limits for me but I DO tolerate cauliflower well), folate for healthy blood cells, vitamin C to get that immune system going, B vitamins for energy, enzymes to aid detoxification processes, manganese for the old nerves and antioxidants to protect from cancer. Not bad for a comfort food!
This cauliflower pudding tastes great hot or cold, in a bowl or jar (or straight from the processor), with fresh berries in summer or stewed apple and cinnamon in winter. Or get indulgent with chocolate sauce and add some crunch with cacao nibs and/or nuts and seeds. The options are endless!
Vegan Lowcarb Cauliflower Pudding
Serves 1-2
500 g cauliflower (approx. half a head) a good dash (75-100ml) almond milk or other plant milk 30g vegan vanilla protein powder sweetener or flavdrops to taste real vanilla or vanilla essence 1 tsp guar gum (optional, but helps firm it up; leave out if you tend to have tummy issues like me)
Start by thoroughly washing your cauliflower and trimming it into small pieces. The smaller the pieces, the more quickly it will be cooked. You can also process it in your food processor until it resembles rice to speed up the cooking. Boil, steam or microwave the cauliflower until it becomes REALLY soft – trust me, you don’t want any raw cauliflower pieces in your pudding! Once the cauliflower is cooked and cooled down a little, process with all the other ingredients until smooth and creamy. Adjust the sweetener to your liking and…
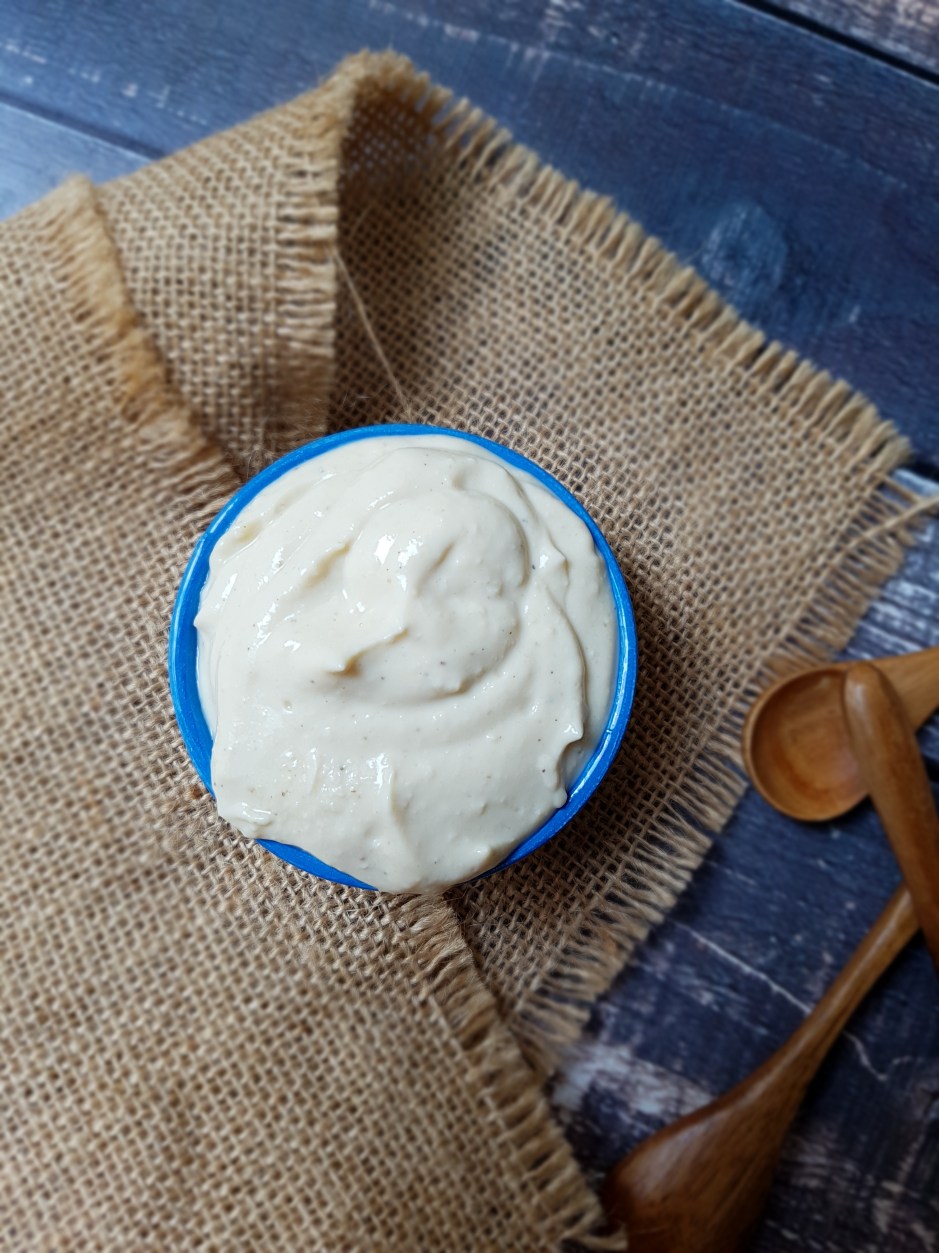
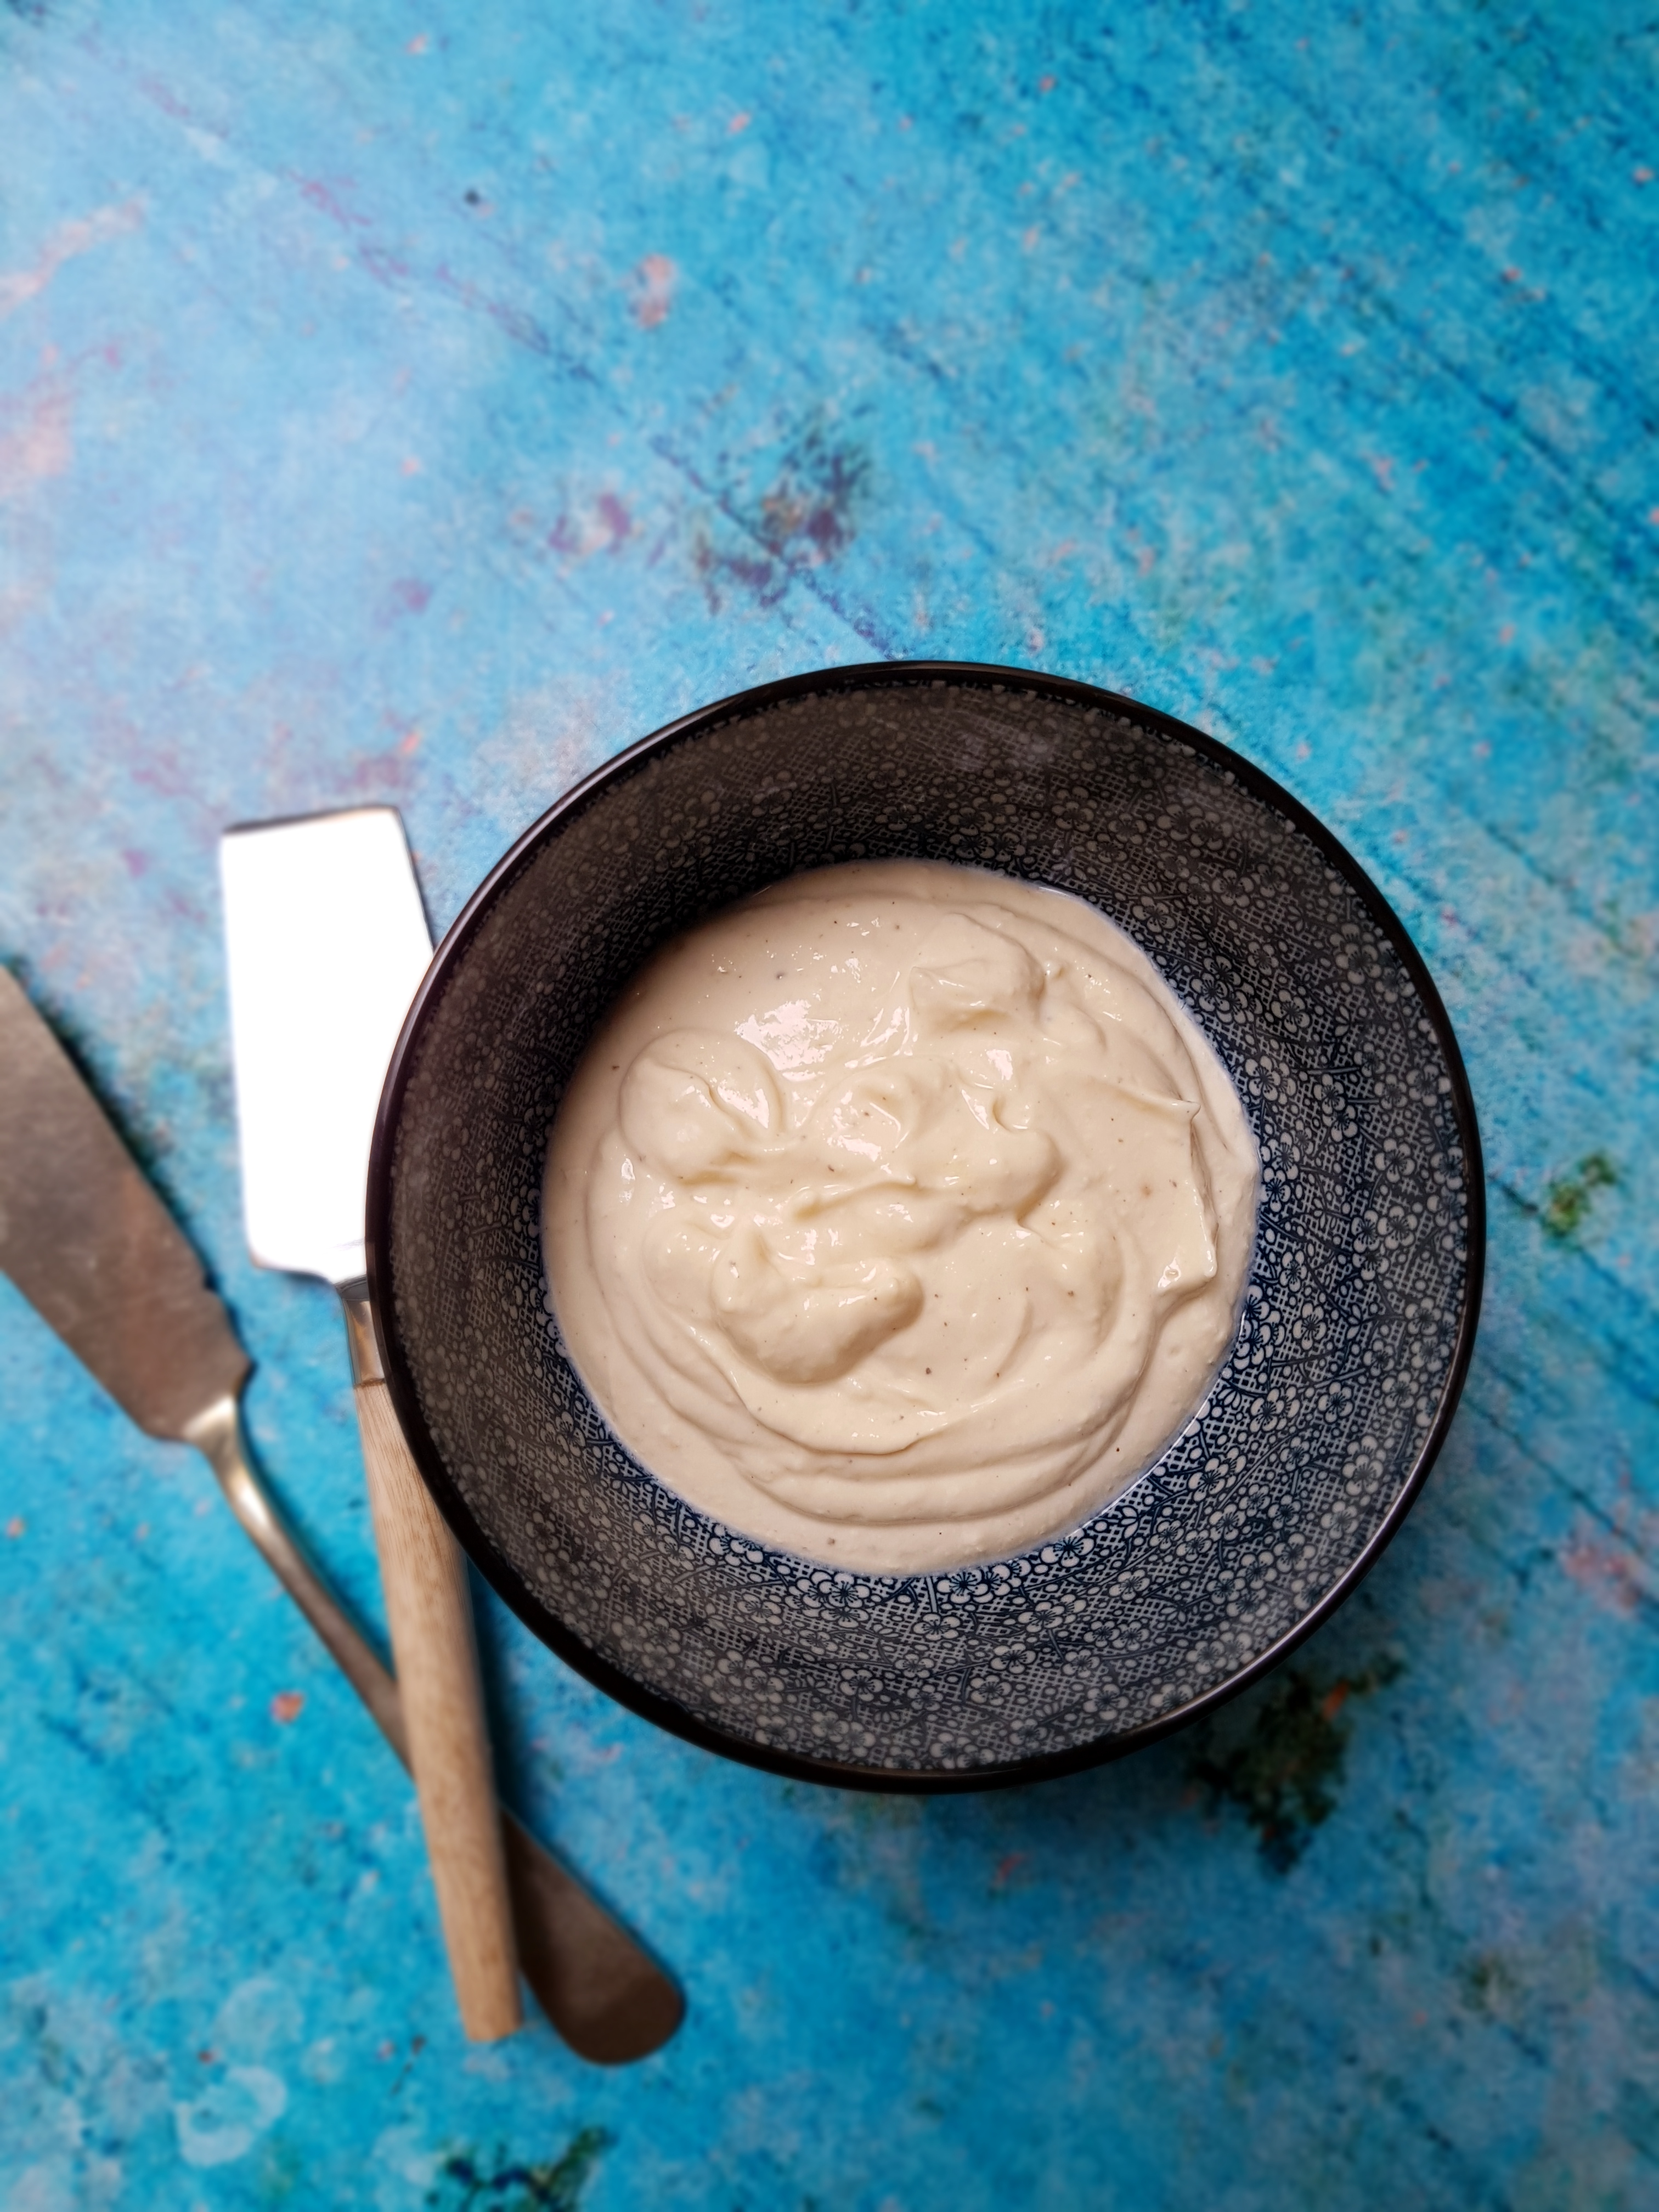
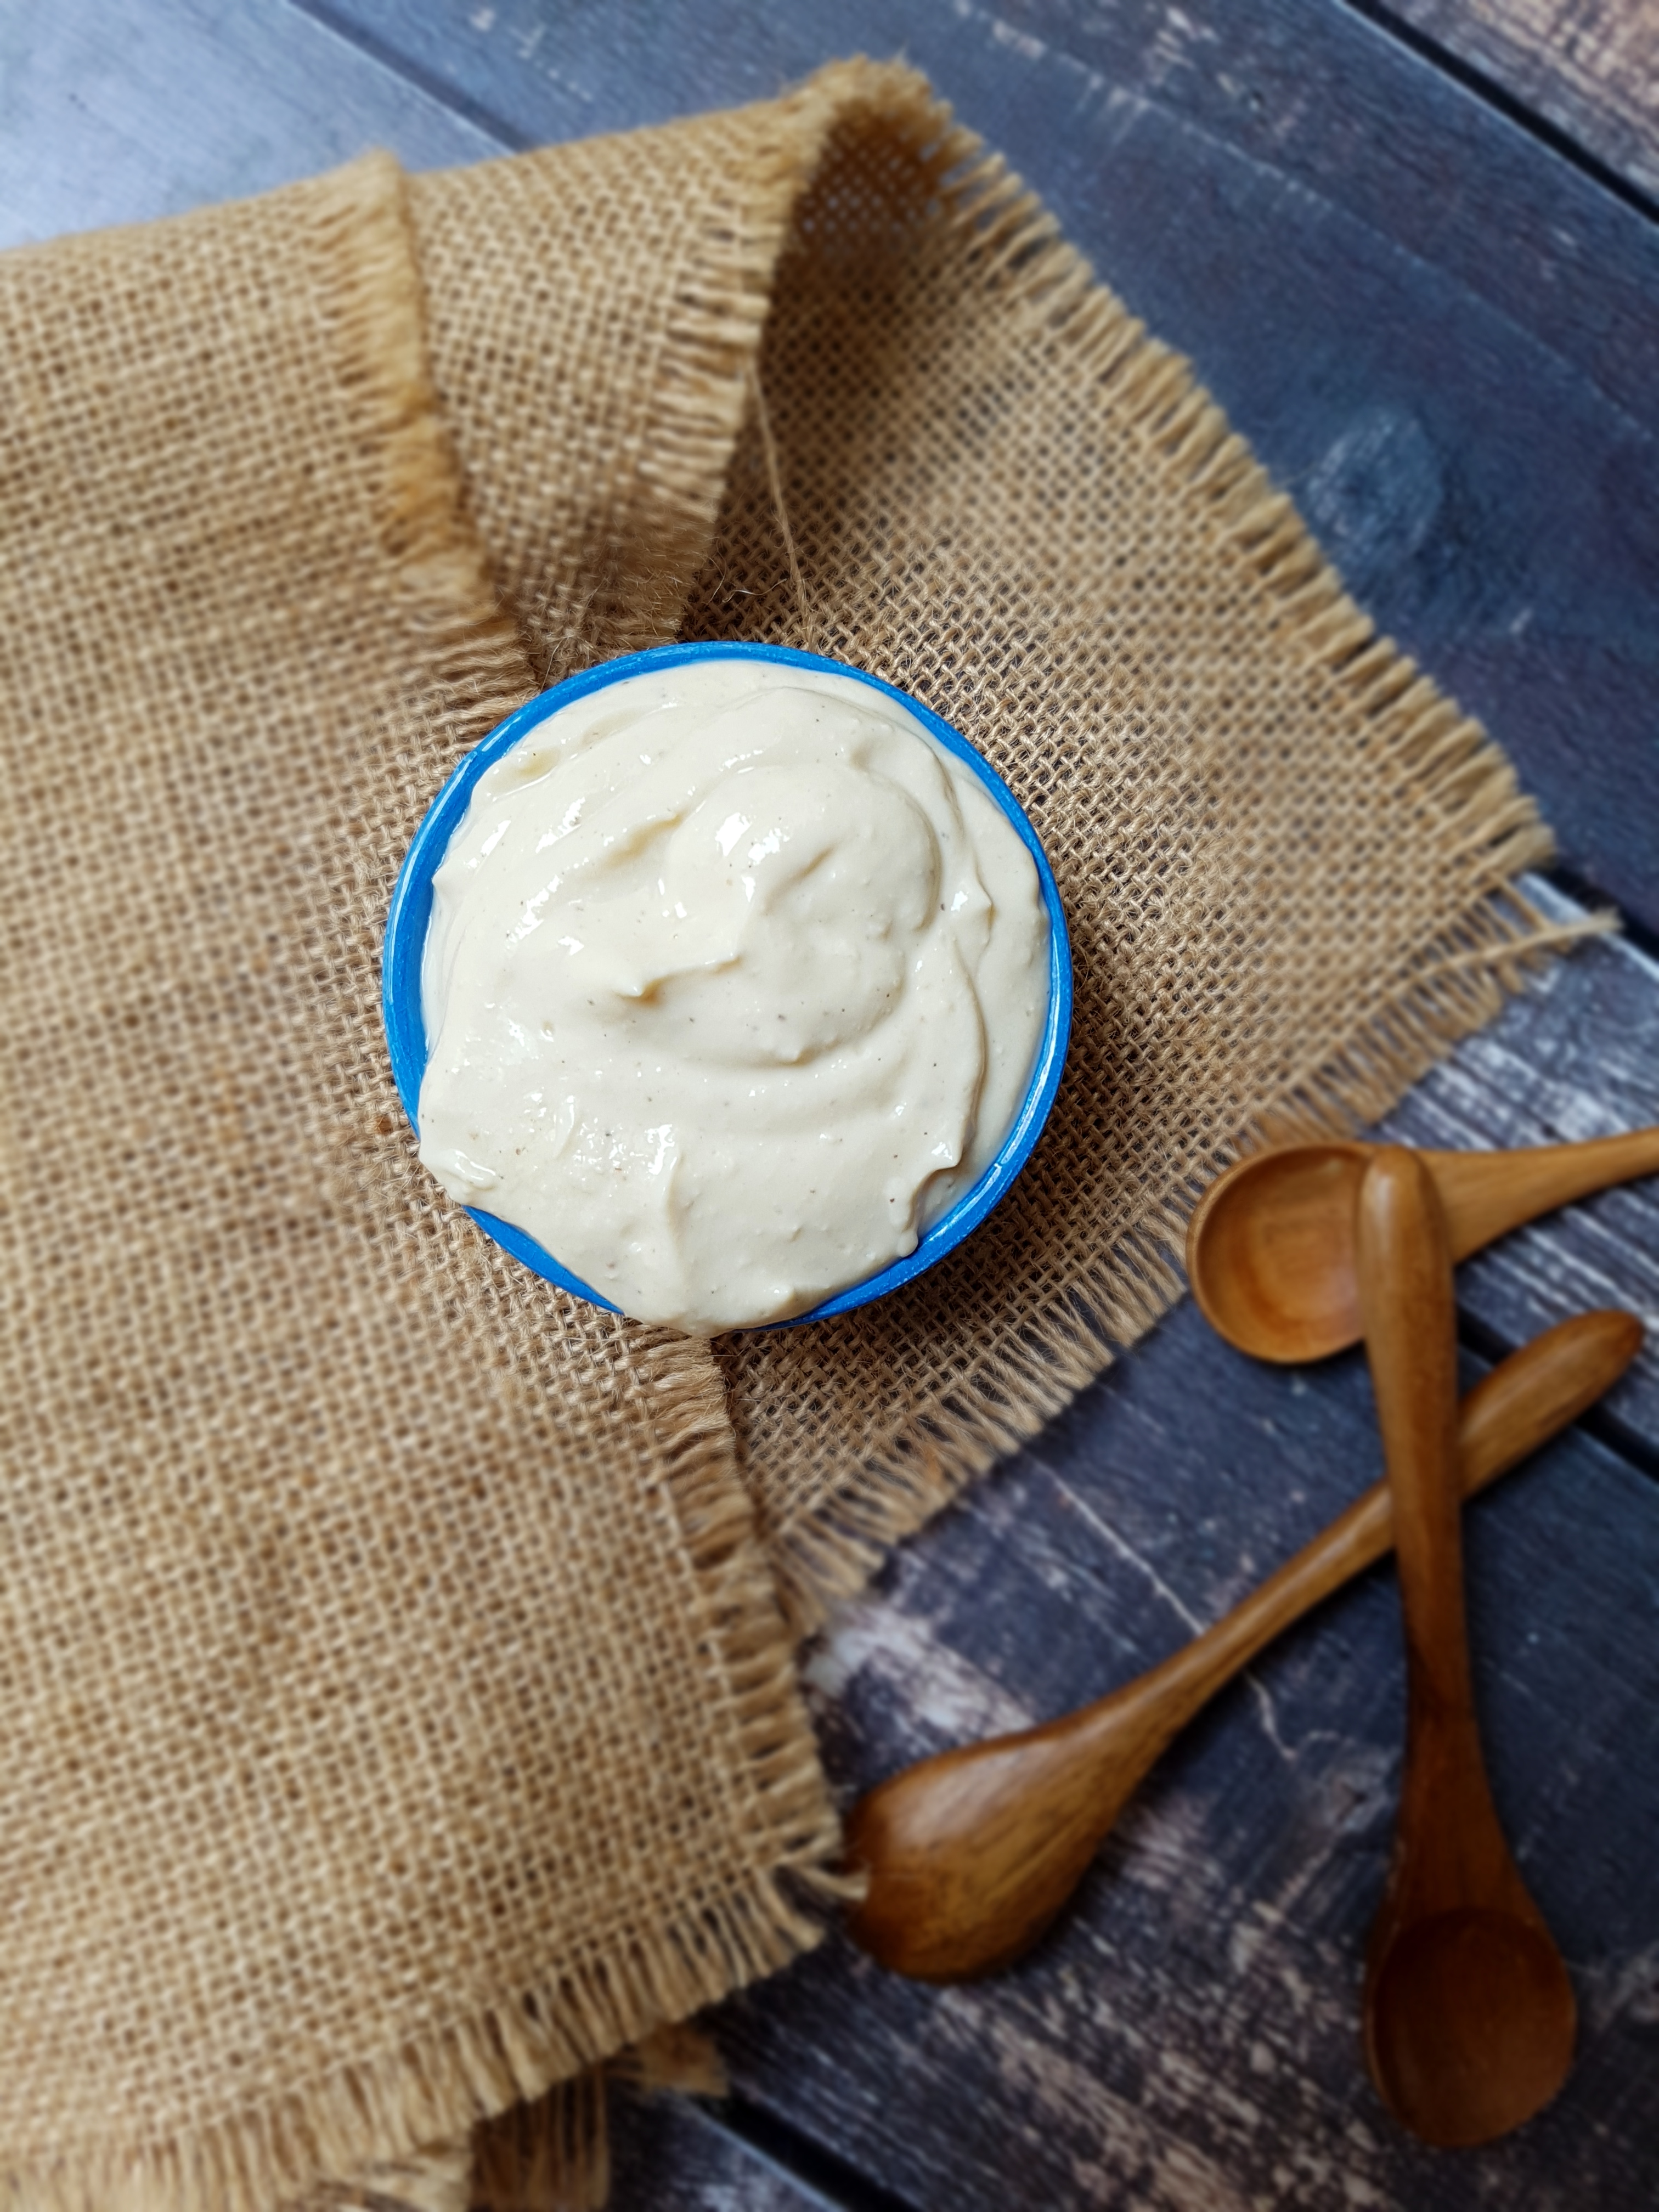
Ready for a game-changer, peeps? Who doesn’t love mayonnaise? And I bet, after trying this recipe, you’ll love my instant lowfat vegan mayonnaise!
Instant Lowfat Vegan Mayonnaise
There were two problems with mayonnaise until now: a) it is full of fat, and b) it is incredibly tedious, time-consuming and tricky to make yourself. Obviously, traditional mayonnaise being made from eggs is off-limits if you are vegan or intolerant/allergic to eggs (not to mention the risk of contracting salmonella). If you have ever attempted to make your own mayonnaise, or even tried to “healthify” it, you are in good company. According to internet searches, it is one of the most coveted items to make vegan, oil-free or egg-free. But the plethora of recipes for vegan mayonnaise you can find online were not what I was looking for, either. They generally still use a lot of oil, making a very high-fat vegan substitute or they use cashews as base which are also high in fat, expensive and not suitable if you have nut allergies.
So my browsing of vegan mayonnaise recipes left me thinking of the U2 song: “I still haven’t found what I was looking for…”. Needless to say, I had to create my own version. I wanted it to be very quick, very yummy and very healthy. And I am quite positively surprised that it turned out great on the first try. In fact, this was probably the quickest recipe creation I have ever done.
Thick and creamy vegan mayonnaise
I knew I wanted to use tofu as a base but without any added oils. I figured that there needed to be some zing and because I could not decide between apple cider vinegar and lemon juice, I simply used both. And because I love mustard (a remnant of my European heritage), I added that as well. I also added just a tiny pinch of toasted sesame oil which is my favourite oil and gives this mayonnaise a mysterious depth of flavour.
The result was a thick, creamy, luscious mayonnaise that – both in terms of flavour as well as texture – can take on any conventional mayonnaise heads-on. I find it so addictive, I can hardly restrain myself from not gobbling up the whole thing when I make this. And why not? Using naturally low-fat silken tofu as base and with only half a teaspoon of sesame oil, this is a light and lower fat alternative that still provides a very rich, authentic taste. Not a bad effort considering this beauty is gluten free, dairy free, egg free, cholesterol free, vegan, nut free, refined sugar free and almost oil-free!
Tip: If you tolerate garlic, add some garlic to make aioli!
Are your fries/coleslaw/potato salad ready for the healthiest, quickest and most delicious mayonnaise of your life?
Vegan Mayonnaise that tastes like the real thing!
Instant Lowfat Vegan Mayonnaise
300g nigiri tofu 1 tbsp apple cider vinegar 3 tsp lemon juice 1 tsp Dijon mustard 1 tsp sea salt (use herb sea salt for extra flavour) 1/2 tsp black pepper 1/2 tsp toasted sesame oil
Blitz all ingredients in a high-powered blender and serve straight away. Alternatively, store in the fridge for up to 5 days.