Three Ingredient Protein Bliss Balls [gf, vegan, nut free]

Soooo….it’s been 3 whole years since I last posted. Crazy, I know. And we all know that a few things happened last year. So let me just say I hope you are all staying safe and sane and because I thought we can all use a little bliss and energy in our lives right now, I created these bliss balls (or energy balls) for you.

They are obviously gluten free, dairy free and vegan as all the creations on this page. And they are also high in protein to feed that baby biceps. Being nut-free, they are not only great for kids lunchboxes, they are also considerably lower in fat than nut-based bliss balls.

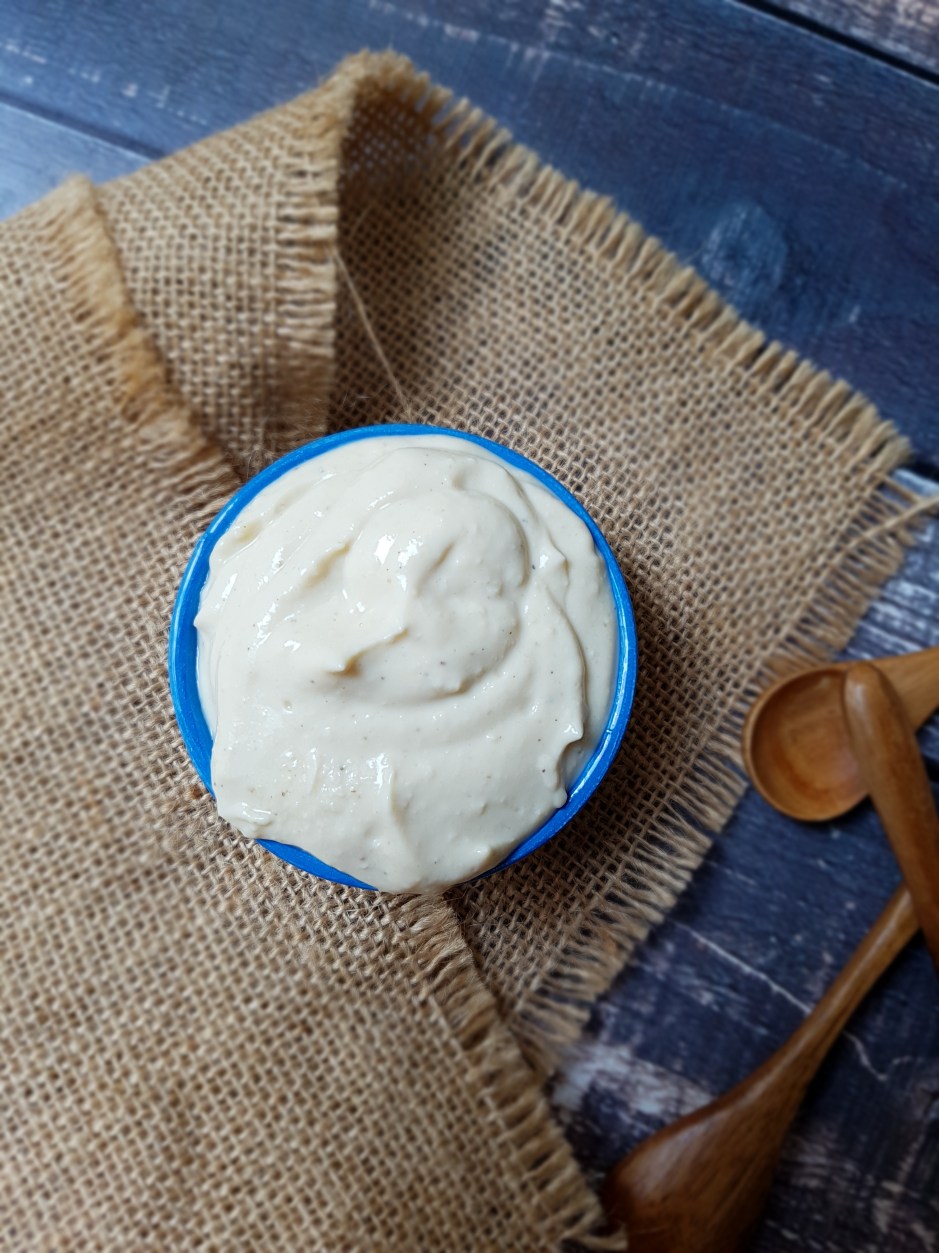
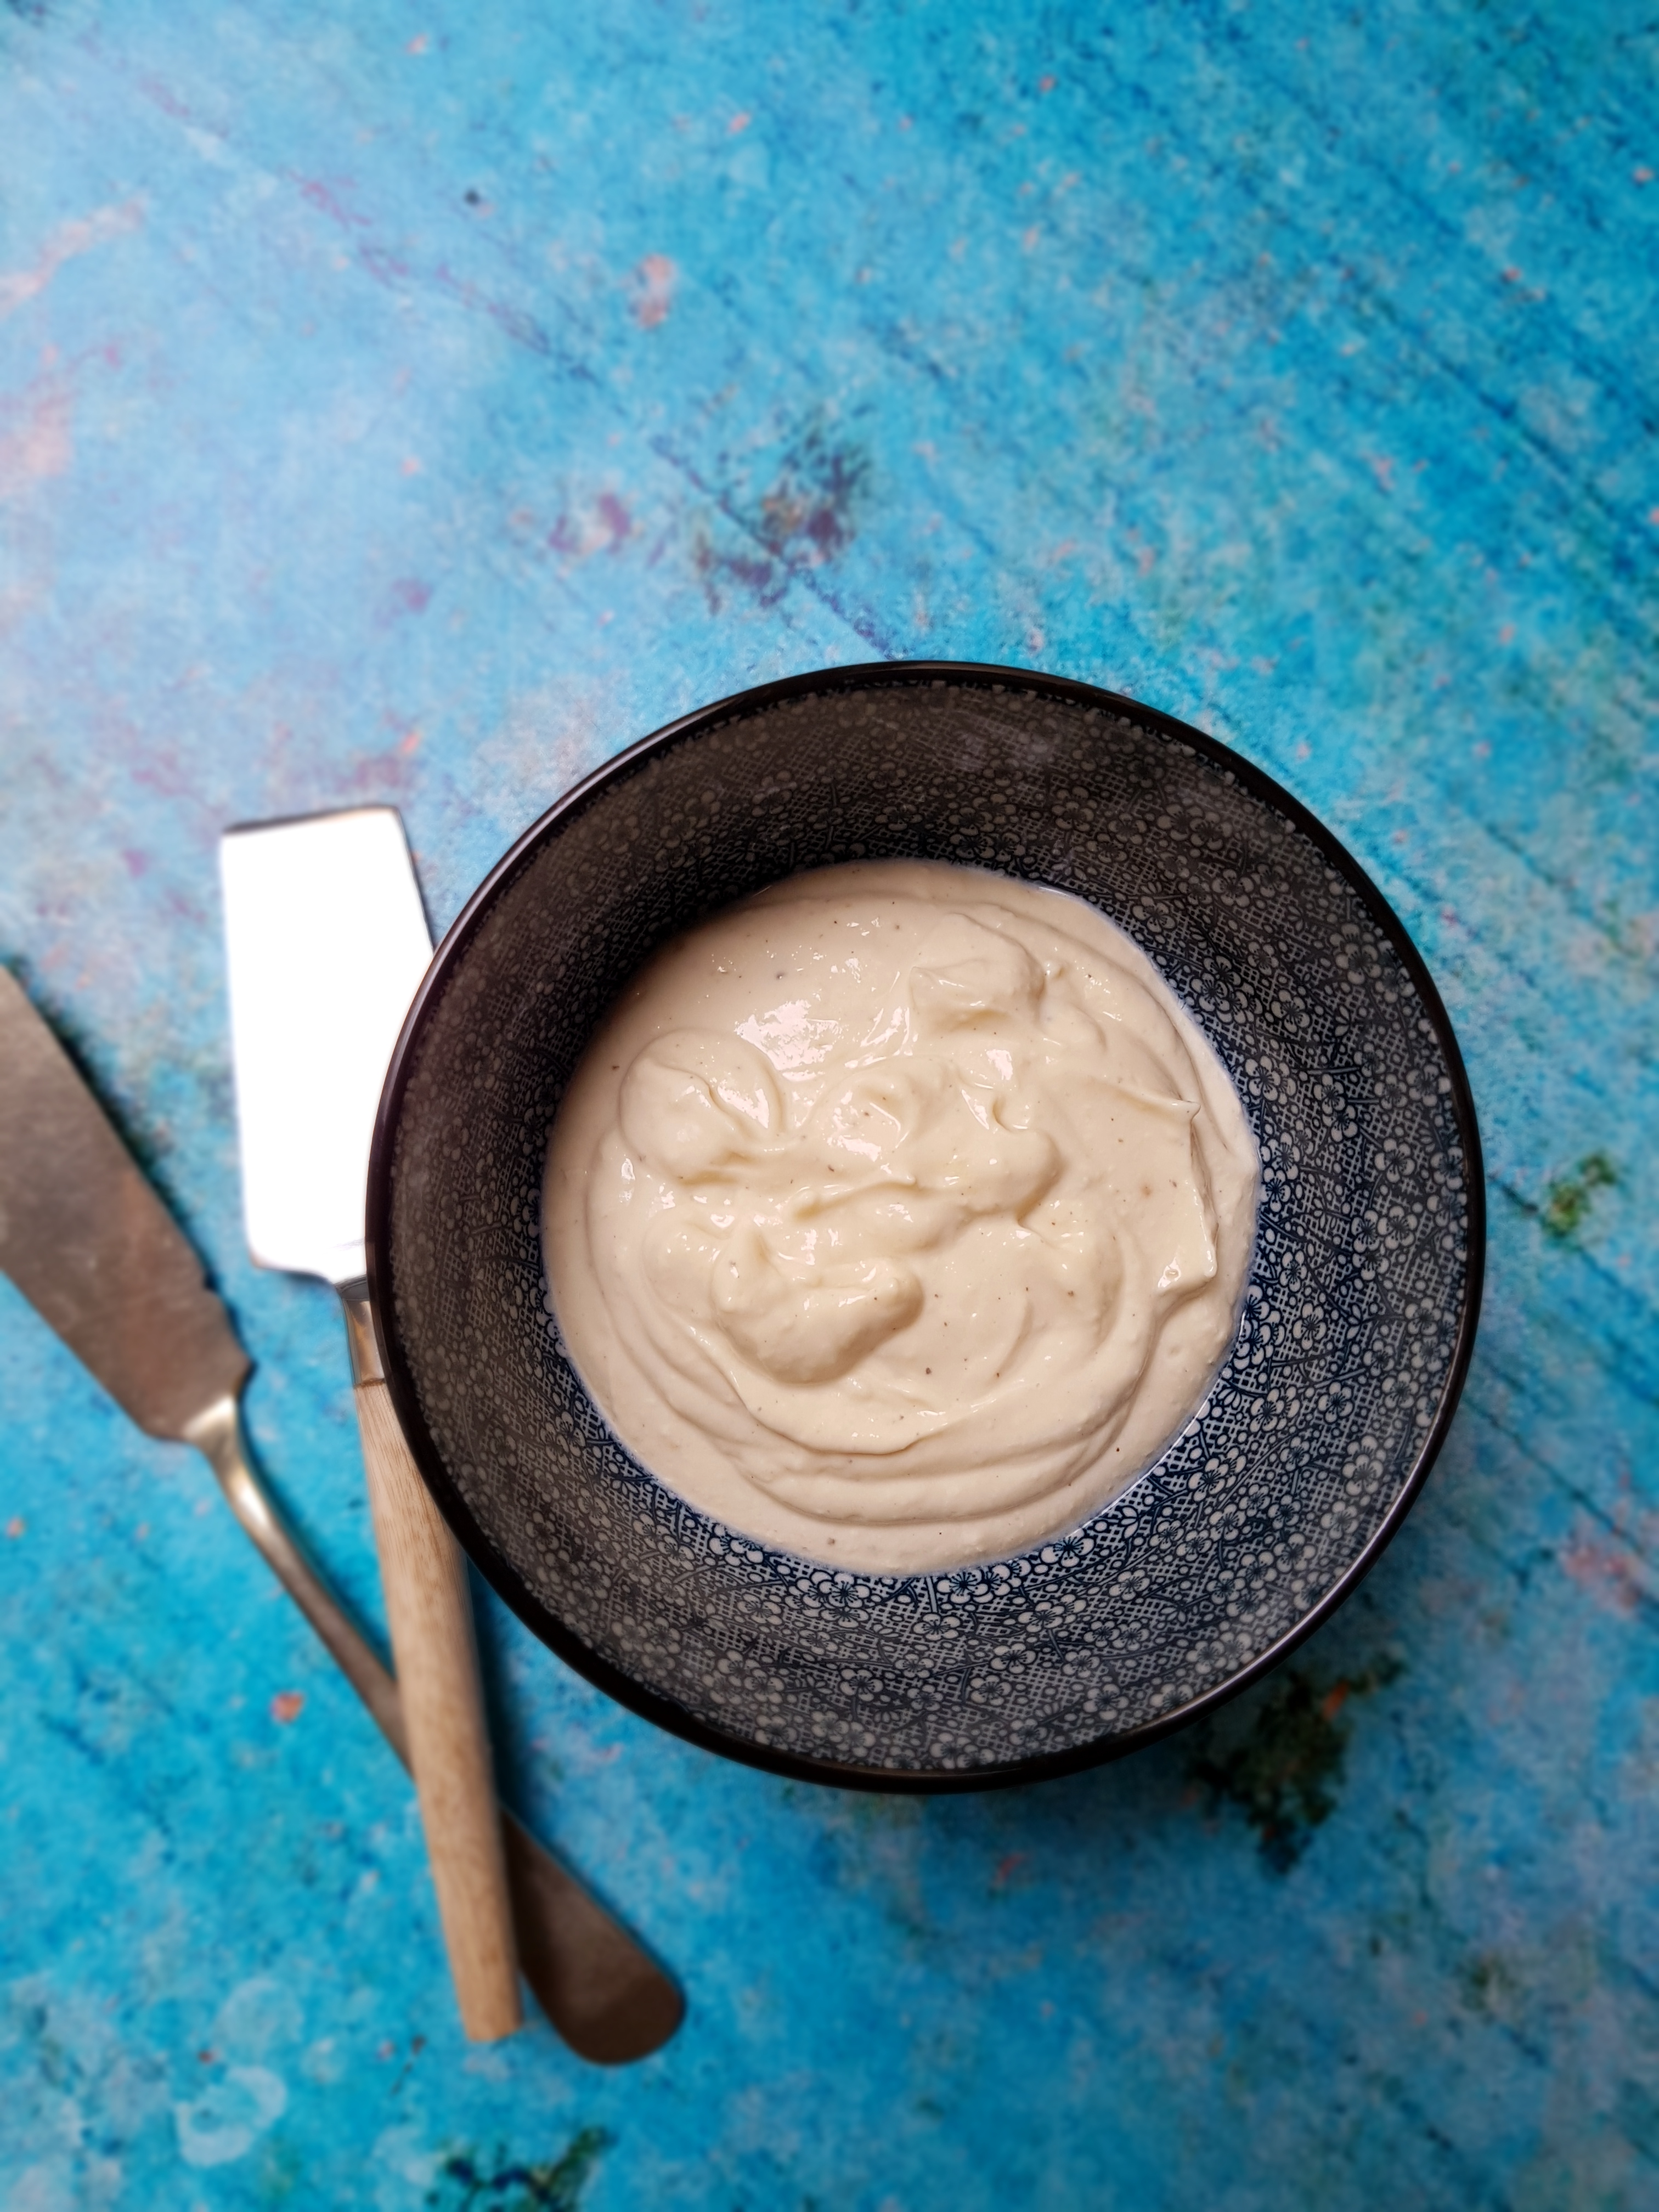
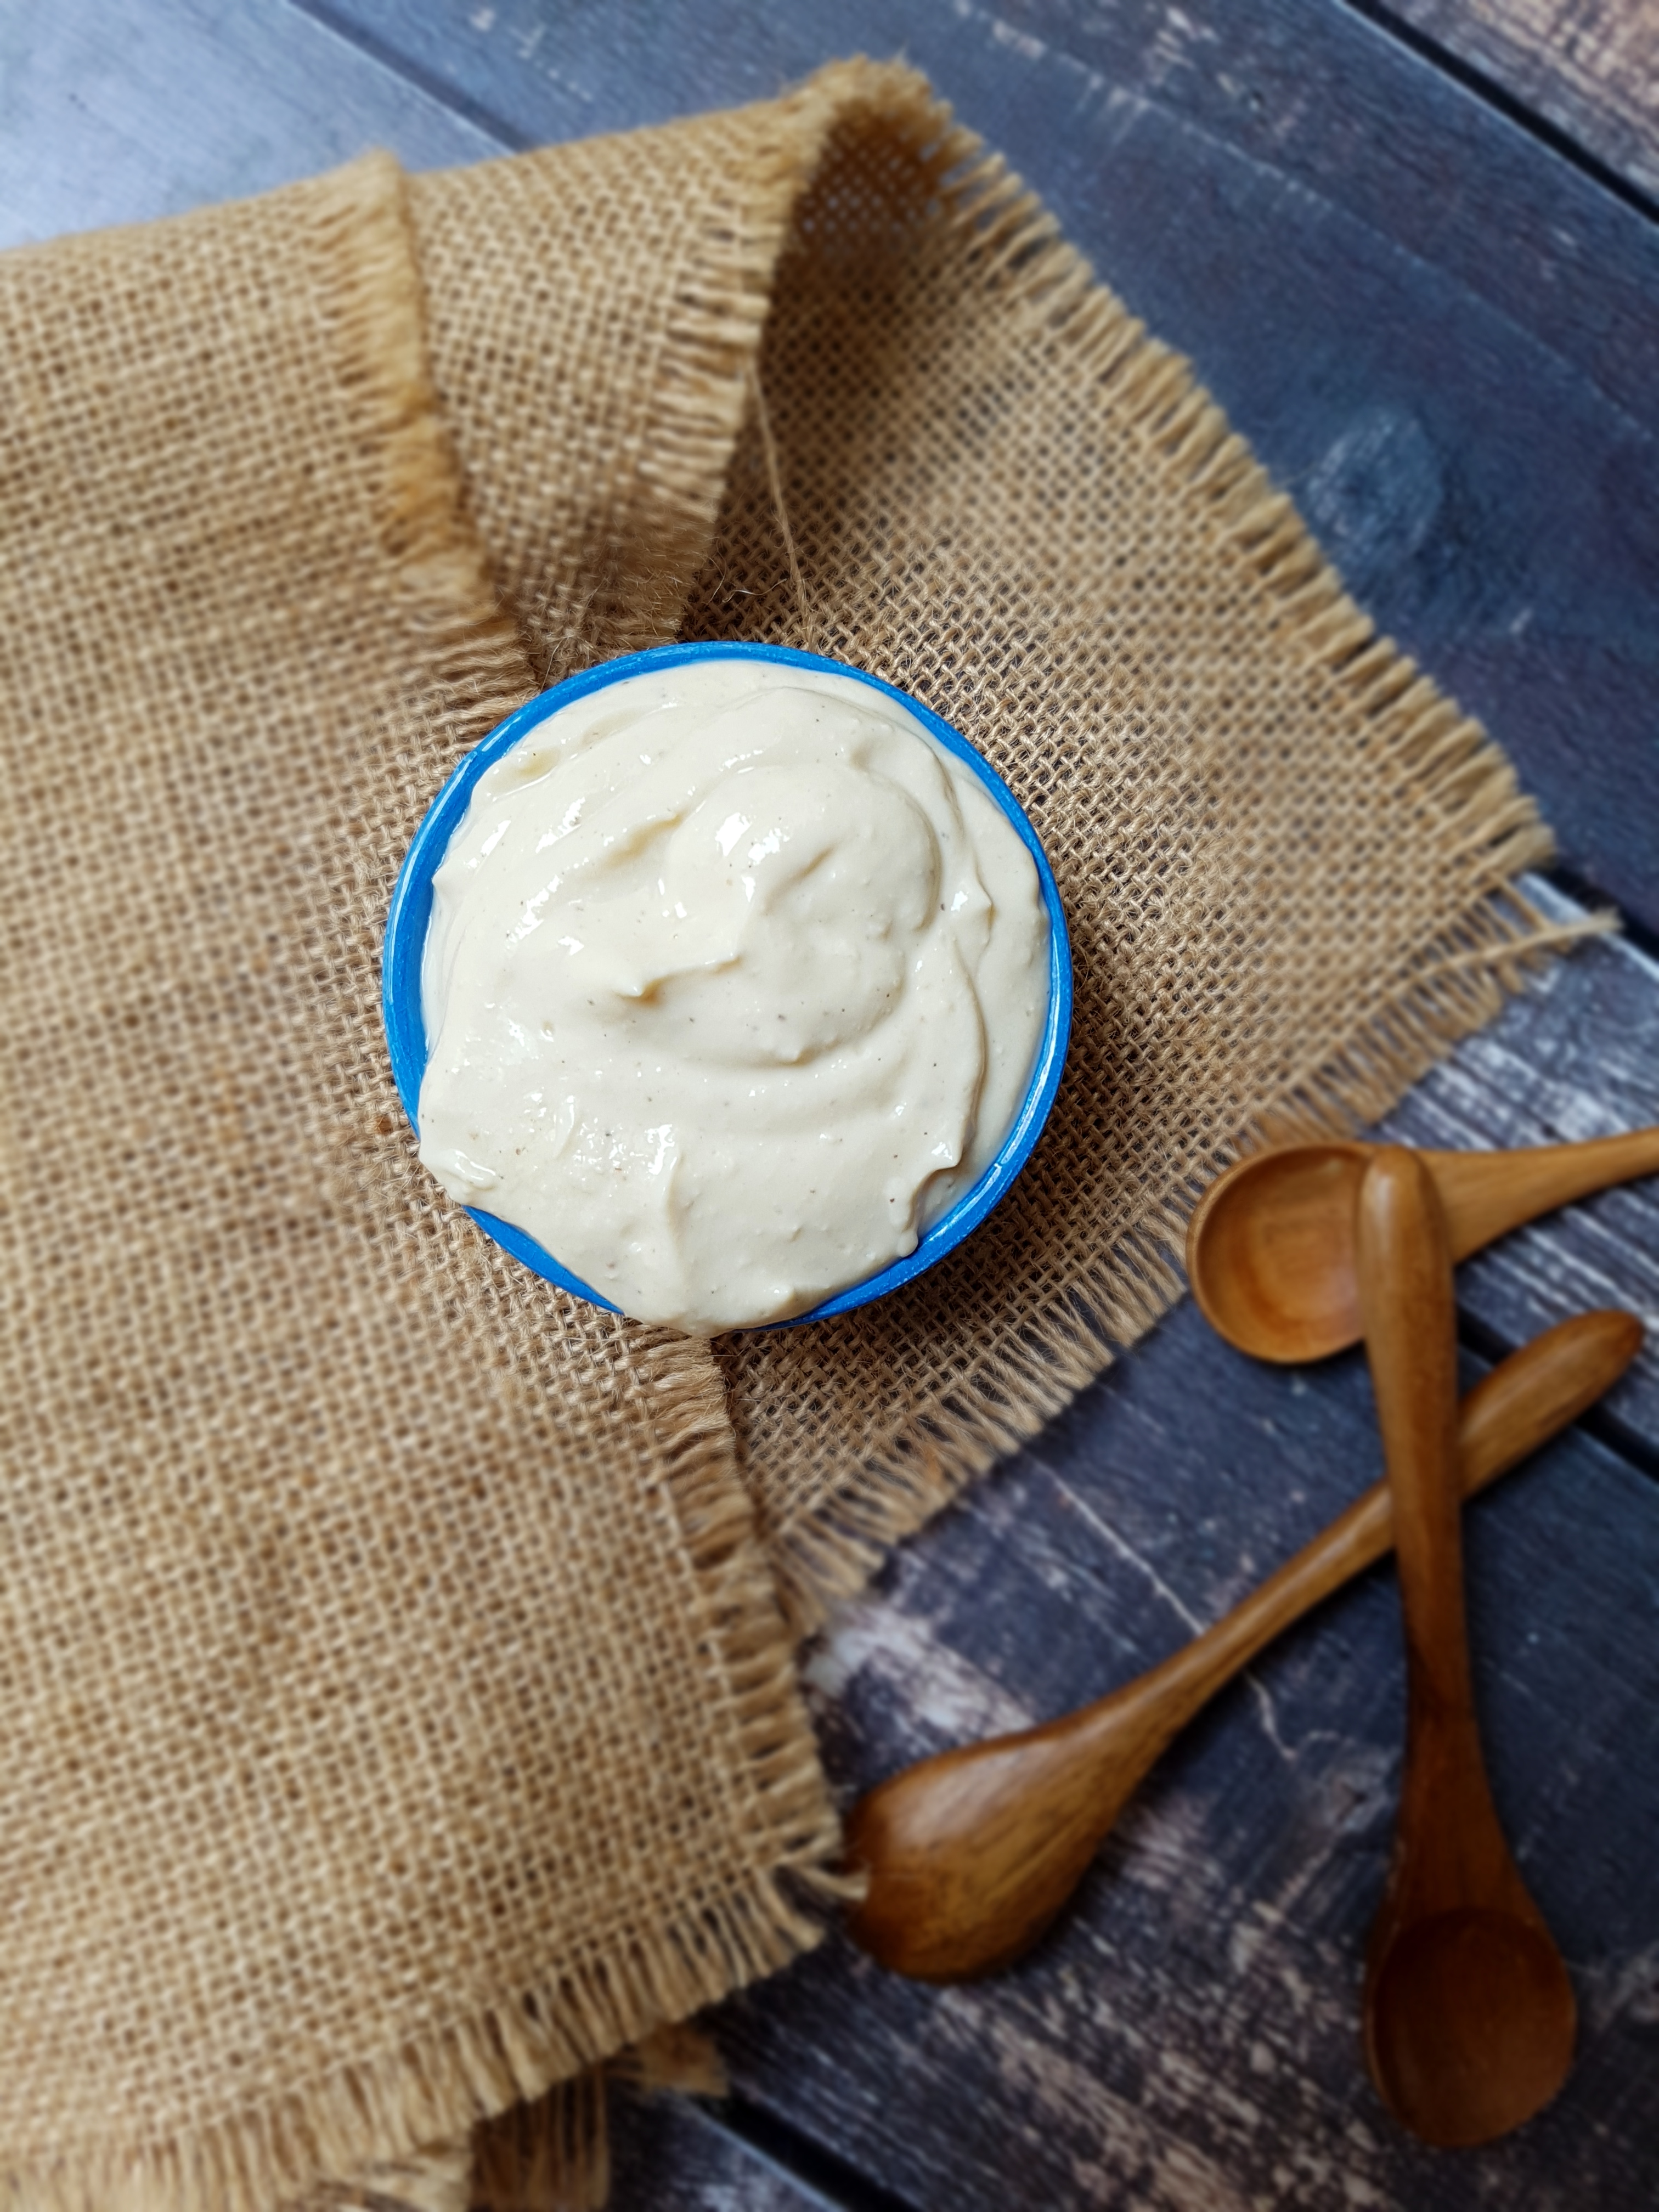
When I found out, that my two littlies really like dates, I decided to harvest this opportunity and create these super yummy and super healthy treats that only require THREE simple ingredients and are ready in a jiffy! Think juicy dates, your favourite vegan protein powder (obviously, do not use powder that contains stimulants if you are making these for kids), as well as buckwheat groats! If your protein powder is not salted, I also highly recommend adding a good pinch of Himalyan sea salt. And because being flexible is key, feel free to add whatever you fancy – raw cacao powder, maca powder, coffee powder, nuts, seeds…the sky really is the limit!

Are you ready?

Delicious nut free bliss balls

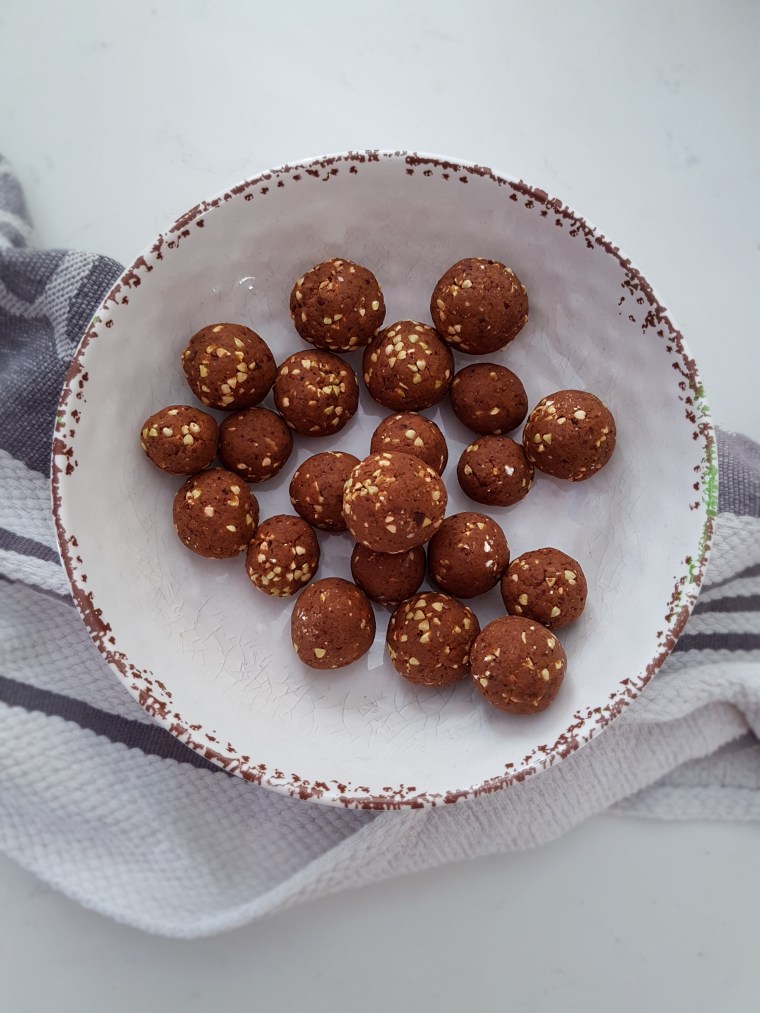
Makes approx. 20-25 bliss balls

250 g juicy dates
100 g vegan protein powder of choice
50 g raw buckwheat groats
pinch of Himalayan sea salt (optional, but highly recommended)
any other add-ins (optional) (coffee, chocolate chips, nuts…)

  1. Chuck everything into a high powered blender and blitz away! Note, you will probably have to add a little (!) (hot) water to get the mix going, depending on the amount of moisture in your dates.
  2. The mix should come together in a ball after about 20 seconds or so. If not, add a tiny dash more water. Don’t forget to scrape the sides of your blender with a spatula.
  3. Now comes the fun part: Roll into balls! If you can resist, I’d highly recommend putting these in the fridge for a bit before tucking in.
  4. Please let me know in the comments if you made these and what you added. 🙂

Enjoy!

Nat XOXO

Instant Lowfat Vegan Mayonnaise

Ready for a game-changer, peeps? Who doesn’t love mayonnaise? And I bet, after trying this recipe, you’ll love my instant lowfat vegan mayonnaise!

Instant Lowfat Vegan Mayonnaise

There were two problems with mayonnaise until now: a) it is full of fat, and b) it is incredibly tedious, time-consuming and tricky to make yourself. Obviously, traditional mayonnaise being made from eggs is off-limits if you are vegan or intolerant/allergic to eggs (not to mention the risk of contracting salmonella). If you have ever attempted to make your own mayonnaise, or even tried to “healthify” it, you are in good company. According to internet searches, it is one of the most coveted items to make vegan, oil-free or egg-free. But the plethora of recipes for vegan mayonnaise you can find online were not what I was looking for, either. They generally still use a lot of oil, making a very high-fat vegan substitute or they use cashews as base which are also high in fat, expensive and not suitable if you have nut allergies.

So my browsing of vegan mayonnaise recipes left me thinking of the U2 song: “I still haven’t found what I was looking for…”. Needless to say, I had to create my own version. I wanted it to be very quick, very yummy and very healthy. And I am quite positively surprised that it turned out great on the first try. In fact, this was probably the quickest recipe creation I have ever done.

Delicious homemade mayonnaise
Thick and creamy vegan mayonnaise

I knew I wanted to use tofu as a base but without any added oils. I figured that there needed to be some zing and because I could not decide between apple cider vinegar and lemon juice, I simply used both. And because I love mustard (a remnant of my European heritage), I added that as well. I also added just a tiny pinch of toasted sesame oil which is my favourite oil and gives this mayonnaise a mysterious depth of flavour.

The result was a thick, creamy, luscious mayonnaise that – both in terms of flavour as well as texture – can take on any conventional mayonnaise heads-on. I find it so addictive, I can hardly restrain myself from not gobbling up the whole thing when I make this. And why not? Using naturally low-fat silken tofu as base and with only half a teaspoon of sesame oil, this is a light and lower fat alternative that still provides a very rich, authentic taste. Not a bad effort considering this beauty is gluten free, dairy free, egg free, cholesterol free, vegan, nut free, refined sugar free and almost oil-free!

Tip: If you tolerate garlic, add some garlic to make aioli!

Are your fries/coleslaw/potato salad ready for the healthiest, quickest and most delicious mayonnaise of your life?

Tofu-based mayonnaise
Vegan Mayonnaise that tastes like the real thing!

Instant Lowfat Vegan Mayonnaise

300g nigiri tofu
1 tbsp apple cider vinegar
3 tsp lemon juice
1 tsp Dijon mustard
1 tsp sea salt (use herb sea salt for extra flavour)
1/2 tsp black pepper
1/2 tsp toasted sesame oil

Blitz all ingredients in a high-powered blender and serve straight away. Alternatively, store in the fridge for up to 5 days.

Enjoy!

Vegan Glutenfree Lowfat Pear Streusel Muffins

It’s my birthday and I brought you muffins! Not any old muffins, but the most delicious, moist, fruity, fudgy, crowd-pleasing vegan glutenfree lowfat pear streusel muffins! Yes, that’s right. While anything involving the word “streusel” would usually conjure the idea of either vegan, gluten free or lowfat, these babies are exactly that. No white flour, butter or refined sugar involved, and with fat only coming from the fat naturally occurring in oats. Who is in?

Vegan Glutenfree Lowfat Pear Streusel Muffins

These little delights were born out of the necessity to do something with a huge bag full of pears that our supermarket gave away for next to nothing as they were approaching their use-by date. Ever since my teenage years, I have enjoyed making muffins. It is such an easy way to use up whatever fruit you have on hand, it is quick, virtually fool-proof and the results never disappoint. Using fruit in muffins is also a great way to lower their fat content as the fruit keeps the nice and luscious.

Back to my bag full of pears and my obsession with muffins. So vegan glutenfree lowfat pear streusel muffins it was. I had never attempted streusel before so I am quite pleased how these babes turned out after the first attempt. As I said, they are ready in a jiffy and not complicated at all. Perfect if you just want to whip up something quickly for surprise guests or the 3pm munchies.

As my daughter and hubby (who are not into health food at all) devoured them, I can’t really say how long these will keep…:-)

Vegan Glutenfree Lowfat Pear Streusel Muffins

Makes 12 muffins

For the streusel:
1/4 cup oat flour
1/3 cup coconut sugar
2/3 cup oats
1/2 cup applesauce
cinnamon

For the muffins:
one cup soy milk or other plant milk
2 tbsp apple cider vinegar 
1 tbsp vanilla extract
1/2 cup applesauce
2 cups oat flour
1/2 cup coconut sugar
4 tsp baking powder
1/2 tsp salt
cinnamon
4 pears, diced

Preheat oven to 180 °C and grease a muffin tin or line it with liners. In a large mixing bowl, mix the milk with the vinegar, vanilla and applesauce and set aside for 15 minutes.

Meanwhile, prepare the streusel by mixing all the streusel ingredients in a small bowl. Set aside.

After 15 minutes are up, add the oat flour, coconut sugar, baking powder, salt and cinnamon and gently stir with a wooden spoon until incorporated and you have a smooth batter. Fold in the diced pear. Scoop batter into prepared muffin tin, then divide the streusel on top of the muffins. Bake for 20-25 minutes and let cool in pan for another 10 minutes before taking them out. Best to store in the fridge in an airtight container.

Enjoy!

Gingerbread Bliss Balls {vg, gf}

I am continuing my bliss balls obsession with a new flavour that is just perfect for the current season – autumn! While autumn here in the southern hemisphere doesn’t necessarily go hand in hand with gingerbread, the shops in Germany and other Northern and Central European countries start to fill up with all kinds of gingerbread-y goodies as soon as the leaves turn yellow. And because gingerbread is so delicious and comforting all year round – not just in the lead-up to Christmas – here’s my gingerbread bliss balls.

The idea for gingerbread bliss balls has been at the back of my mind for a while. After all, if you make carrot cake bliss balls and cookie dough bliss balls, why not turn other baked favourites into healthy snacks as well? I am pleased to say that these babies are utterly delicious! They are spicy, warming, comforting, full of flavour and just divine. I love all my bliss ball creations – if I do say so myself – but I think this is by far my new favourite. So make these now or bookmark this page if you are craving something really delicious and really healthy or frantically looking for Christmas presets (or any presents) in a few months’ time.

These gingerbread bliss balls are of course vegan and gluten free, but they are also nut free, which is great if you are watching your fat intake or struggle with nut allergies. My gingerbread bliss balls are therefore also great for kids’ parties and toddler snacks, in which case you might want to ease up on the spices a bit. Featuring dates, oats, maple syrup and an array of spices, these gingerbread bliss balls are refined sugar free, packed with fiber and magnesium, antioxidants, vitamins and minerals, while cinnamon helps to lower blood sugar, ginger has anti-inflammatory effects, and cardamom aids detoxification.

If that is not enough to convince you, these balls take just a few minutes to prepare!

Gingerbread Bliss Balls

Gingerbread Bliss Balls

Makes 12-15 bliss balls

2 cups rolled oats
6 Medjool dates
1.5 teaspoons ground ginger
1.5 tsp ground cinnamon
half a tsp nutmeg
half a tsp cardamom
2 tbsp maple syrup
half a tsp gingerbread spice

First, process the oats in a high powdered blender until a coarse meal forms. Add the other ingredients and blitz until you achieve a malleable consistency. Shape 12 to 15 balls and store in the fridge to firm up a little. They can last in the fridge in an airtight container for up to two weeks. But I doubt they will last that long. 😉

Enjoy!

Low Carb Low Fat High Protein Carrot Cake (grain free, dairy free, soy free)

Low Carb Low Fat Carrot Cake

This carrot cake is almost an insolence. Yes, it is low carb AND low fat – for all of you that can’t decide between the two lifestyles (or simply want to eat a truly delicious carrot cake). Talk about having it all. There is many recipes for healthy treats out there, but this cake is gonna make them blush with envy. Not only is this cake moist, scrumptious and totally utterly delicious (tick tick tick). It is low carb and low sugar with the carbohydrates coming from carrots, banana and just a dash of honey (tick tick). It is low fat with the fat coming from eggs and flax (tick). It is high protein (tick), high fibre (tick) and on top of it all, gluten free, grain free, dairy free, nut free and soy free (tick tick tick tick tick). Another decisive advantage is that if you are lazy busy you can just throw all ingredients together in one big bowl in no particular order and without any laborious instructions such as “put the dry ingredients here…mix the wet ingredients there”, separating the eggs, or melting butter or coconut oil (helped by the fact that there is no fat or oil in there). It also neatly pours out of the bowl (thanks to the flax that keeps everything together)

Given the high amount of protein and fibre, this cake will fill you up for a while which is another plus, and the icing on the cake is the icing on the cake (forgive the pun). It is fat free and sugar free, made of cannellini beans – which is the reason why this cake is not paleo. If it wasn’t for the icing, this carrot cake would be perfectly paleo(ish). So for all our primal friends out there, just omit the icing or use your favourite paleo icing instead. As there is eggs and honey in it, this is not a vegan cake, but you might be able to experiment with chia eggs and rice malt/agave/maple syrup though I cannot vouch for the results.

As a word of warning, if you have IBS, follow a low FODMAP diet or otherwise have problems with fibre, this carrot cake might not be suitable for you or you might just want to go easy and enjoy a small amount. The coconut flour in this recipe is full of fibre which is great but might give certain people intestinal discomfort. Try it for yourself. Nothing ventured, nothing gained.

For one cake (approx. 12 large or 24 small slices)

2 heaped tbsp vanilla flavoured pea protein powder
3/4 cup coconut flour
1/2 cup flaxmeal
pinch of salt
1.5 tsp baking soda
1.5 tsp cinnamon
0.5 tsp nutmeg
1 mashed banana
2 tbsp honey
2 tsp vanilla essence
4 eggs
300 ml plant milk
5 large carrots, grated

For the frosting
1 cup cannellini beans, drained and rinsed
4 tbsp stevia
1 tsp vanilla
pinch of sea salt

Preheat oven to 180 °C and line a round baking tin with baking paper. Mix the cake ingredients in a large bowl until a homogenic mass develops (I did this by hand). Scoop into the mould and bake for 20 minutes until a toothpick comes out clean. Transfer to a cooling rack and allow to cool completely before frosting.

For the frosting, process all ingredients in a high-powered blender until completely smooth. You can use it straight away or place in the refrigerator to firm up even more. Tip: If you find the taste of the frosting to bland, you could add spices such as nutmeg or flavouring such as almond or lemon essence.

Enjoy!


Vegan lentil eggplant and sweet potato stew

mouthful. But believe me, you will want to take many mouthfuls of this stew! Imagine you have a dinner party with one friend who is paleo, one vegan friend, one gluten-intolerant friend, one friend with a nut allergy and one friend who needs to follow a low FODMAP diet. What do you do? Scroll down!

But you should also scroll down if you just want to eat the most delicious stew evaaa…with lentils, eggplant, sweet potato, tomato and kidney beans it is health in a bowl, but that doesn’t mean compromising on flavour! Curry powder, ginger and turmeric makes this stew an explosion of flavours on your tongue – the best proof that tasty and filling dishes do NOT require meat, onions or added fats!

With its “meaty” consistency, this stew will satisfy herbivores and omnivores alike, and with its rich flavours simply from vegetables, herbs and spices, it is an indulgent treat without having to worry about fat. The “good” carbs in the legumes and spuds make you fell fuller for longer – needless to say, the lentils and beans pack a decent amount of protein and fibre. You could always add extra protein from quorn, tempeh or – if you are not vegetarian or vegan – chicken or any other meat or fish. And feel free to have it as spicy or as mild as you want! I did not add any salt; all the sodium comes from the stock, so if you use a low-salt stock or broth, this can even be a low-sodium stew.

This stew is gluten free, dairy free, soy free, paleo, vegan and vegetarian, nut free and low FODMAP. I try to avoid onions and garlic as much as possible as they are not my friends. If you can, frying garlic and onions before adding the other ingredients would add even more flavour (if that is possible!). This stew was born out of the need to make use of an eggplant and a sweet potato. Adding the legumes was kind of a lightbulb moment, and I don’t regret having thrown all these ingredients together. Eggplant naturally takes a bit longer to cook than other vegetables so it is not instant but delayed gratification. It will taste even better the next day and is the perfect candidate for dinner parties. You wouldn’t even have to ask your guests for dietary requirements as this stew covers them all!

This stew tastes so good, it is almost an insolence that it is so super healthy and allergy-friendly as well! Try for yourself!

Vegan Lentil Eggplant and Sweet Potato Stew

Makes approx. 8 serves

1 tbs coconut oil
1 large eggplant
, diced in 1cm pieces
1 large sweet potato, cubed (I leave the peel on as I’m lazy but feel free to peel it beforehand!)
1 l vegetable stock
1 tin (400ml) diced tomatoes
1 tin (400ml) lentils
1 tin (400ml) kidney beans
spices (I used Madras curry powder, ginger and turmeric)

Melt the oil in a large stockpot, add the spices and cook until fragrant. Add the eggplant, sweet potato, stock, tomatoes and legumes. Cover, bring to the boil, then open the lid a crack, turn down the heat and simmer until all the eggplant and sweet potato are tender (30 minutes). Give the stew a good whiz with a stick blender until you reach a coarse consistency. Serve as is or with fragrant jasmine rice or freshly toasted gluten free bread.

Enjoy!

Vegan Frosting II

Dairy Free Frosting on spoon

I experimented a bit more with my dairy and soy free frostings, as I found that Xanthan does not only get lumpy, but is also a bit hard on the stomach for some folks!

This coconut frosting is relatively easy and quick and tastes great! It also has a better texture than my previous frosting and uses arrowroot instead of Xanthan.

1/2 tin of coconut milk
a bit of erythritol to taste
pinch of salt
teaspoon of arrowroot, dissolved in a teaspoon of water
a drop of vanilla
100 g coconut oil
20 g Nuttelex or other dairy free spread (you can use butter if not strictly vegan or dairy intolerant)

Simmer coconut milk, sweetener and salt and simmer for 10 minutes. Remove from heat and add the arrowroot paste and vanilla, bring back to the boil and swiftly whisk out any lumps. The mix becomes shiny and of goopy texture. Remove saucepan from the heat source and quickly stir in coconut oil. Let cool, transfer to container and chill for 2 hours. Once nice and cool, remove from fridge and beat with the spread until it looks like frosting. Voilà! Your vegan frosting is ready to use! Great on my carrot cake! Be careful: This frosting gets very firm in the fridge, but will melt very quickly when outside the fridge.

Enjoy!

Funneled frosting
Funneled frosting