Quick and Easy Oatmeal Bar – oil-free, vegan and lunchbox friendly!

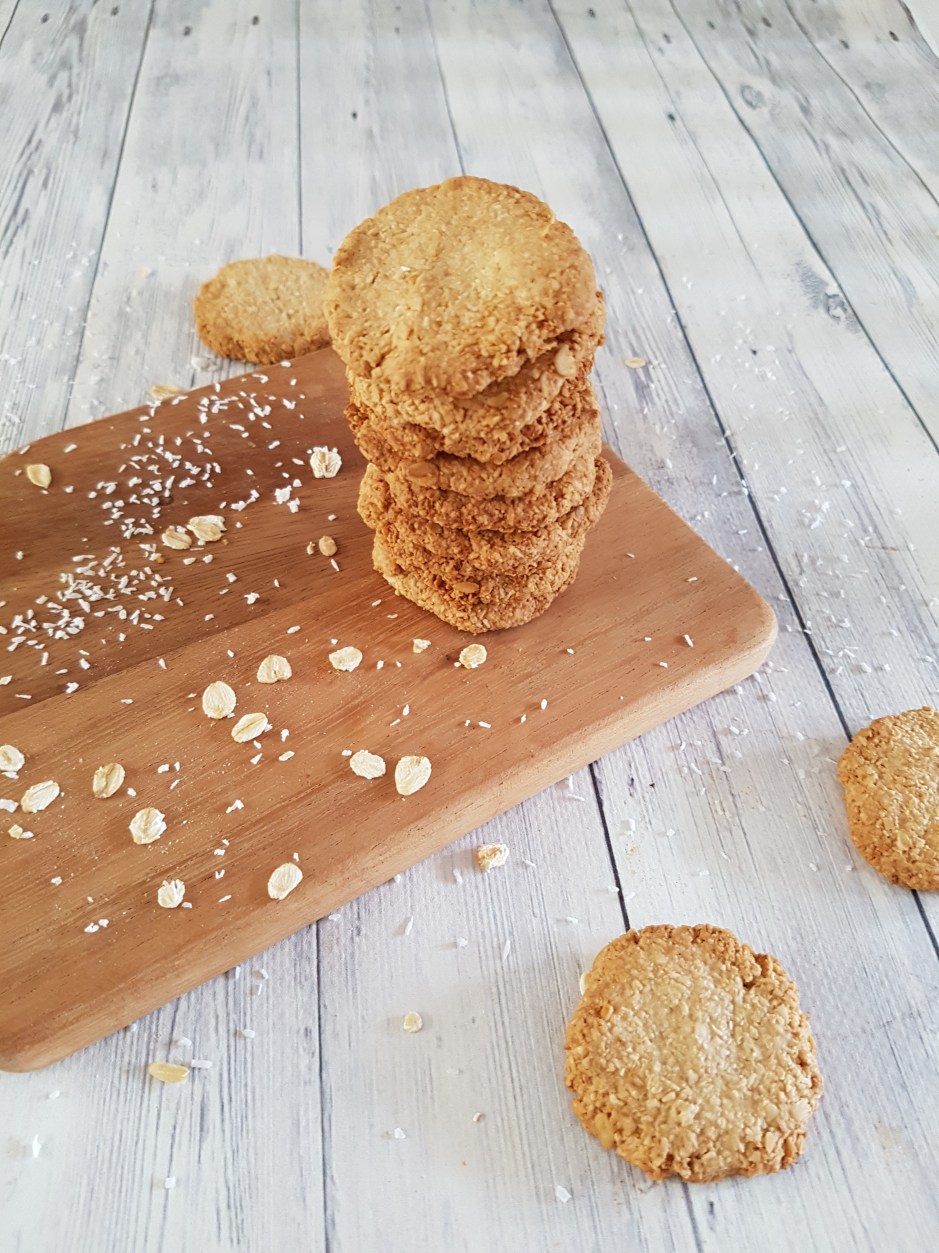
This is probably the recipe I am making most often in my kitchen and still it has taken me so long to get around to posting it!

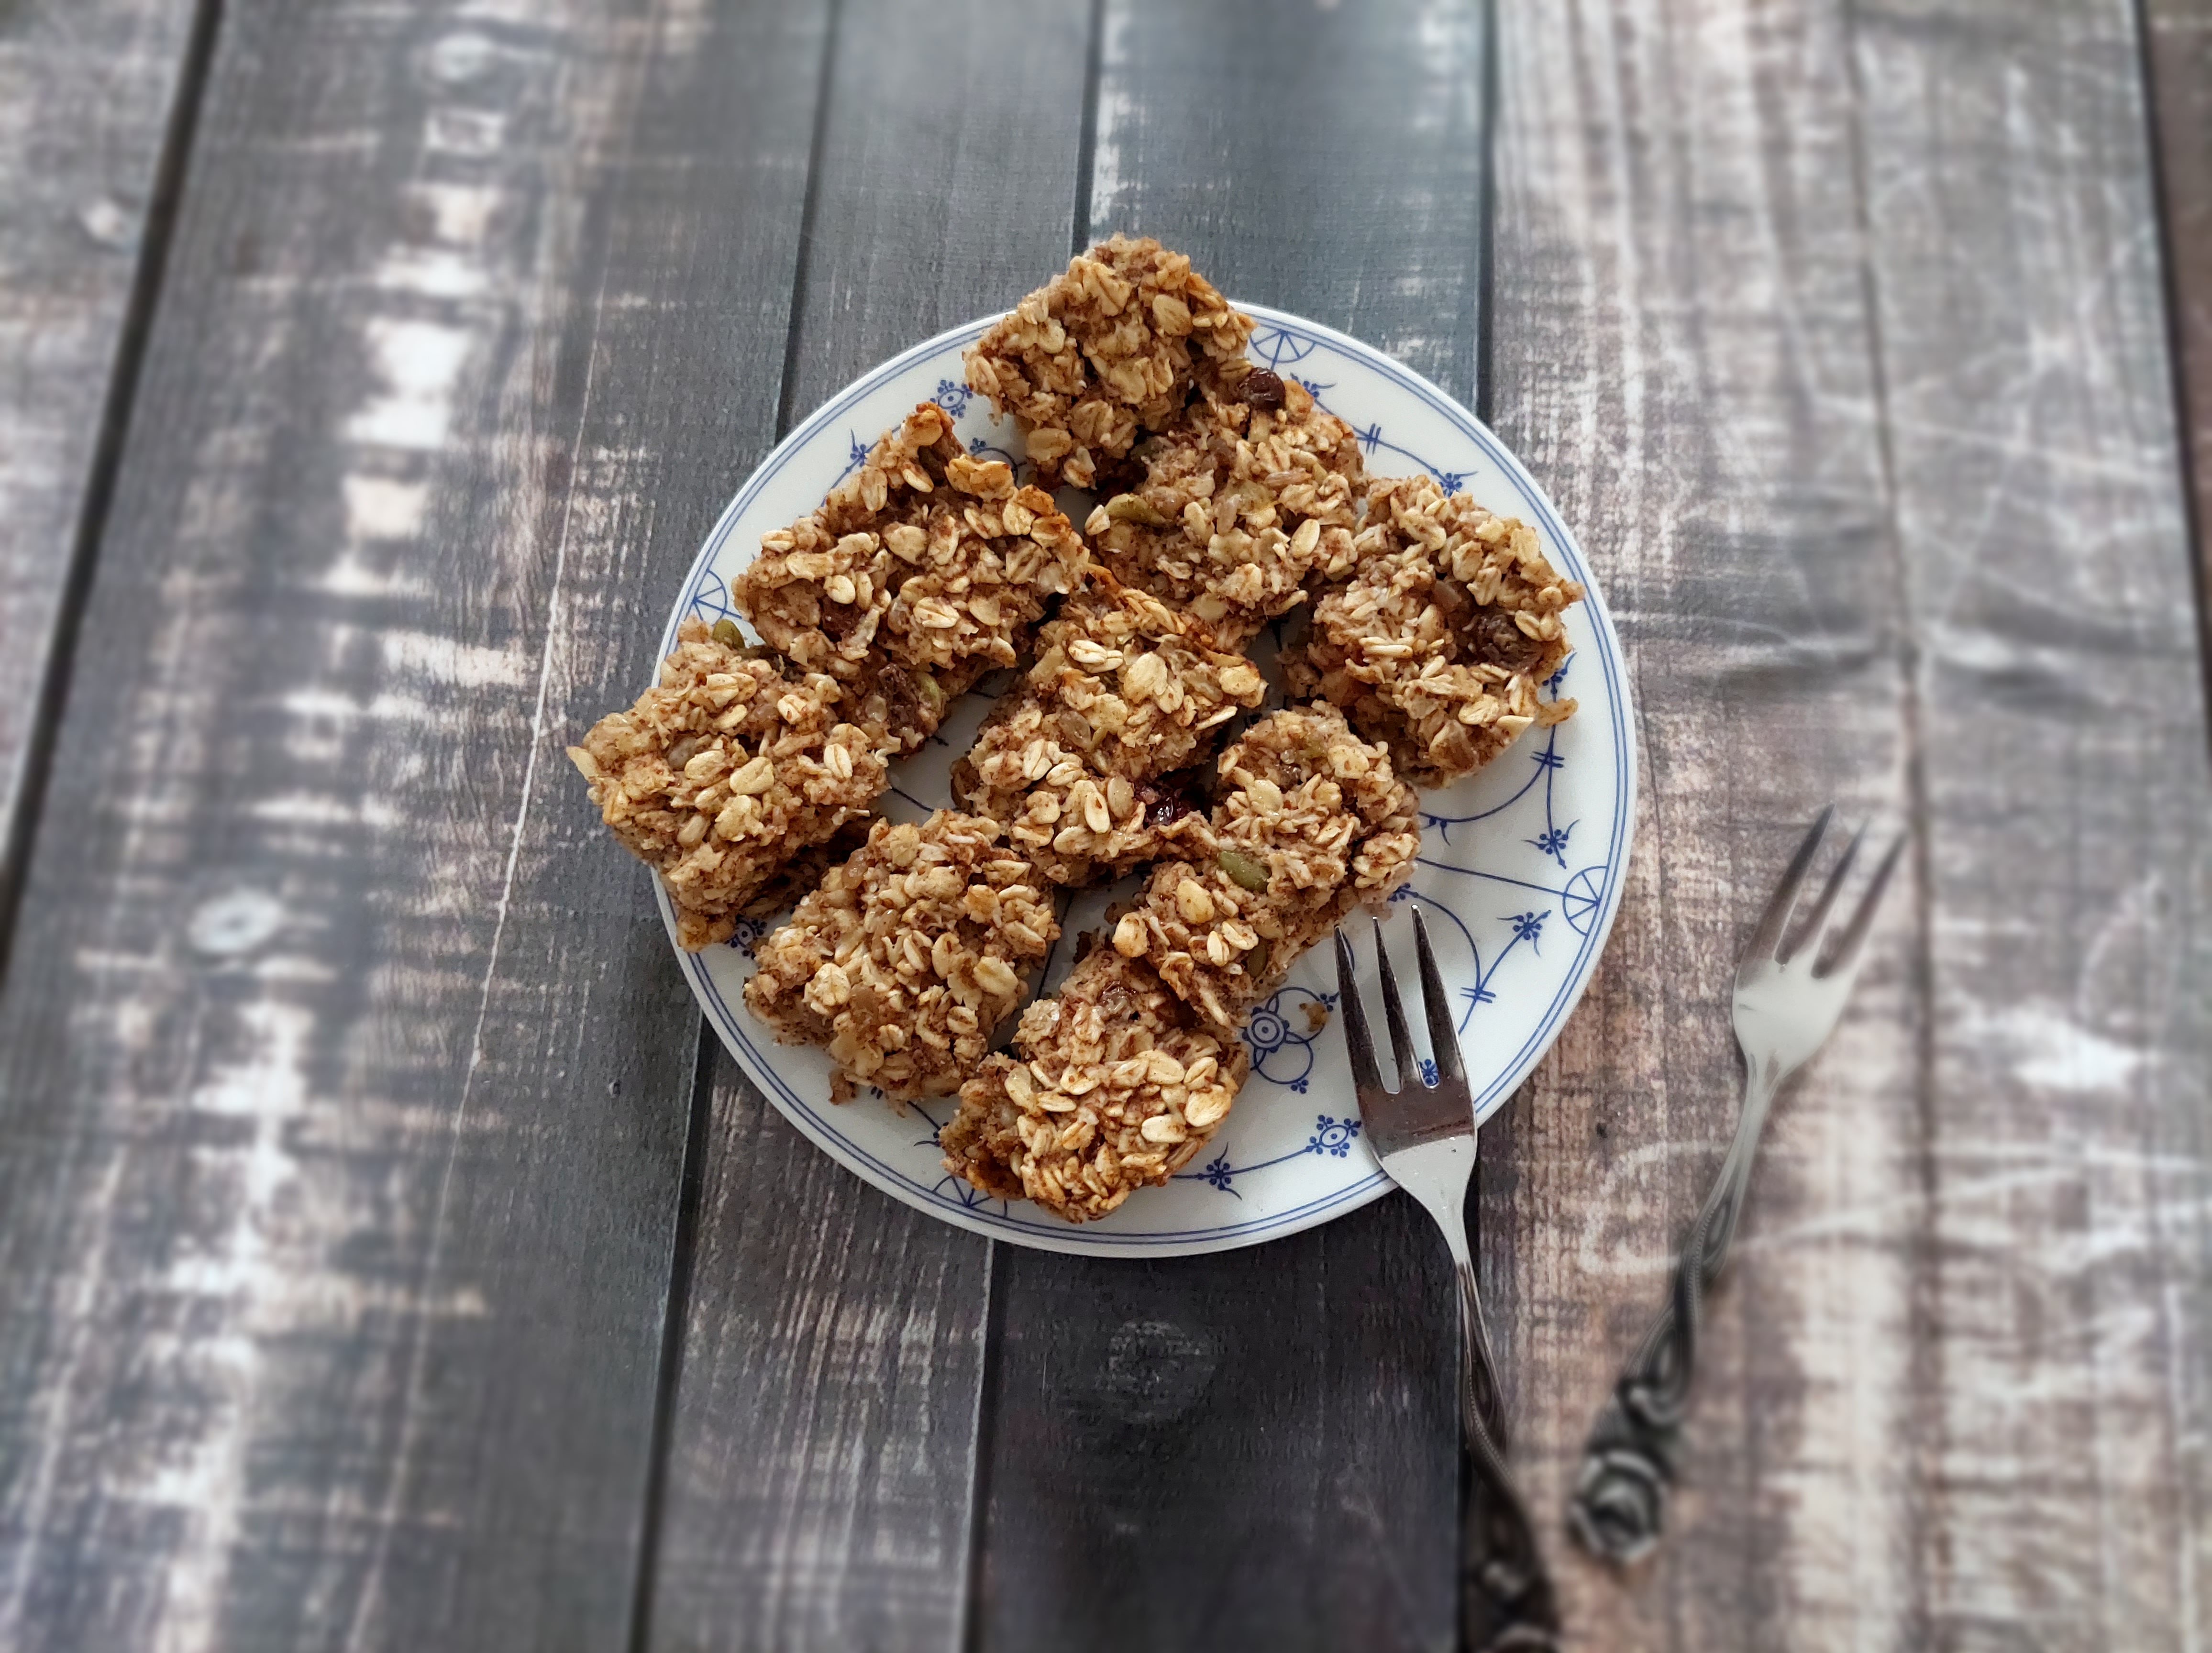
Everyone needs a recipe for a quick and easy lunchbox-friendly bar in their repertoire, so here comes my version of a low-fat, vegan, nut-free, gluten free (if you use gf oats) oatmeal bar that is a hit in lunchboxes, for picnics, afternoon tea, and at kids birthday parties alike! It is full of fibre to keep small (and big) tummies full and slow carbs to get those brains working. I also love it as a mess-free and satisfying breakfast on the go with its great balance of plant protein, complex carbohydrates, fibre, and a small amount of healthy fats (naturally occurring fats in oats and from any seeds you are adding if any).

Whip it up every Sunday afternoon for the week ahead and fill your house with the cozy aroma of this healthy and yummy oatmeal bar! This is an extremely customizable and forgiving recipe – use whatever milk or sweetener you like, add any combination of dried fruits, nuts and seeds (if nuts are allowed) or even chocolate chips. Add gingerbread spice or pumpkin pie spice for an autumnal twist, glaze it with chocolate – the options are seriously endless. You can adjust the sweetener to your liking and even leave it out altogether and your bars will still be tasty! It is also pretty fool proof – I don’t even really follow a recipe anymore and always manage to create something delicious based on this loose recipe matrix.

4 cups old-fashioned oats (you can use quick oats, but the result will be a bit more mushy and with less of a “bite” to it, still delish tho!)
4 flaxseed eggs or egg replacer eggs (or use “real” eggs if not vegan)
1/4-1/2 cup (more or less) honey, maple syrup or raw sugar or mix hereof (adjust to taste)
1 cup plant milk
3/4-1 cup apple sauce
1 tbsp baking powder
1 tbsp of vanilla essence
pinch of sea salt
1 cup (adjust to taste) any mix of dried fruit (dates, sultanas, cranberries, candied peel etc.) and seeds/nuts (optional)
1 tbsp Cinnamon and/or other spice (gingerbread or pumpkin pie spice is lovely)
optional: melted dark chocolate to drizzle over

Mix all ingredients and let stand for 20 minutes for the pats to soften and the flavours to develop. Preheat your oven to 180°C. Line a square 20cm baking pan with baking paper and pour the batter in, smoothing the top. Bake at 180°C for around 30 minutes. Let cool, then cut into 30 squares.

Enjoy! xx

Pumpkin Spice Bars [vegan, gluten free]

Quick, easy, healthy and yummy pumpkin spice bars – a great breakfast or snack!

Looking for a quick easy and healthy recipe to have at hand when the 3pm slump strikes, the kids come home hungry from school or you need a quick breakfast on the run that doesn’t weigh you down? Then look no further than these pumpkin spice bars!

I have made and perfected this recipe countless times over the years and let me just reassure you that these pumpkin spice bars don’t need to be pumpkin spice bars at all. You can replace the pumpkin puree with apple puree and have apple bars (my favourite!) or replace it with banana and have banana bars etc. This recipe is veeery forgiving – you can play around with different grains, different sweeteners (or omit sweetener altogether) and it will always work!

Ingredients:
3 flax eggs (3 tbs ground flaxseed dissolved in 9 tbs water or plant milk and left to thicken)
3 cups rolled oats
3/4 tsp baking powder
1 cup pumpkin puree (or apple sauce or other fruit/veg puree)
cinnamon and other spices to taste
pinch of salt
1 cup soy milk or other plant milk
1/4 cup coconut sugar or other sweetener (may be omitted)
sultanas or other dried fruit and seeds (half a cup)

Method:
Preheat fan-forced oven to 180°C. Line or grease a 20×30 cm baking tin. Stir all ingredients together and let rest for 20 minutes – the longer the better! Pour into prepared tin and bake for 20 minutes or until golden on top. Let cool completely before you slice into squares.

Substitutions and adjustments:

As for oats, you can use quick or rolled oats, the rolled oats give a better texture though.

Sweetener: I have made these many times, including with raw sugar, coconut sugar, stevia, honey, and maple syrup and they all work well. As the oats, apple sauce and dried fruit are naturally sweet you can even omit sweetener altogether.

Milk: You can use any plant milk you like. I used soy milk to keep it nut free, but feel free to use nut milks if you don’t need the bars to be nut free.

Add-ins: These bars are very low in fat as they are free of oil, butter and eggs. The fat only derives from the natural fat in the oats and the seeds. If you follow a very low fat diet, omit the seeds and just add dried fruit.

Flax eggs: If you eat eggs, you can use 2 whole eggs instead of the aquafaba.

Pumpkin puree/apple sauce: mashed banana works well if you don’t have apple sauce, or any type of “baby food” purees. I’ve made these with pumpkin purée with great results.

Enjoy!

Nat xoxo

Vegan Chocolate Coconut Panna Cotta with Agar {gluten free, dairy free, sugar free}

Panna Cotta is the ultimate Italian dessert. It is creamy and indulgent, but light enough to to be served after a rich meal. Because it is a snap to make and can easily be prepared in advance, it is a popular option for dinner parties. Maximum impression with minimum effort – well, not so fast. Panna cotta (literally “cooked cream”) is traditionally made from cream and/or milk, making it unsuitable for folks with dairy intolerance/allergies or those who avoid dairy for health and/or ethical reasons. Moreover, panna cotta’s infamous “jiggle” results from beef gelatin which is obviously not suitable for vegans and vegetarians or for those who avoid gelatin for religious reasons. But fear not! I got you covered with my vegan chocolate coconut panna cotta – less jiggle, more fun to eat!

Vegan Chocolate Coconut Panna Cotta

The concept to use agar agar instead of gelatin is of course not new and I have experimented with it before. However, it is very difficult to get the ratio right. Most of the time, the vegan “panna cotta” ended up brick hard, overset and just unpleasant to eat. Obviously, a panna cotta made from agar will never be 100% like a gelatin one, but this vegan chocolate coconut panna cotta is almost like the real deal without any dairy – and is omnivore-approved as well. I think that’s a fair deal!

This vegan chocolate coconut panna cotta is fairly foolproof to put together and the agar sets a lot quicker than gelatin – another plus in my book. So yes, if your mother in law texts you to let you know they’ll be at your place for dinner in an hour, you can still whip this one up and have it ready for dessert. If that sounds good or you just want to have an excuse to enjoy a healthier, but no less delicious, version of a classic, grab your pot and stirrer now!

I used coconut milk for this panna cotta. I tried both full-fat and “light” versions and it definitely works with both! Obviously, more fat equals more taste but if you have a luscious main meal and want to go easy on the dessert, you can totally use light coconut milk here. In any case, coconut milk contains beneficial fat called lauric acid, a medium-chain fatty acid that’s easily absorbed and used by the body for energy. Coconuts’ fatty acids are primarily saturated fats, but they’re known to actually help you lower cholesterol levels, improve blood pressure, and prevent heart attacks or a stroke. I don’t think your traditional panna cotta can match this!

I also used xylitol instead of sugar (though you can totally use sugar or any other sweetener of your choice). This makes this dessert practically zero-carb, although that is not necessary. The idea to add cacao is due to the fact that I had run out of vanilla. If you have vanilla, I would still recommend adding it as it just makes everything awesome. I used raw organic cacao – another superfood I consume pretty much daily. Not that I am a health freak. But if you can have deliciousness that’s also good for you, why not?

Another thing I love about this vegan chocolate coconut panna cotta is that it is so customisable. Add some peppermint or orange oil for an interesting twist. Bring the summer on your table by adding some berries or mango!

Vegan Chocolate Coconut Panna Cotta

Serves 6

250ml coconut milk (light is fine)
1.5 teaspoon coconut oil (melted)
0.5 teaspoon agar agar powder
2 tablespoons xylitol or sugar
2 tablespoons raw cacao
a dash of vanilla essence (optional but recommended)

Add coconut milk, coconut oil, agar and xylitol/sugar into a saucepan and stir well over medium heat until completely dissolved. Bring to a gentle boil while constantly stirring, then turn down the heat. Add the cacao and vanilla and keep stirring on a gentle simmer for at least five minutes or until viscous.

I used a silicon mini muffin tray to pour the mixture in. If you are using a ceramic or metal mould/ramekin, you will need to slightly oil it to be able to get the panna cotta out. If you intend to serve it in a glass without flipping it over, you won’t need to worry about. Pour the mix into your mould and chill in the fridge for around two hours. Serve with whatever you fancy. Chocolate sauce and fresh berries are great options.

Enjoy!

Healthy Anzac Biscuits {vg, gf, lf}

Today is Anzac Day. And without going into all the historical intricacies, for the purposes of this blog, this means Anzac biscuits! Traditional Anzac biscuits, albeit tasty, are far from healthy as they contain butter (or far worse – margarine), refined sugar and white flour. Healthy Anzac biscuits? It seems like an impossible quest, but you can totally do this. Enter my healthy Anzac biscuits!

Healthy Anzac Biscuits

Healthy Anzac biscuits that are gluten free, vegan, refined sugar free and much lower in fat than standard Anzac biscuits. The best bit is that taste-wise, they are so close to the “original” that nobody will believe they are healthy! And as I can attest, they are husband and toddler approved too! I am not a biscuit person myself, but I can hardly stay away from them! With only a handful of standard pantry ingredients and very little prep time, there is no reason to enjoy a healthy Anzac biscuit – not only on Anzac day!

Consisting of oats, desiccated coconut, coconut oil and maple syrup, they are a guilt-free treat with benefits. Oats are one of the most nutritious foods on the planet, a great source of fiber, and have been shown to lower bad cholesterol. Coconut provides an array of essential nutrients, with manganese, copper and selenium only to mention a few. Coconut oil is a medium chain fatty acid, which is not readily stored as fat, but converted to energy and moreover has antifungal and antimicrobial properties. Maple syrup boasts calcium, iron, magnesium, phosphorus, potassium, and zinc as well as vitamins such as thiamin, riboflavin, niacin, and B6. Now that’s what I call healthy Anzac biscuits!

Healthy Anzac biscuits

Vegan, Gluten Free, Dairy Free, Refined Sugar Free, Low Fat

Makes 16 small biscuits

2 cups rolled oats
1/4 cup desiccated coconut
2 tbsp organic maple syrup
4 tsp melted coconut oil
1 tsp vanilla extract
2 tbsp water

Preheat your oven to 160 °C and line a baking sheet with baking paper. Give all ingredients in that order into a high-powered blender and blitz for 20 to 30 seconds, scraping down the sides as necessary, until the dough is combined and comes together. Form into 16 rather flat cookies and arrange evenly on your lined baking sheet. Bake for 20 minutes until lightly golden, let cool completely and store in an airtight container.

Enjoy!

Maca Espresso Energy Balls {gf, vg, nut free}

I hope you love all my recipes, but you gotta love these maca espresso energy balls. If you don’t – seriously, what’s wrong with you? Just kidding, I mean, no kidding. These energy balls are so crazy insanely delicious it is actually a sin I haven’t put them on the blog sooner. They are buttery, scrumptious, decadent…I am lost for words. And they pack a serious nutritional punch. All this requires five super-healthy ingredients and five minutes of your time. Yes, that’s right.

Maca Espresso Energy Balls

Want to know what’s in them? Five superfoods that will get you out of your afternoon slump before you have time to yawn:

Medjool dates – chock-full of fibre, aminoacids, potassium, zinc, magnesium, calcium, iron, B vitamins and lots of other goodies.
Oats – one of the healthiest foods on the planet, they contain a type of fiber called beta-glucan, which helps lower levels of bad cholesterol. Plus, manganese, selenium, magnesium, vitamin E and zinc to boot.
Carob or Cacao – carob contains gallic acid which has antibacterial, antiviral and antiseptic properties. Carob also contains vitamins A, B1, B2, B3, D and E. It is a lower fat and naturally sweet alternative to cacao. However, you can totally use cacao instead, which has 40 times the antioxidants of blueberries and is the highest plant-based source of iron.
Maca – rich in vitamin B vitamins, C, and E. It provides plenty of calcium, zinc, iron, magnesium, phosphorous and amino acids and is known to balance hormones and mood. It is also a caffeine-free source of energy.
Espresso coffee – loaded with antioxidants and may even protect against diabetes. Improves cognitive function, mood and fat burning

If that wasn’t a reason alone to get rollin’ – these will also be the easiest energy balls you’ll ever make. Just pulse the ingredients in a high-powered blender and after 15 seconds (!) you will have a malleable dough. No mess, no fuss. Just what you want when you need an energy kick. You can eat them straight away but they will firm up and improve texture in the fridge. They would last a while, at least a week – though I highly doubt that you’ll leave them for that long!

I have mentioned before that I am in love with Medjool dates. The feeling that you are eating something naughty and indulgent when it’s a gem of nature can only be topped by eating bananas! And it’s not only the taste, the texture is just so exquisite, it’s like a buttery caramel fudge made with butter, cream and lots of sugar! None of those nasties in these little babies, however. They are gluten free, dairy free, vegan, nut free, soy free, refined sugar free, and – unlike most recipes for energy balls or bliss balls – very low in fat.

The oats will make sure to fill you up so you don’t need to reach for the bag of Skittles on your co-worker’s desk, while the dates proved slow-releasing carbs without the sugar crash that would normally lead you to yet anouther trip to the vending machine. Carob, maca and just a little bit of coffee (that can of course be caffeine-free if you want) provide a gentle energy kick without the jitters. Maca espresso energy balls for the win!

Maca Espresso Energy Balls

Makes 12 balls

115 g Medjool dates
60 g rolled oats
2 tsp carob (or cacao)
1 tsp maca
1 tsp instant espresso powder


Just blitz all ingredients in a high-powered blender until a doughy ball forms. Shape into 12 balls and store in the fridge.

Enjoy!

Carrot Cake Bliss Balls {vegan, gluten free, nut free, refined sugar free}

The other day, I got upset at my hubby for buying expensive Medjool dates instead of those dry, hard, brittle dates from the drygoods section that are indefinitely cheaper. (When you have a midget and a mortgage, you tend to worry about financials.) How wrong of me! One bite and it was bliss all the way. I just could not get over that wonderful caramel taste. It reminded of the most exquisite butterscotch toffees. Then, that luxurious velvety texture…I had to admit once more that hubs had been right all along, and that he had hit the jackpot with these beauties. Bliss. Seriously. And what better way to make use of a blissful ingredient than bliss balls? Carrot cake bliss balls it was.

Carrot Cake Bliss Balls

I am not a newbie to bliss balls (see here), but have always been reluctant to splash out on Medjool dates rather than dried dates. The latter, obviously, require some soaking before you can do something bliss ball-y with them, so not having to soak the Medjool dates was another win for lazy, I mean, busy me. It so happened that I had some carrots to use up, too, so something in my head screamed “carrot cake”. While I don’t have a particular sweet tooth, I have a bit of a weakness for carrot cake (as can be seen here, here, and here).

What I love about carrot cake is that you can fix your 3.30 snack attack without the sugar rush as the carrots and nuts in carrot cake provide for some fibre and protein to soak up the carbs that would otherwise wreak havoc in your bloodstream. Plus, the wintery spices give it a bit of a festive and mysterious touch. In short, I figured that Medjool dates+carrots+oats+a few spices and a bit of coconut might be worth a try. Yes, even the precious Medjool dates could not be precious enough for some healthy experimenting.

I have to say that this is one of my recipes I am most excited about, if I dare say so myself! I can’t believe just how good these are, with none of the guilt! And as they are low in fat and refined sugar free, they are even material for a kid’s party – none of the kids will notice they are devouring something healthy, and you don’t have to worry about the sugar crash. They are also nut free, as coconut is botanically not a nut and most people who are allergic to tree nuts can safely eat coconut. Coconut also provides vitamins and magnesium, with the carrot adding a beta carotene and fibre boost and the dates being an excellent source of iron, manganese and long-lasting energy.

These balls are so easy to make with just a few ingredients, so there is no reason not to make these today and fight the munchies!

Carrot Cake Bliss Balls {vegan, gluten free, nut free, refined sugar free}

Carrot Cake Bliss Balls

Makes 18 (possibly more if you don’t eat as much of the batter as me! :-D)

2 large carrots, grated
10 Medjool dates, pitted
1 cup oats
3 tbsp desiccated coconut
2 tsp cinnamon
2 tsp molasses or coconut syrup
1 tsp ginger
1/2 tsp nutmeg

Just blend all ingredients in a high powered blender until you reach a malleable consistency. Shape into walnut sized balls and enjoy straight away or store in the fridge.

Enjoy!


Gluten Free Vegan Avocado Brownies

Luscious chocolate brownies that are vegan, oil-free and gluten free sounds like an oxymoron, but if you have avocados, you can make the impossible a reality. With their neutral taste and creamy texture, avocados are the perfect replacement for nasty processed oils and antibiotics-laden eggs. Avocados are also a perfect complement to dark chocolate and cacao, so using avocados to make brownies was a no-brainer for me.

Now, every man and his dog seems to make chocolate cake with avocado as a “secret” ingredient these days, so I am probably not going to shock anyone anymore by saying that these yummy gooey brownies have avocado in them. Both my husband and daughter love avocado, and they are in season right now, so needless to say, we are going through quite a few at the moment. As they ripen very quickly, this recipe doesn’t only make sure that you get your dose of healthy monounsaturated fats in one super-fudgy yet good-for-you brownie, it is also a great way to rescue any avocados you might have lying around that are past their prime! I hate wasting food so if you can create something nutritious to fix your chocolate cravings while being good to your wallet and the planet too, then why not?

Honestly folks, if you don’t try this, you are really missing out! These brownies are seriously rich and chocolatey and so fudgey it’s ridiculous. Your junk-loving friends, relatives and kids will never be able to tell that they pack a punch: Besides superfoods avocado and raw cacao, there is oatmeal for healthy carbs, protein and fibre, vegan protein powder to keep you full and satisfied as well as coconut flour, psyllium and flaxmeal for some more protein, fibre and nutrition! Needless to say, they are gluten free, vegan, dairy free, soy free, refined sugar free and oil free! How about that? Like most of my recipes, this is a fuss-free affair – melt chocolate, mix everything together and bake for 20 minutes. Easy as that!

Shall we get baking?

Gluten Free Vegan Avocado Brownies

Gluten Free Vegan Avocado Brownies

60 g vegan dark chocolate
150 g brown rice syrup, divided
flesh of 1 large ripe avocado, mashed
1 large ripe banana, mashed
50 g ground rolled oats
2 tbsp rice or pea protein powder
2 tbsp raw cacao
1 tbsp flaxmeal, almond meal or LSA
2 tsp coconut flour
1 tsp psyllium husks, flaxmeal or chia seeds
1 tsp gluten free baking powder

Preheat oven to 180 °C or 350 °F and grease a 20x20cm baking pan. Melt chocolate and 100 g brown rice syrup in a double boiler until melted and smooth. Let cool slightly. In a different bowl, mix avocado, banana and 50 g brown rice syrup until smooth. Stir in melted chocolate mix until smooth, add all remaining ingredients and blend until smooth. Spoon into baking pan and bake for 20 minutes.

Enjoy!

Healthy Twix Bar (grain free, sugar free, vegan, paleo, low fat)

Healthy Twix Bar
Healthy Twix Bar

Who doesn’t love a Twix bar? The combination of a crumbly biscuit, gooey caramel and creamy chocolate certainly never goes astray. Shame only that the original Twix bar is so full of sugar and industrial oils – not to mention that for us gluten free folks, it is off-limits anyway. So I thought I come to your rescue and create a healthy version of this popular treat.

As part of my subscription to a monthly box with organic goodies, I was regaled with a packet of coconut flour recently. Though by no means a coconut flour newbie, I have experimented a bit with the stuff lately and just love how it is so easy to create yummy and healthy goodies with it. As it sucks up all the moisture of any other ingredients you mix it with, it is also a great staple for lowfat baking as mixing it with mashed banana or apple sauce yields terrific results. Once I had nailed my shortcrust base, it was time to think of the caramel (knowing that I would use my favourite Lindt chocolate as topping). So it came in handy that Minimalist Baker has this recipe for making a one-ingredient date caramel. A one-ingredient date caramel ticks all my boxes for healthy, easy and yummy delicacies. And I tell you, the stuff rocks. I use it in yogurt, on icecream or porridge. It tastes just as indulgent, creamy and buttery as store-bought caramel – minus the fat and the sugar slump! For this recipe, I use the caramel of about 4 dates, but I’d recommend making the original recipe and keeping any leftovers in the fridge – they won’t stay there for long!

So once you got your biscuit and your caramel sorted, it’s time for the chocolate glaze! Just use your favourite dairy free chocolate for a true vegan delight. If you tolerate dairy and are not vegan, you could also use milk chocolate. It#s a matter of taste and experimenting. The date caramel is rather sweet so I try to offset the sweetness with a bitter-ish chocolate. Using milk chocolate would obviously yield a result closer to a “real” Twix bar (whatever is real about the stuff). It’s up to you – but this recipe is sooo easy and requires just 15 minutes in total so I think you should do it again and again and see how you like it best!

Makes one double-finger “Twix” bar

For the biscuit base
40 g coconut flour
40 g “babyfood” (i.e. unsweetened apple sauce, pureed banana or any other pureed fruit)
2 tbsp of plant milk
stevia or erythritol to taste
generous pinch of Maldon sea salt
pinch of gluten free baking powder

For the caramel
1/4 of this recipe

For the chocolate glaze
40 g chocolate (dairy free preferred)

Preheat oven to 180 °C. Line a baking tray with paper. Mix all ingredients for the biscuit base until it comes together in a uniform mass. Roll a ball, then half this ball and shape two “Twix” like logs. Bake until slightly golden, about 10-15 minutes. Let cool slightly before adding the caramel.

Meanwhile, prepare the date caramel according to the recipe. Spread evenly onto the biscuit logs.

Break up the chocolate in little pieces, place in a microwave safe bowl and heat in microwave in 30 second increments. Once it is liquid and smooth, drizzle over the caramel logs.

Now, here comes the hardest part: If you can at all resist, place the Twix bars in the fridge to firm up. But there’s no harm in devouring these beauties straight away.

Enjoy!

Vegan Paleo Panna Cotta with Mocha Sauce


Paleo Vegan Panna Cotta

It´s time to eliminate your prejudices – you don’t have prejudices, you say? I bet you have some – two of which I will eliminate in this blog post. First, I am sure you think that “vegan” and “paleo” is mutually exclusive. Well, yes and no. If you are talking lifestyle, then probably yes. If you are talking indulgent desserts, not necessarily. Oh, you say that “paleo” and “indulgent” is mutually exclusive? And that “vegan” and “indulgent” is mutually exclusive? That actually takes us to four prejudices I will get rid of with this post. What is the fourth one, you ask? Well – have you heard of panna cotta? With the possible exception of Italian chefs, the word “panna cotta” is commonly associated with the words “difficult” or “complicated”. But, actually, this could be the easiest dessert you’ll ever make. And yes, you can finally invite your paleo cousin and vegan sister in law to the same dinner party!

The educated among you will know that “panna cotta” is Italian and means as much as cooked or boiled cream. Which already presents the first challenge as dairy cream is neither paleo or vegan. What to do? Coconut to the rescue! If you have followed this blog, you will know that I am a big fan of coconut – coconut oil, coconut flour, coconut cream – you name it. Not only does this versatile gem taste divine, it is also exceptionally healthy. I have mentioned the various health benefits of coconut numerous times, so I suggest you do your research on this.

The second challenge is the gelatin required in traditional panna cotta recipes – though popular among the paleo community – and rightly so – it is a no-go for a vegan or even vegetarian diet. but nature wouldn´t be nature if it hadn´t bestowed us with a worthy alternative – agar, which you can almost use completely interchangeably with gelatin. Voilà! There you have a dessert which boasts healthy fats and is loaded with antioxidants. Win!

Serves 4

1 tin (420 ml) coconut cream, full fat
1 tablespoon vanilla essence
100 g honey
1 tablespoon agar
200 ml boiling water
For the sauce
100 g honey
2 tablespoons raw organic cocoa
1 tablespoon potato starch
1 tin (420 ml) coconut milk
2 tablespoons ground coffee

Heat the cream, vanilla and honey in a saucepan over medium heat until the honey is completely dissolved and everything is well combined. Take off the heat. Boil the agar in the water for five minutes until completely dissolved. Stir into the coconut mass until completely dissolved. Pour the mass into four heat-proof moulds and refrigerate for three hours or until set.

For the sauce, combine all ingredients bar the coffee in a small saucepan over small heat until thickened. Turn off the heat and stir in the coffee until completely dissolved. Refrigerate until ready to use.

Enjoy!

Sweetened Condensed Milk – Dairy free and sugar free!

Condensed Almond Milk

Who doesn’t like puddings, custards, fudge or millionaire’s shortbread (aka caramel slice)? And who wouldn’t want to have these treats sugar-free, dairy free and low-carb? Who of you vegans, low-carbers and dairy intolerant folks has not pondered old favourite recipes calling for condensed milk – only to resign yourself to the fact that no dairy and no sugar means saying good bye to your favourite treat?

Don’t fret! Rescue is nigh! Would you have thought that you can create a sugar free dairy free worry free version of this yummy ingredient (I prefer it straight from the spoon!) all by yourself? All you need is yummy-tummy almond milk – which you should have in your fridge at all times anyway, some erythritol, stevia, honey or other sweetener of your choice, a pinch of salt, and a drop of vanilla, as well as an hour or so of your precious time – so if you are like me, you don’t even need to leave the house! The great thing about almond milk (and other non-dairy milks) is that the risk of burning is considerably reduced.

Makes approx. 400 g sweetened condensed milk (equivalent to 1 tin from the shop)

1 l unsweetened almond milk
2 tbsp erythritol or other sweetener (I have used honey and agave before, which also works well, it just gets a bit more runny than with sugar crystals, so if you make condensed milk for fudge or millionaire’s shortbread, I would use a solid sweetener like erythritol, stevia or palm sugar.)
pinch of salt
drop of vanilla

Place all ingredients in a saucepan (the bigger it is, the quicker you will have your condensed milk!), bring to the boil, then simmer uncovered on low heat, stirring every few minutes until the mixture has reduced by about half and has turned a slight amber colour (this takes between one and up to two hours). At this stage, it will still be slightly runny, but that is okay – it will firm up, promise! Let cool in the pot for a few minutes, covered by a clean teatowel, then transfer to a glass jar and refrigerate. Enjoy straight from the spoon or in your favourite recipes. Lasts about one week in the fridge.

Enjoy!